
Key phrase detection identifies significant words and phrases in your transcript and lets you extract the most important highlights from your audio or video file.
With the AssemblyAI Python SDK it only takes a few lines of Python code to achieve this. Let's learn how to obtain transcripts together with their key phrases step-by-step.
Project Prerequisites
We will use the following dependencies to complete this tutorial:
- Python 3.8 or newer
- The AssemblyAI Python SDK, version 0.19.0 or greater
- An AssemblyAI API key, which can be copied from the AssemblyAI dashboard
All code in this blog post is also available on GitHub under the key phrases guide of the AssemblyAI cookbook repository.
Getting Started
Create a new folder for your project. Then, navigate to your project directory in your terminal and create a new virtual environment:
# Mac/Linux:
python3 -m venv venv
. venv/bin/activate

# Windows:
python -m venv venv
.\venv\Scripts\activate.bat
Install the AssemblyAI Python package:
pip install assemblyaiSet your AssemblyAI API key as an environment variable named ASSEMBLYAI_API_KEY. You can get a free API key here.
# Mac/Linux:
export ASSEMBLYAI_API_KEY=<YOUR_KEY>

# Windows:
set ASSEMBLYAI_API_KEY=<YOUR_KEY>
Key Phrase Detection Python Code
After installing the dependencies and setting the environment variable, let's write the Python code to handle the transcription and key phrase detection.
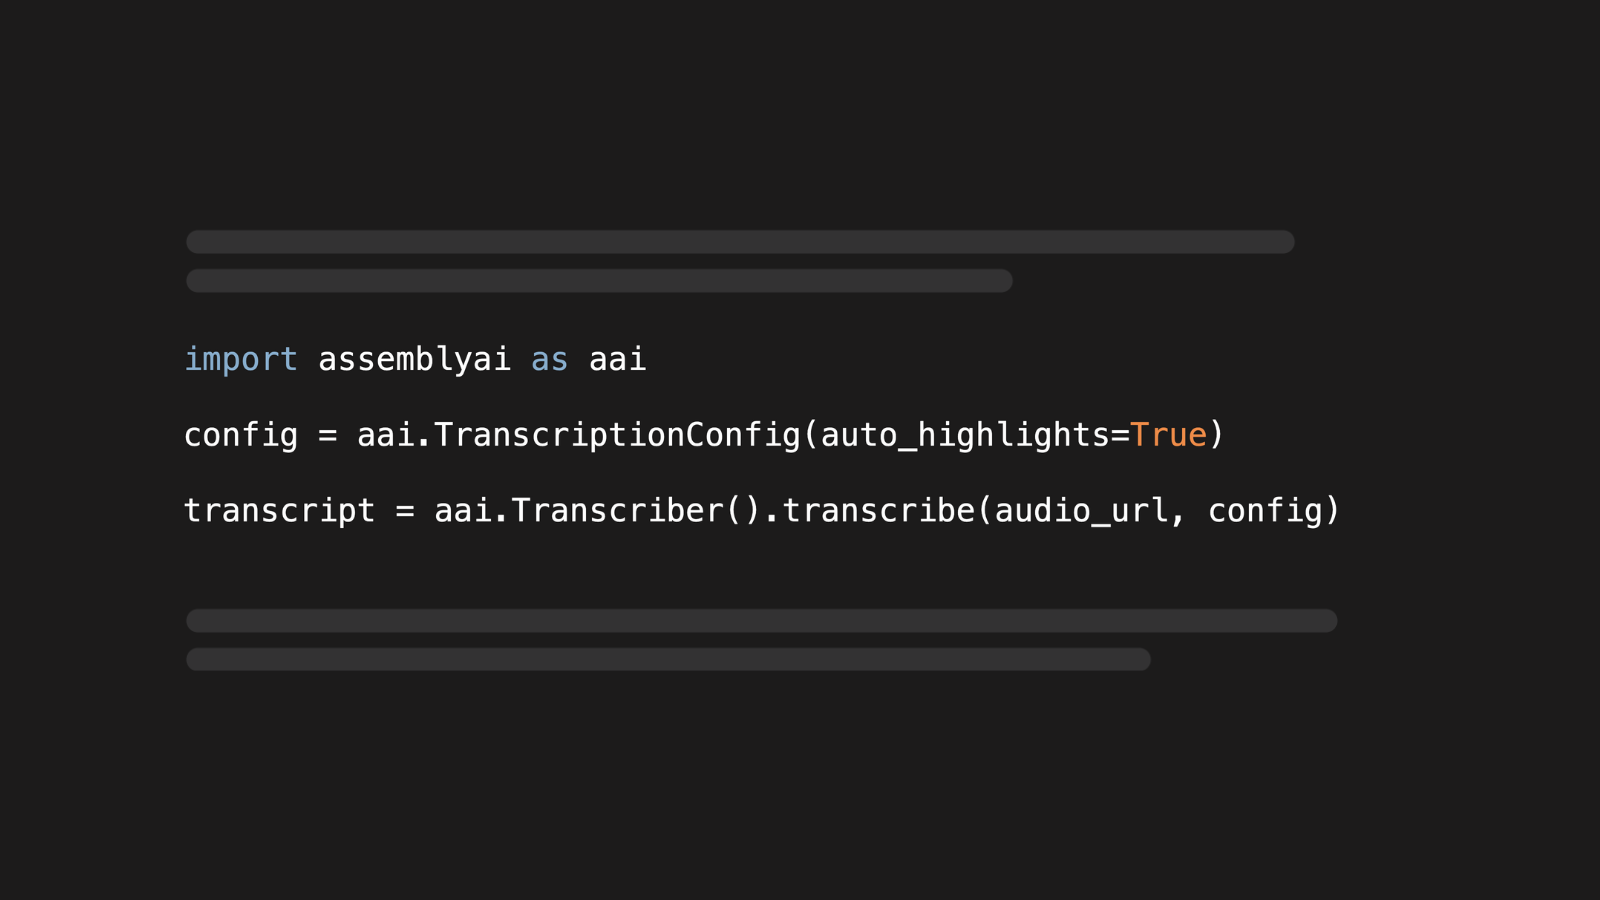
Create a new file named keyphrases.py and copy in the following code:
import assemblyai as aai
# If the API key is not set as an environment variable named
# ASSEMBLYAI_API_KEY, you can also set it like this:
# aai.settings.api_key = "YOUR_API_KEY"
# The URL of the audio file. Can also be a path to a local file.
URL = "https://github.com/AssemblyAI-Examples/audio-examples/raw/main/20230607_me_canadian_wildfires.mp3"
# Configuration settings with `auto_highlights` enabled.
config = aai.TranscriptionConfig(auto_highlights=True)
# Create a Transcriber object and start the transcription.
# This calls the API and blocks until the transcription is finished.
transcript = aai.Transcriber().transcribe(URL, config)
# Iterate over all key phrases
for result in transcript.auto_highlights.results:
print(f"Highlight: '{result.text}', Count: {result.count}, Rank: {result.rank}, Timestamps: {result.timestamps}")
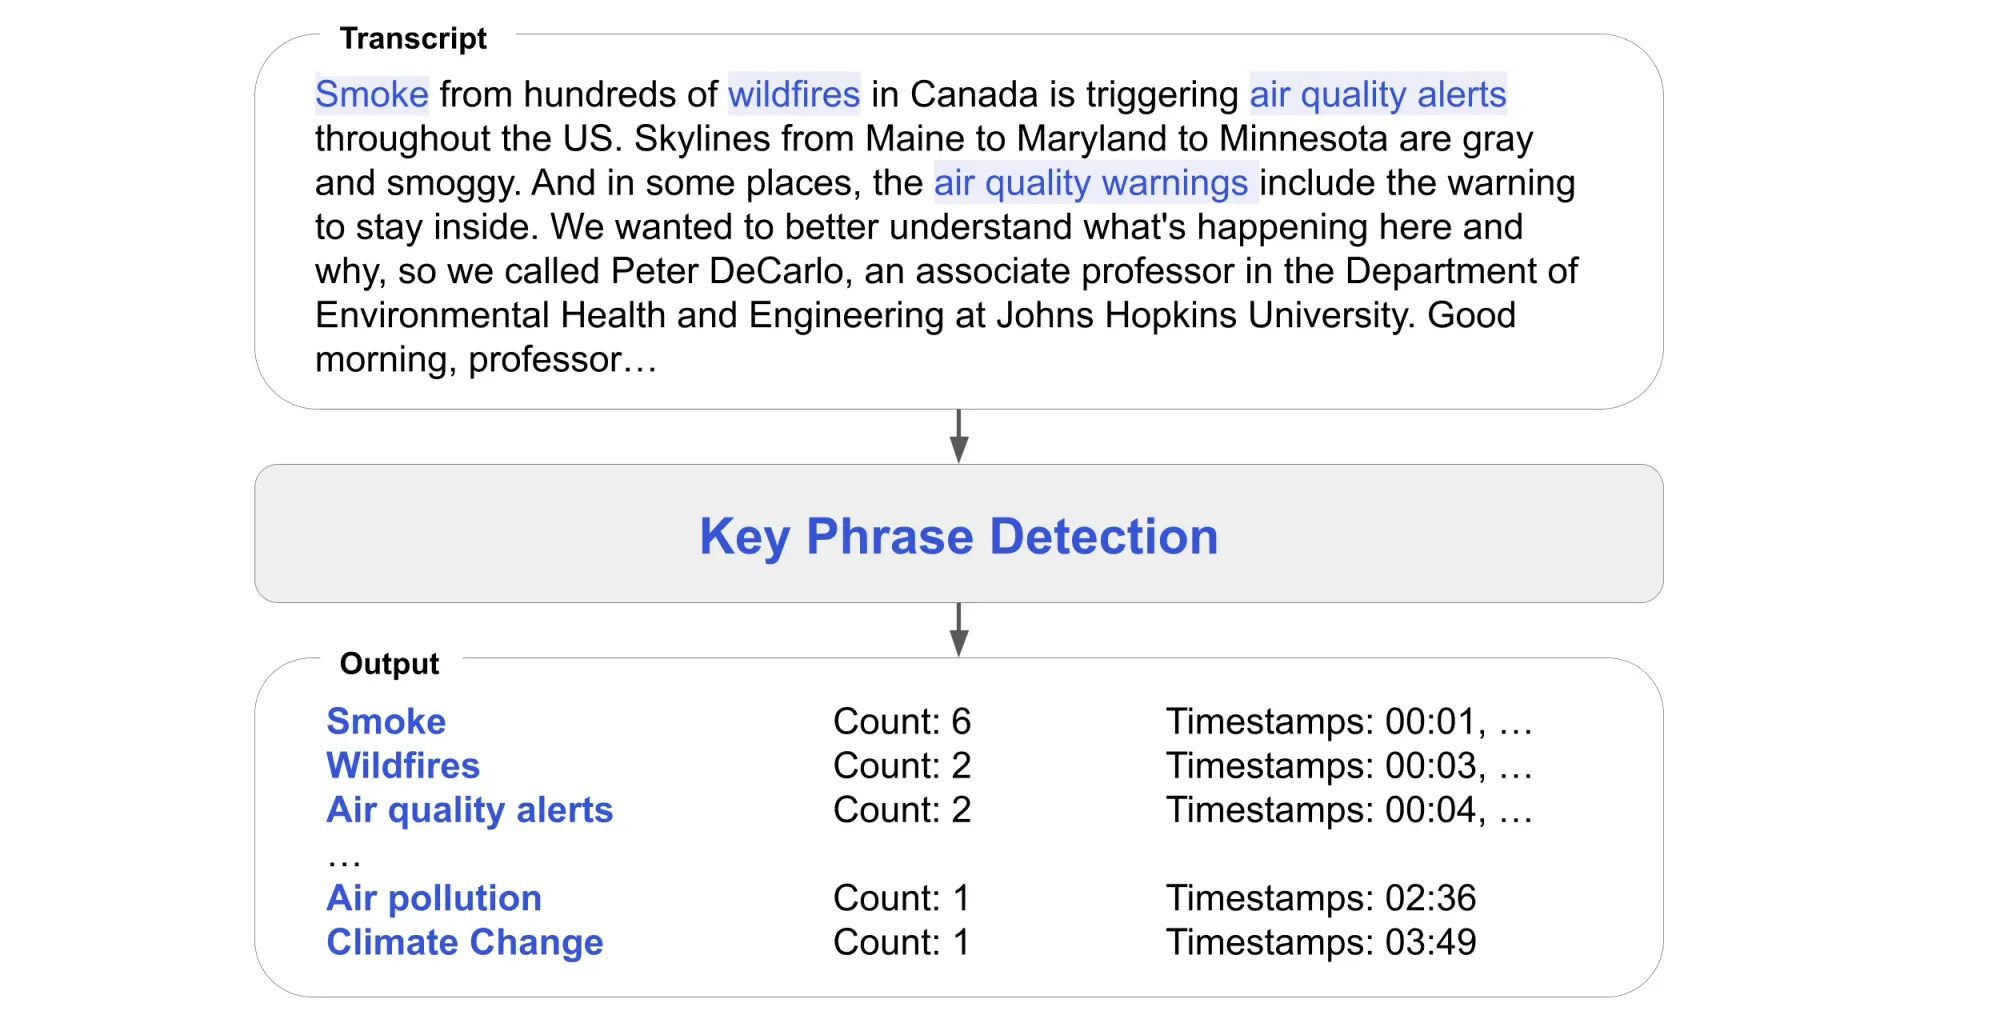
# print(transcript.text) # Print the full textThe above code imports the assemblyai Python package into the script, using aai as a shorthand reference. Then the script sets the URL variable which needs to be either a publicly-accessible URL of a file or a path to a local file.
The third line of code sets the config parameters with auto_highlights set to True. This enables the Key Phrases model which is responsible for detecting all important highlights in the transcript.
The fourth line of code instantiates the Transcriber object, which is the main class for calling AssemblyAI's transcription service. Note that the Transcriber automatically looks for a value in an environment variable named ASSEMBLYAI_API_KEY and will use that as the API key if one is set. This can be overridden by explicitly setting the API key with aai.settings.api_key = "YOUR_API_KEY" instead.
In the same line, we call the transcribe() function on the Transcriber object and pass in the URL and the config variable with our desired settings. This function executes the transcription API call and blocks program execution until the transcription is finished. Alternatively, you can also set a webhook to obtain the result when it's ready.
The returned variable is an aai.Transcript object that contains the auto_highlights.results attribute. The value of this results attribute is a list of all the key phrases. We iterate over this list, and for each key phrase we print the text of the highlight, together with the corresponding count, rank, and timestamps. Note that you could also print the complete transcribed text by calling print(transcript.text).
Run the Key Phrase Detection Code
Ensure the keyphrases.py file is saved and that your virtual environment is still activated. Navigate to the project directory in a terminal and run the keyphrases.py file with the following command:
python keyphrases.pyOnce the script has finished executing, you should see the following highlights printed to your terminal:
Highlight: 'air quality alerts', Count: 1, Rank: 0.08, Timestamps: [Timestamp(start=3978, end=5114)]
Highlight: 'wide ranging air quality consequences', Count: 1, Rank: 0.08, Timestamps: [Timestamp(start=235388, end=238838)]
Highlight: 'more fires', Count: 1, Rank: 0.07, Timestamps: [Timestamp(start=184716, end=185186)]
Highlight: 'more wildfires', Count: 1, Rank: 0.07, Timestamps: [Timestamp(start=231036, end=232354)]
Highlight: 'air pollution', Count: 1, Rank: 0.07, Timestamps: [Timestamp(start=156004, end=156910)]
Highlight: 'weather systems', Count: 3, Rank: 0.07, Timestamps: [Timestamp(start=47344, end=47958), Timestamp(start=205268, end=205818), Timestamp(start=211588, end=213434)]
Highlight: 'high levels', Count: 2, Rank: 0.06, Timestamps: [Timestamp(start=121128, end=121646), Timestamp(start=155412, end=155866)]
Highlight: 'health conditions', Count: 1, Rank: 0.06, Timestamps: [Timestamp(start=152134, end=152666)]
Highlight: 'New York City', Count: 1, Rank: 0.06, Timestamps: [Timestamp(start=125768, end=126274)]
Highlight: 'respiratory conditions', Count: 1, Rank: 0.05, Timestamps: [Timestamp(start=153028, end=153786)]
Highlight: 'New York', Count: 3, Rank: 0.05, Timestamps: [Timestamp(start=125768, end=126034), Timestamp(start=171448, end=171970), Timestamp(start=175944, end=176322)]
Highlight: 'climate change', Count: 3, Rank: 0.05, Timestamps: [Timestamp(start=229548, end=230230), Timestamp(start=244576, end=245162), Timestamp(start=263332, end=263982)]
Highlight: 'heart conditions', Count: 1, Rank: 0.05, Timestamps: [Timestamp(start=153988, end=154506)]
Highlight: 'Smoke', Count: 6, Rank: 0.05, Timestamps: [Timestamp(start=250, end=650), Timestamp(start=49168, end=49398), Timestamp(start=55284, end=55594), Timestamp(start=168888, end=169118), Timestamp(start=215108, end=215386), Timestamp(start=225944, end=226170)]
Highlight: 'air quality warnings', Count: 1, Rank: 0.05, Timestamps: [Timestamp(start=12324, end=13434)]
Sort Highlights by Timestamps
By default, the highlights are sorted by rank, with the highlight with the highest rank being the first.
If you want to sort the highlights by timestamps, you can use the built-in sorted function in Python with the key argument being the start attribute of the highlight's first timestamp.
key_phrases = transcript.auto_highlights.results

key_phrases = sorted(key_phrases, key=lambda x: x.timestamps[0].start)

for result in key_phrases:
    print(f"Highlight: '{result.text}', Count: {result.count}, Rank: {result.rank}, Timestamps: {result.timestamps}")
If you save the file and run python keyphrases.py again, you should get this output:
Highlight: 'Smoke', Count: 6, Rank: 0.05, Timestamps: [Timestamp(start=250, end=650), Timestamp(start=49168, end=49398), Timestamp(start=55284, end=55594), Timestamp(start=168888, end=169118), Timestamp(start=215108, end=215386), Timestamp(start=225944, end=226170)]
Highlight: 'air quality alerts', Count: 1, Rank: 0.08, Timestamps: [Timestamp(start=3978, end=5114)]
Highlight: 'air quality warnings', Count: 1, Rank: 0.05, Timestamps: [Timestamp(start=12324, end=13434)]
...
As you can see, the first timestamp of the text Smoke is at 250 ms, so this is the smallest value and therefore it's the first highlight in the list.
Conclusion
In this tutorial, you've learned how to detect key phrases in audio files using the AssemblyAI Python SDK.
Here are a few other resources to learn more about key phrases and other speech intelligence AI models you can apply to your audio files:
- Key Phrases model documentation reference
- All AI models for speech recognition and audio intelligence - Documentation reference
- Python Speech-to-Text with Punctuation, Casing, and Formatting
- How to get Zoom Transcripts with the Zoom API
Alternatively, check out our YouTube channel for learning resources on AI, like our Machine Learning from Scratch series.