How to get Zoom Transcripts with the Zoom API
In this tutorial, we'll learn how to get Zoom transcripts using the Zoom API using Python.


In this tutorial, we’ll learn how to transcribe Zoom recordings using the Zoom API and AssemblyAI’s speech-to-text model.
The Zoom API affords you programmatic access to information regarding your account, including access to your Zoom cloud recordings. In this tutorial, we’ll learn how to create a Server-to-Server OAuth app that will allow us to fetch cloud recordings and then transcribe them with AssemblyAI’s Speech-to-Text API.
In addition, you can also process these transcripts with LLMs or Audio Intelligence models in just a few lines of code with the AssemblyAI API, which we’ll briefly show at the end of this article. The information in this tutorial works with local Zoom recording as well, so feel free to continue on even if you do not have cloud recordings.
Getting started
The Zoom API has many different endpoints that give you access to different information regarding your account. For this article, we will be using, among others, the list recordings endpoint. This endpoint requires a Pro zoom plan or higher, as listed in the documentation, so make sure you have a Pro or higher Zoom account before starting this tutorial. If you are transcribing a local file, a free Zoom account will be sufficient.
Additionally, you’ll need an AssemblyAI API key to transcribe your meetings. You can sign up here to get one for free. You can also follow along with this tutorial in Colab.
Get Your Free AssemblyAI API key
Clone the repository associated with this tutorial:
git clone https://github.com/AssemblyAI-Examples/assemblyai-zoom-transcripts.git
Now, enter the project directory and set up a virtual environment for this project:
cd assemblyai-zoom-transcripts python -m venv venv # you may have to use `python3` instead
Finally activate the virtual environment and install all required dependencies
Windows:
.\venv\Scripts\activate.bat pip install -r requirements.txt
MacOS/Linux:
source ./venv/bin/activate pip install -r requirements.txt
If you are transcribing Zoom cloud recordings, continue on to the next section. If you are transcribing Zoom local recordings, jump down to the Transcribing Zoom local recordings section.
Creating a Zoom Server-to-Server OAuth app
When you want to create a program that uses the Zoom API, you do so by creating a Zoom app. Zoom apps allow you to create various applications that afford different levels of access to account information using OAuth, which is a modern standard for providing limited access to your account. We need to create a Zoom app so that we can use the Zoom API in our program.
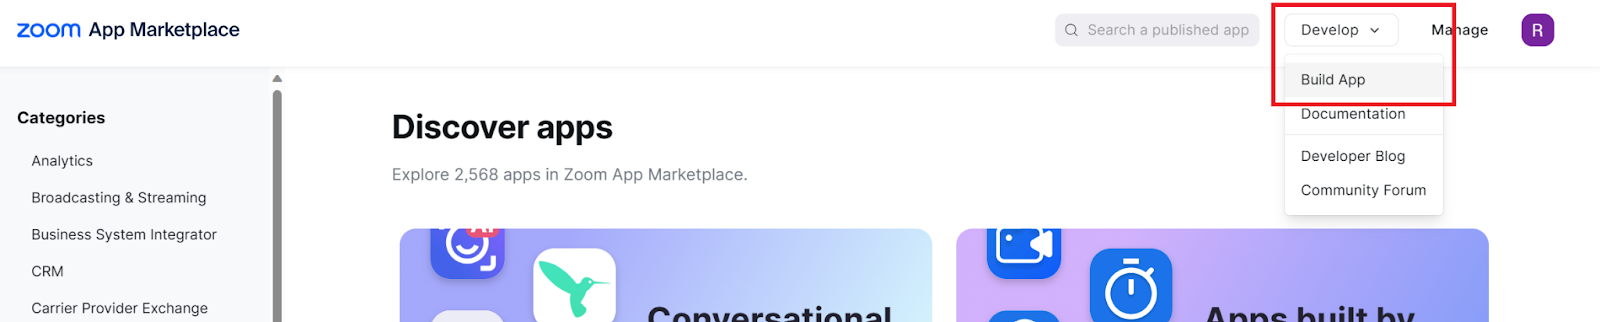
Go to the Zoom app marketplace, making sure that you are signed in with your upgraded account. In the top right corner of the screen, click Develop > Build App
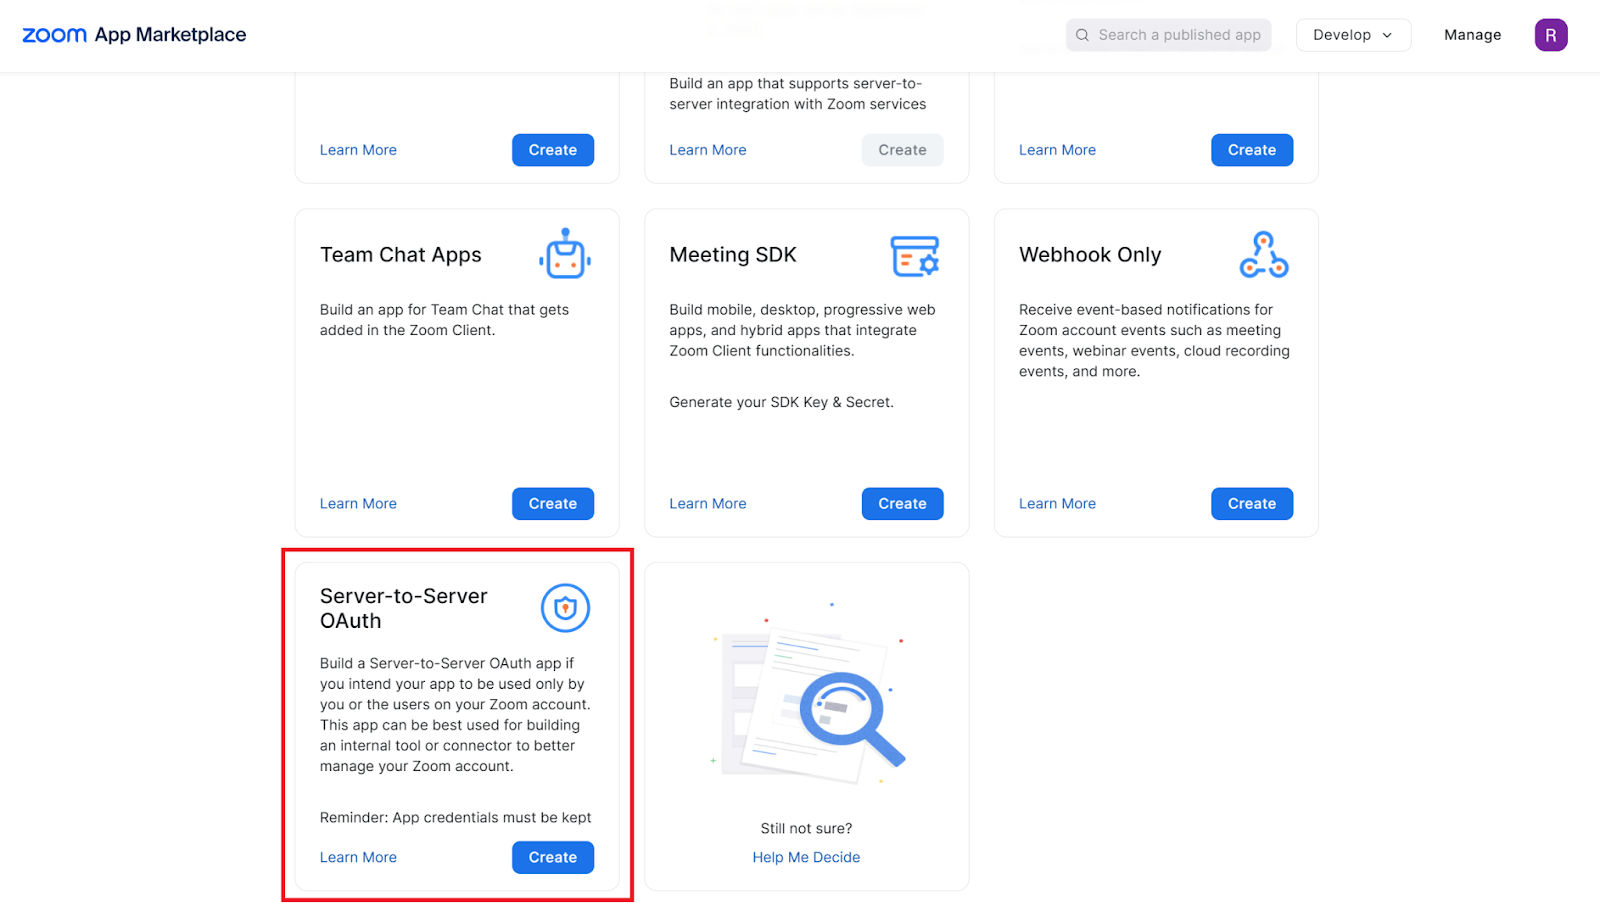
You will see a screen with several types of applications that you can choose from. Select Server-to-Server OAuth, give your app a name, and then click Create.
App Credentials
You will be met with a screen that displays your app’s credentials. These are used to identify your account as well as the “server” that our transcription program will run on (i.e. your computer).

Copy and paste these values into the appropriate places in the .env.example file in the project repo.
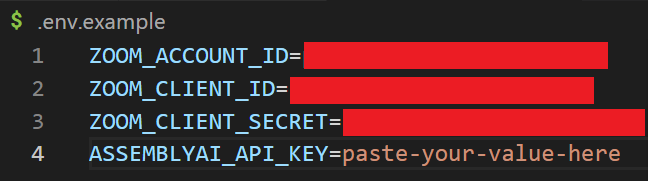
Important: After you have saved, rename this file to .env. This is required to allow the project code to run properly and prevents you from accidentally uploading the credentials to GitHub (which you should not do) since .env is listed in the .gitignore file.
Basic Information
To activate the Zoom app, you will need to fill in the Company Name and Developer Contact Information.
Scopes
Now, go down to the Scopes tab for your app. Scopes allow for fine-grained control over what a given application is authorized to do with your account. Using scopes has a litany of benefits and are central to the OAuth standard.
In our case, we need only to add the Recording > View all user recordings scope (recording:read:admin). Adding only this scope means that, in the event that the credentials for this application are somehow compromised, the only thing the malicious party would get access to is the ability to read your recordings. Look at all of the other permissions the malicious party would not have access to in the event that your credentials are leaked! By limiting the scope to only what is needed, we follow the principle of least privilege, greatly increasing the security of your account.

Activation
Now you’re ready to activate your application. Simply click Activate your app in order to do so.
Setting your AssemblyAI API key
As mentioned previously, you will need an AssemblyAI API key in order to follow along with this tutorial. You can sign up to get one for free here.
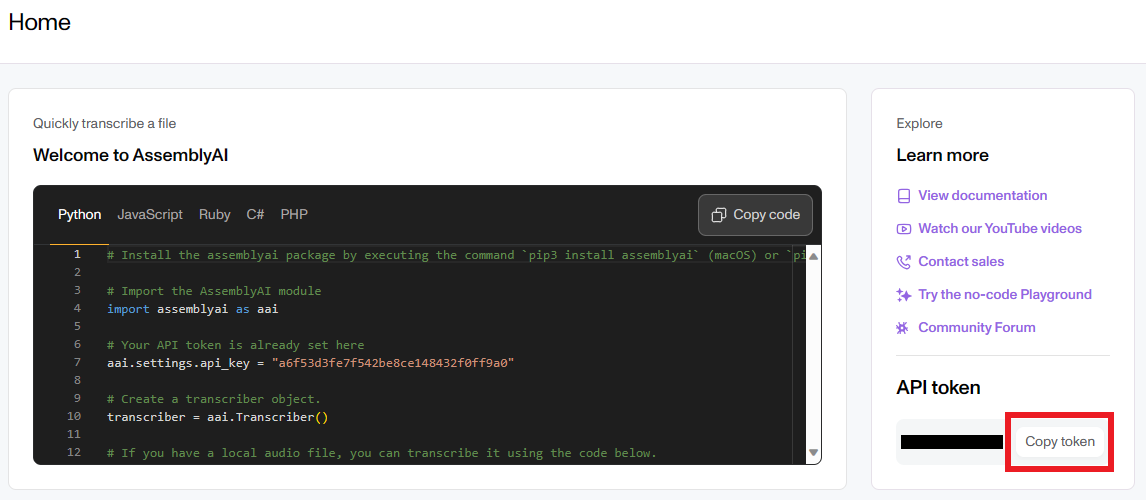
Go to your Dashboard and copy your API key (aka “API Token”) by clicking the Copy Token button.
Now go to your .env file in the project repository (formerly .env.example file), and paste the copied key into the value of the ASSEMBLYAI_API_KEY variable.

Now that all of our credentials are set up, we can move on to actually transcribing our Zoom calls!
Transcribing Zoom cloud recordings
To make it easier to work with the Zoom API, we’ll first define a class called ZoomClient that will handle getting information from Zoom for us.
Creating a ZoomClient
The code for ZoomClient can be found in the project repository under ./utils/zoom.py. First, we import the requests module that will allow us to actually make HTTP requests to the Zoom API. After that, we define our ZoomClient class, which takes in our app’s credentials and stores them.
import requests class ZoomClient: def __init__(self, account_id, client_id, client_secret) -> None: self.account_id = account_id self.client_id = client_id self.client_secret = client_secret self.access_token = self.get_access_token() def get_access_token(self): pass
The final attribute we define in the initialization function is assigned as the return of a method which gets an access token. An access token is required for authorization of requests to the Zoom API for Server-to-Server OAuth apps. While the client credentials are permanent, access tokens are ephemeral and used only for requests when the application is in use.
We must implement the get_access_token method. We do this by making a request to the https://zoom.us/oauth/token endpoint, using our credentials to get the token.
def get_access_token(self): data = { "grant_type": "account_credentials", "account_id": self.account_id, "client_id": self.client_id, "client_secret": self.client_secret } response = requests.post("https://zoom.us/oauth/token", data=data) return response.json()["access_token"]
Note
Access tokens expire after one hour. Our program should be able to run in that time; but if you have many meetings and need to make paginated requests intermittently, you should be aware of this limitation. In this case, you will need to refresh the token. You can do this simply by instantiating a new ZoomClient object, or writing a method to refresh the self.access_token attribute.
Getting cloud recording information with the Zoom API
Now that we can initialize a ZoomClient object with the proper credentials, we need to add a method to actually fetch the cloud recordings. We can do this by calling the appropriate endpoint, passing in our access token. We return the JSON of the response from the Zoom API.
def get_recordings(self): headers = { "Authorization": f"Bearer {self.access_token}" } url = f"https://api.zoom.us/v2/users/me/recordings" return requests.get(url, headers=headers).json()
Getting a download URL
Among the information in the JSON returned by the get_recordings endpoint are the meeting IDs of the associated cloud recordings. These IDs are unique identifiers that can be used to reference the meetings. We’ll use these IDs in order to fetch the information regarding the recordings for the meetings.
In particular, we create a method that takes in a meeting ID and fetches information regarding its recordings from the Zoom API, once again using our access token. Each meeting has several types of recordings. For example, one recording may contain both video and audio, while another may contain only audio.
We extract the download URL for the recording that has audio only, and then use this to dynamically construct a link that contains both our access token and the password required to view that particular meeting. In this way, we generate a publicly accessible URL for this file so that the AssemblyAI API can fetch the audio data for transcription. Finally, we return this download URL.
def get_download_url(self, meeting_id): headers = { "Authorization": f"Bearer {self.access_token}" } url = f"https://api.zoom.us/v2/meetings/{meeting_id}/recordings" r = requests.get(url, headers=headers).json() url = [i['download_url'] for i in r['recording_files'] if i['recording_type'] == 'audio_only'][0] download_link = f'{url}?access_token={self.access_token}&playback_access_token={r["password"]}' return download_link
Transcribing the meetings
Now that our ZoomClient is fully defined, we can move on to actually using it in our main transcription script. First, we import the required packages and then load our environment variables from our .env file. We then assign the Zoom credentials to a few variables and set the AssemblyAI key for the AssemblyAI Python SDK.
import os from dotenv import load_dotenv import assemblyai as aai from utils.zoom import ZoomClient load_dotenv() ZOOM_ACCOUNT_ID = os.environ.get('ZOOM_ACCOUNT_ID') ZOOM_CLIENT_ID = os.environ.get('ZOOM_CLIENT_ID') ZOOM_CLIENT_SECRET = os.environ.get('ZOOM_CLIENT_SECRET') aai.settings.api_key = os.environ.get('ASSEMBLYAI_API_KEY')
Now, we instantiate the AssemblyAI Transcriber object and ZoomClient object that we will be using.
transcriber = aai.Transcriber() a = ZoomClient(account_id=ZOOM_ACCOUNT_ID, client_id=ZOOM_CLIENT_ID, client_secret=ZOOM_CLIENT_SECRET)
Now, we fetch our recordings. If there are any, we select the first one and get its download URL. This is done only for simplicity - feel free to add additional logic if you would like to transcribe all recordings or only some specific recordings.
Once we have the download URL, we transcribe it in one line of code by using the Transcriber object’s transcribe method. Finally, we print the transcript to the terminal and save it to a file called transcript.txt.
recs = a.get_recordings() if recs['meetings']: rec_id = recs['meetings'][0]['id'] my_url = a.get_download_url(rec_id) transcript = transcriber.transcribe(my_url) print(transcript.text) with open('transcript.txt', 'w') as f: f.write(transcript.text) else: print('No meetings to transcribe.')
Running the script
To get your transcript, simply run python main.py in the terminal, making sure that your virtual environment is activated and that you are located in the project root directory.
The time to generate a transcription depends on the length of the audio file and is usually about 15-30% of the duration of the audio file - keep this in mind if you are transcribing a very long meeting and it seems like it’s taking a while!
Transcribing Zoom local recordings
Transcribing local Zoom recordings is much more straightforward that transcribing cloud recordings. To transcribe a local recording, simply pass its path into the transcribe method in the code block below:
import assemblyai as aai aai.settings.api_key = 'YOUR-ASSEMBLYAI-API-KEY' transcriber = aai.Transcriber() transcript = transcriber.transcribe("./local/recording/path") print(transcript.text)
Make sure that you are executing this file in an environment which has the AssemblyAI Python SDK installed. Also, be sure to not check into source control any files that have your API key hard-coded into them.
Analyzing transcripts with LLMs and Audio Intelligence models
You can do a lot more with these transcripts than simply print them to the terminal. AssemblyAI’s API also makes it easy to analyze transcripts with LLMs to do things like get custom summaries and generate action items using LeMUR. For example, we can get a list of action items for a meeting as below:
import assemblyai as aai transcriber = aai.Transcriber() transcript = transcriber.transcribe("https://storage.googleapis.com/aai-web-samples/meeting.mp3") result = transcript.lemur.action_items( context="A GitLab meeting to discuss logistics", answer_format="**<topic header>**\n<relevant action items>\n", ) print(result.response)
Additionally, the AssemblyAI API offers a suite of Audio Intelligence models that can automatically redact PII, detect speakers, analyze sentiment, and more. For example, you can perform entity detection on a file as follows:
import assemblyai as aai transcriber = aai.Transcriber() transcript = transcriber.transcribe( "https://storage.googleapis.com/aai-web-samples/meeting.mp3", config=aai.TranscriptionConfig(entity_detection=True) ) for entity in transcript.entities: print(entity.text) # i.e. "Dan Gilbert" print(entity.type) # i.e. EntityType.person print(f"Timestamp: {entity.start} - {entity.end}")
Final words
In this tutorial, we learned how to write a script that transcribes Zoom cloud recordings using the Zoom API and AssemblyAI’s Speech-to-Text API. We learned how to create a Server-to-Server OAuth Zoom app with restricted authorization using scopes, and then use our app’s credentials to obtain an access token in order to make requests to the Zoom API. We additionally saw how the AssemblyAI Python SDK makes it easy to transcribe files in just a few lines of code.
If you found this tutorial helpful, feel free to check out some of our other educational content on AI, like
- RLHF vs RLAIF for language model alignment
- Introduction to Generative AI
- What is Residual Vector Quantization?
Alternatively, check out our YouTube channel for additional educational content. Finally, feel free to follow us on Twitter to stay in the loop when we release new content.
Lorem ipsum dolor sit amet, consectetur adipiscing elit, sed do eiusmod tempor incididunt ut labore et dolore magna aliqua. Ut enim ad minim veniam, quis nostrud exercitation ullamco laboris nisi ut aliquip ex ea commodo consequat. Duis aute irure dolor in reprehenderit in voluptate velit esse cillum dolore eu fugiat nulla pariatur.