
Twilio is a leading platform for customer communication and engagement that makes it easy to generate personalized user experiences, from tailored coupons to individualized appointment reminders. But what if, instead of just sending communication out to customers, you want to record communication coming in from customers?
For example, a doctor might want to automatically transcribe a patient phone call so she can focus on engaging with the patient rather than scrambling to write down notes. After the call, the doctor can review the transcription in order to give a diagnosis, confident she didn’t miss any details.
Not only is transcribing phone calls in this way useful, it's also easy to do with AssemblyAI's Real-Time Transcription service. By the end of this tutorial, you’ll be able to make a call and see your words transcribed in front of you in real time! Let’s get started.
Prerequisites
To follow along with this tutorial, you’ll need to have a Twilio account set up. You’ll also need to have an AssemblyAI account, which must be upgraded to access the Real-Time Transcription feature.
The commands in this tutorial are for Debian-based systems (Ubuntu 20.04 LTS), so you may need to change some of the commands to suit your OS.
Installations
First, you’ll need to make sure you have Node.js, the Node package manager, cURL, and wget installed.
Additional Information
You can copy Bash commands and paste them into the terminal by right clicking in terminal and selecting “Paste”.
ngrok
Next, we’ll install ngrok, which allows us to generate a public-facing URL which we can use to forward HTTP requests from Twilio to our localhost.
Twilio CLI Tools
Finally, we’ll install Twilio’s CLI tools, which will allow us to specify that our Twilio POST request is directed to our ngrok URL.
You’ll be prompted to login with twilio login, and then set a shorthand identifier for your account. Finally, run twilio profiles:use $IDENTIFIER to use your account, where $IDENTIFIER has been replaced with the shorthand identifier that you just set for your account.
Creating ngrok Tunnel
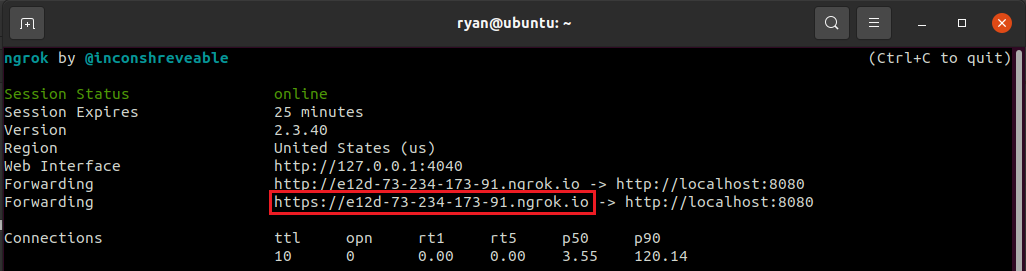
Now that we're done with setup, we can move on to the fun stuff! The first thing we’ll do is create an ngrok tunnel. Open a new terminal and create an ngrok tunnel with
where 8080 specifies the localhost port. After running this command, several URLs will be displayed in the terminal. Copy the HTTPS Forwarding URL, like the one circled in red below.
Setting up Twilio URL
Leave ngrok running and open up a new terminal. We need to tell Twilio what the routing address for our Twilio number is. We do this as follows
Where $TWILIO_NUMBER has been replaced with your Twilio number that you can find in the Twilio console (the number under "Trial Number")

And $NGROK_HTTP_URL has been replaced with the ngrok URL that you copied from the previous section.
Exporting AssemblyAI API Key
Next, go to AssemblyAI and copy your API Key, which you'll find in place of the red box below.

Now, export your AssemblyAI API key to an environment variable with
Where you have replaced $YOUR_KEY with the AssemblyAI API Key you just copied.
Spinning up Your localhost
Next, navigate into the directory from which you want to run your transcription, and then execute
in order to install the necessary packages. Now run
to download transcribe.js from AssemblyAI's GitHub. Finally, spin up the server with
and then call your Twilio number and begin speaking. You will see the transcription from AssemblyAI in the console! Feel free to adapt transcribe.js to suit your needs - you can check out this video for both an in-depth explanation of how the above approach works and instructions on how to display your transcription in-browser rather than in the console!