
Stable Diffusion allows you to create incredible images like the one below with only a sentence; but it requires a GPU to run in a reasonable amount of time. Since GPUs are expensive and in short supply, many users opt to instead pay for credits in a web app like DreamStudio in order to use Stable Diffusion in the cloud.
Luckily, users do not need to pay for either of these options. In this guide, we'll learn how to leverage Google Colab's free GPUs to create a simple web app that runs Stable Diffusion. The app will allow you to go to your browser, type in a prompt, and see the generated image in just 10 seconds.

If you don't have any coding experience and/or want to just use the app, jump down to the Use the Application section. Let's dive in!
Introduction
To build our Stable Diffusion web app, we will utilize Flask, Jinja, and ngrok.
Flask is a micro web framework for Python that allows us to run arbitrary Python functions associated with different routes. When a user submits a prompt through the Stable Diffusion web interface, our Flask app will run a Python function that generates a corresponding image and then returns an HTML document that contains the image to be displayed in the user's browser.
To create the returned HTML document, we will insert the generated image into a template using Jinja. Jinja is a templating engine that makes it simple and intuitive to return our generated images.
When we spin up our Flask application, it will be locally hosted on Google Colab's servers. In order to expose this application to the internet for use, we will use ngrok - a reverse proxy that will effectively provide a public URL at which we can access our application.
So, the overall schematic looks like this:
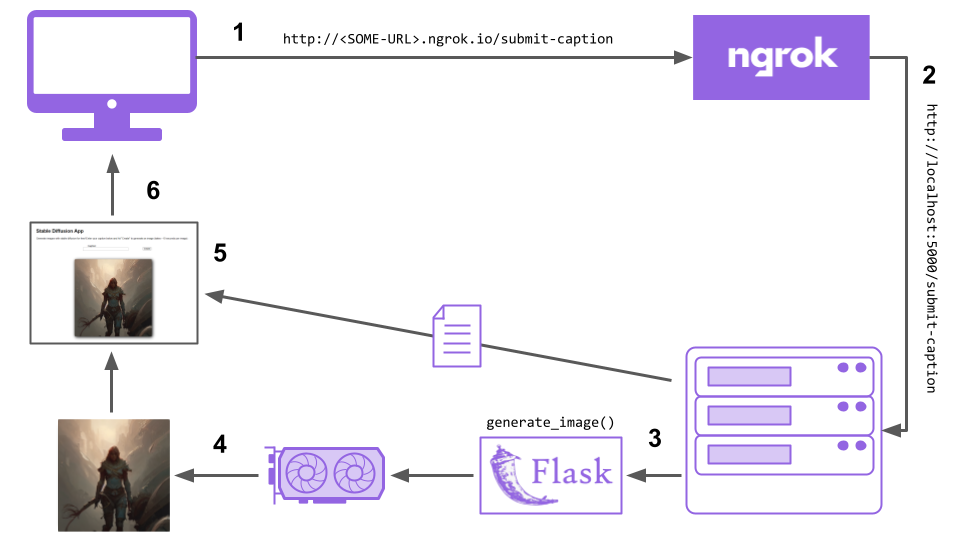
- A user submits a caption to Ngrok
- Ngrok forwards this request to Colab's servers
- The server uses Flask to run the
generate_image()Python function - This Python function runs the image generation on a Colab GPU
- The generated image is inserted into an HTML template with Jinja
- The resulting HTML document is returned to the user, displaying the generated image
All of this happens in just about 10 seconds! Now that we understand how everything will work from a birds-eye view, let's jump over to the associated Colab notebook to see the code in action.
How to build the Stable Diffusion web app
To follow along with this section, make sure you've opened the Colab notebook associated with this article.
Step 1: Install dependencies
First, we need to install all necessary dependencies, beyond those that come natively installed on Colab. First, we need to install all necessary packages to use Hugging Face's diffusers library, which allows us to use the Stable Diffusion model.
pip install diffusers==0.10.2 transformers scipy ftfy accelerateNext, we need to install flask_ngrok, which will allow us to run a Flask application using ngrok.
pip install flask_ngrokStep 2: Make an ngrok account
Next, we need to make a free ngrok account. This will allow us to get an authentication token so we can use ngrok's services. Following along with the Colab notebook, we
- Go to ngrok.com
- Click "Sign up for free" and create an account
- Verify your email
- Go to the ngrok dashboard and copy your Authtoken

Paste your Authtoken in place of YOUR-TOKEN-HERE in the Colab notebook in order to register it in ngrok's configuration.
ngrok authtoken YOUR-AUTHTOKEN-HEREMake sure to run the cell after you paste your token in!
Step 3: Create the app files
Next, we need to create a couple of files that the Flask application will use. First, we create a CSS file, which provides simple styling for our application. Next, we create the actual HTML file that will be returned in the HTTP response by Flask.
If you inspect the HTML file you may notice that it is a nonstandard HTML file, seeing an image source like this:
src="{{ generated_image|default("https://images.squarespace-cdn.com/abc.png?format=512w", true) }}"This syntax is a part of Jinja's templating system, and it says that the image displayed should be dynamically replaced with the image that we create with Stable Diffusion. We also provide a default value for when no such image has been generated (i.e. when the app is first opened). This way, instead of having to create and return a whole new HTML file for every caption submission, we simply have to save an image and Jinja will take care of the rest.
Simply run the cells in the Step 2 section in Colab to create the CSS and HTML files.
Step 4: Create and run the Flask app
Now it's time to create and run the Flask application. At the top of the cell, we have various imports that we will need to serve the app, generate images, and convert image types.
from flask_ngrok import run_with_ngrok
from flask import Flask, render_template, send_file, request

import torch
from diffusers import StableDiffusionPipeline

import base64
from io import BytesIO
Next, we initialize the Stable Diffusion (1.5) model using the diffusers library and move it to GPU. This will load the model into memory so that it is ready to process incoming requests.
pipe = StableDiffusionPipeline.from_pretrained("runwayml/stable-diffusion-v1-5", revision="fp16", torch_dtype=torch.float16)
pipe.to("cuda")
Next, we create and start up a Flask object and set it to run with ngrok.
app = Flask(__name__, template_folder='.')
run_with_ngrok(app)
Initial render endpoint
Now we can define the application itself. We do this by using the app.route() decorator to associate various different endpoints with Python functions that should be run when a request is made to the corresponding endpoints.
First, we create a simple function to return the initial web page that is shown when the app is accessed. It maps the route / to a function that simply returns our index.html file created above.
@app.route('/')
def initial():
  return render_template('index.html')
The render_template() function lets Flask know that we are returning a Jinja template that should be dynamically populated accordingly. Since we do not pass in any other arguments to the function, it will simply use the defaults that we defined in index.html.
Caption submission endpoint
Next, we define the only remaining function that will handle every time a caption is submitted.
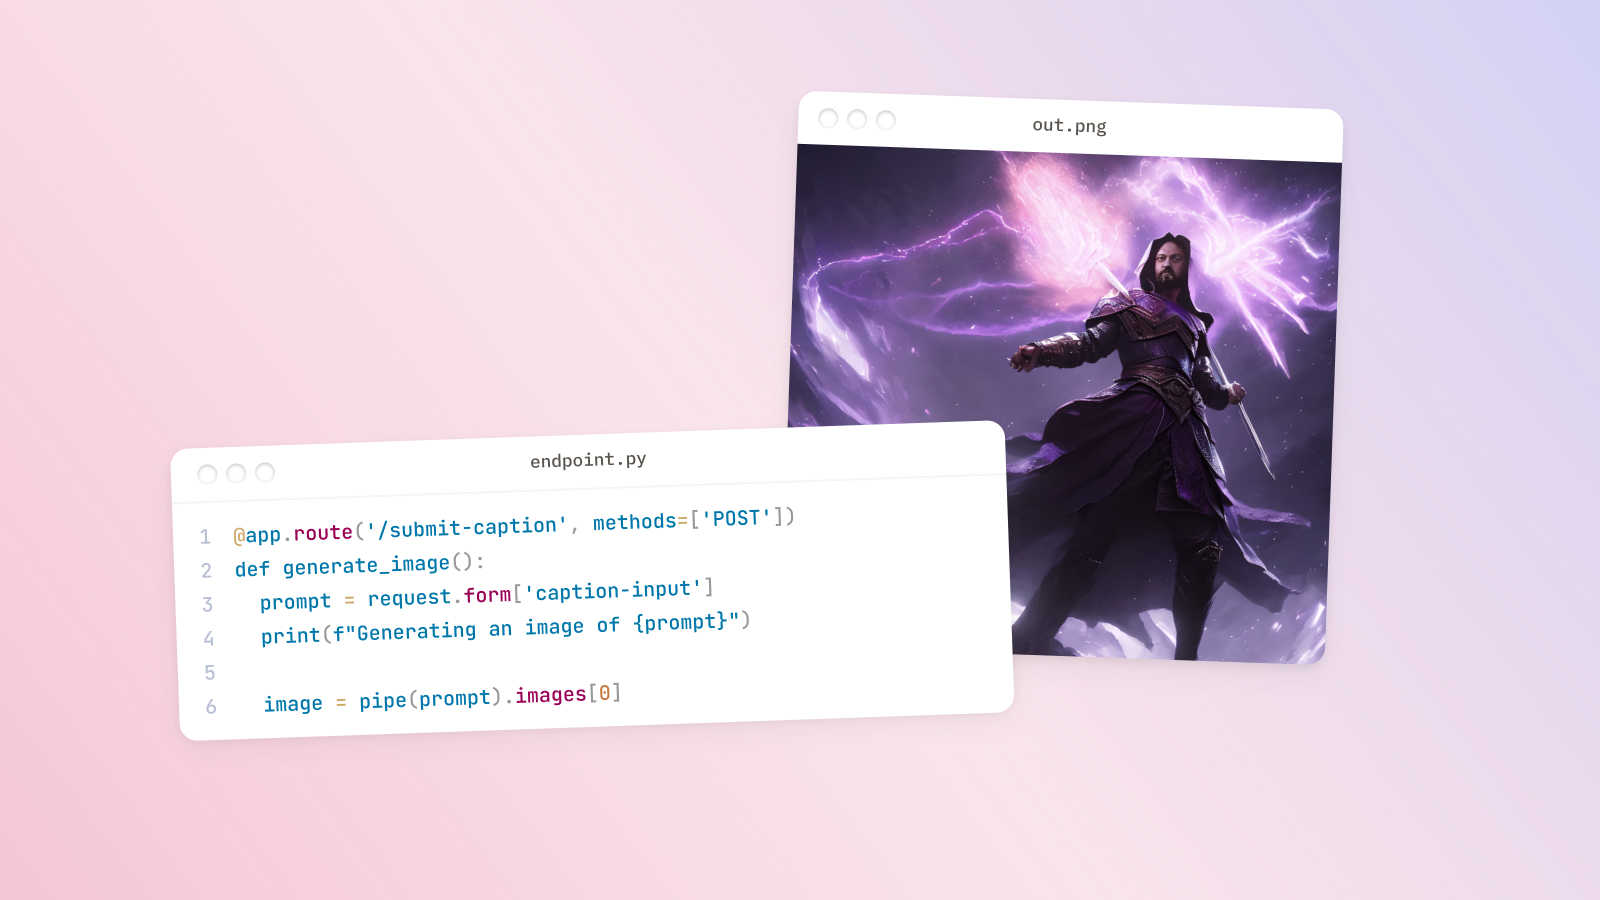
@app.route('/submit-caption', methods=['POST'])
def generate_image():
  prompt = request.form['caption-input']
  print(f"Generating an image of {prompt}")

  image = pipe(prompt).images[0]
  print("Image generated! Converting image ...")

  buffered = BytesIO()
  image.save(buffered, format="PNG")
  img_str = base64.b64encode(buffered.getvalue())
  b = "data:image/png;base64," + str(img_str)[2:-1]

  print("Sending image ...")
  return render_template('index.html', generated_image=b)
We use app.route() to route requests for the path /submit-caption to the decorated function. We set the allowable HTTP methods to POST in order to override the default of only GET. This is required so that users can send in a caption for processing.
Next, we define the prompt variable. In index.html, the <form> element has an <input> element with a name property of caption-input. We identify the text in this textbox with request.form['caption-input'] and assign it to the prompt variable.
After this, image = pipe(prompt).images[0] passes the prompt through the Stable Diffusion model that we loaded at the top of the file, and then assigns the resulting image to a variable called image. Note that we loaded the Stable Diffusion model at the top of this file rather than in this function to avoid having to load the model with every request.
We then convert the image to a base-64 string which allows us we can directly embed the image in the HTML file that we send in the response. Prepending data:image/png;base64, to the string lets the browser know that the <img> tag in the HTML file contains a raw image rather than a URL at which it can find and fetch an image.
Finally, we populate the index.html template with this image string and return the populated template in the HTTP response.
return render_template('index.html', generated_image=b)We use the render_template() function in order to return the index.html file we created above. This is similar to the previous endpoint we defined above, except this time we are actually using Jinja's templating by dynamically replacing generated_image in the template with the image string b.
Run the app
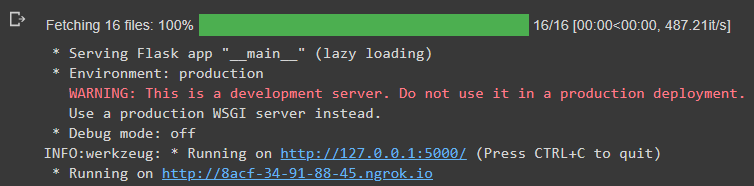
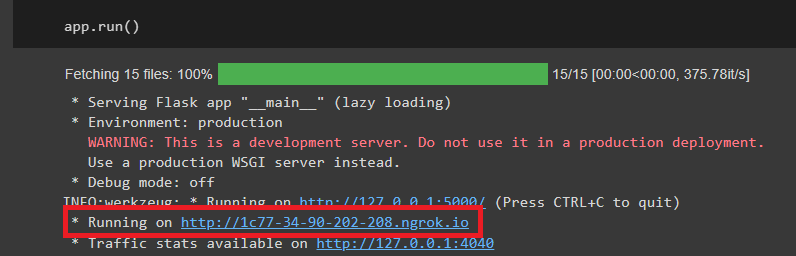
Last but certainly not least, we use app.run() to actually run the Flask application. After executing app.run(), the Flask app will start and a localhost URL at which it can be locally accessed (on the server) will be printed in the cell output. After this, an ngrok URL at which the app can be publicly accessed will be printed.
Use the Stable Diffusion web app
If you jumped down from the beginning of the article / did not follow along with the above section, go to the Setup subsection below. Otherwise, jump down to the Use the app subsection.
Setup
- Go to the Google Colab notebook.
- Click
Runtime > Change runtime typein the toolbar at the top of the screen and make sure thatGPUis listed underHardware accelerator, selecting it if not. - Complete Step 2 in the Colab notebook (no need to run the authtoken cell).
- Click
Runtime > Run allin the toolbar at the top of the screen - Jump down to Step 5 in the Colab notebook, and then move on to the next subsection.
Use the app
To go to the Stable Diffusion application, simply click the ngrok URL that is output from the last cell in Step 4.
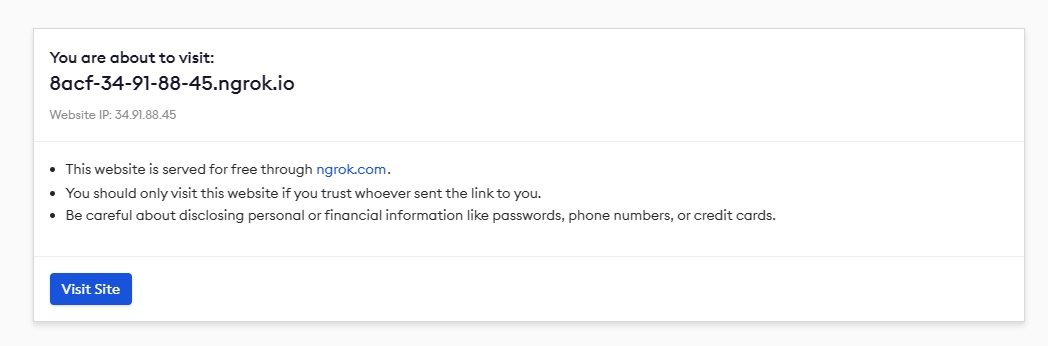
You will receive a notification that you are visiting a website served via ngrok. Click "Visit Site" to advance to the application.
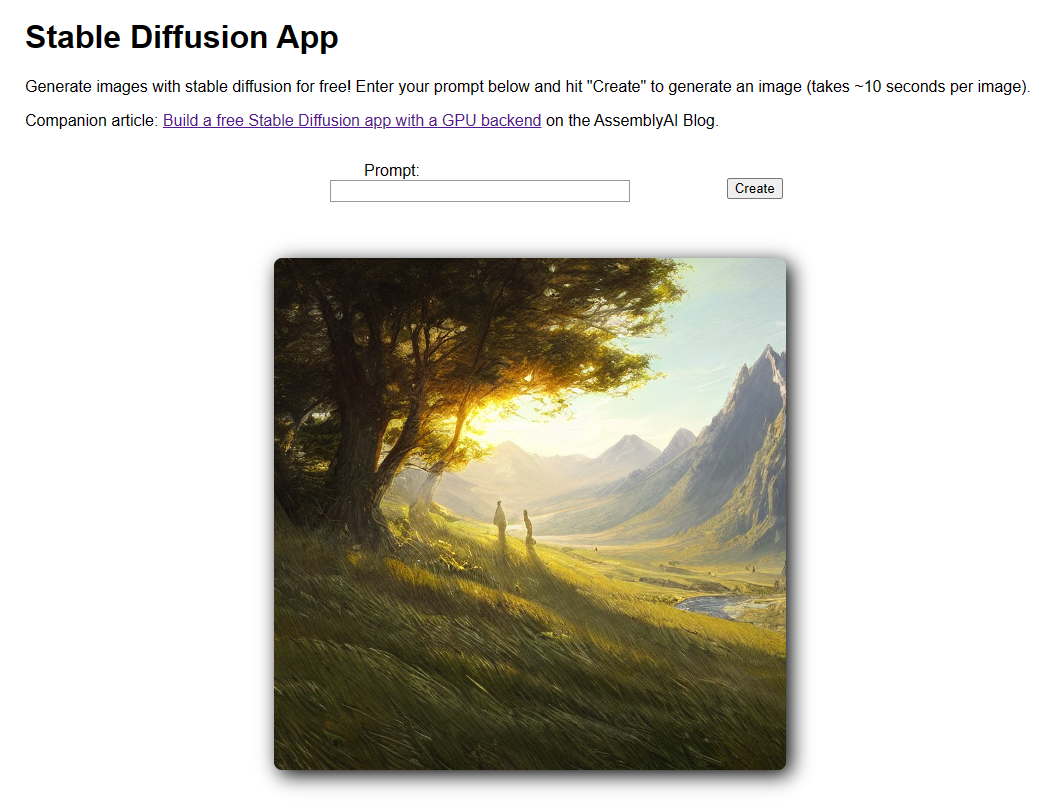
To use the app, simply enter a prompt in the textbox and click "Create". After about 10 seconds, you will see the generated image appear. Below we can see the results the caption "an image of a beautiful sunny landscape, grassy field with ravine and mountain, Greg Rutkowski, romanticism, high detail, painting, digital art, trending on artstation"
Make sure not to submit a second prompt/caption until you see the image from previous one appear in your browser!
Final Words
That's all it takes to build a simple, free-to-use web app for Stable Diffusion! To learn how you can build upon this project, check out the dropdown below.
Project extensions
In this tutorial, we created a simple web app intended to highlight the working principles of leveraging Colab GPUs in a web app. For a more in-depth project, consider building a front end using a tool like React and then creating a web service on Colab. The web service would simply generate images and serve them via JSON (base-64 encoded) to the front end, which would be responsible for using this data to populate the app / handling internal state.
This setup is less brittle than our current approach, and it would keep the front end working even when Colab times out due to inactivity. All that would be required in this case would be to reboot the web service in Colab (and change the relevant URL in your front end) and your app would be back up and running!
If you have more questions about text-to-image models, check out some of the below resources for further learning:
- How do I build a text-to-image model?
- How does DALL-E 2 work?
- How does Imagen work?
- What is classifier-free guidance?
- What is prompt engineering?
Alternatively, consider following our YouTube channel, Twitter, or newsletter to stay up to date with our latest tutorials and deep dives!