

Overview
This comprehensive tutorial walks you through building a complete AssemblyAI workflow within n8n Cloud that:- Watches for changes to a Google Drive folder
- Once an audio file is added, submits a transcription request to AssemblyAI with the audio
- Polls for the transcription process to complete
- Once complete, processes the transcript into a text file with just the transcript text and speaker labels
- Saves the processed transcript
.txtfile output to a Google Drive folder - Deletes the transcript from AssemblyAI’s servers
The Google Drive n8n integration
is used in this example for file storage and triggering, but you can adapt the
workflow to use other services like Dropbox, Amazon S3, FTP/SFTP, or webhooks
based on your needs. For all available integrations, see the n8n integrations
page.
Prerequisites
Before you begin, you’ll need:- An AssemblyAI API key
- Signing up for an AssemblyAI account is free! An account on the free tier can transcribe up to $50 in transcription and will be able to process up to five files in parallel. If you upgrade your account before using $50 in transcription any unused amount will be retained on your account.
- An n8n account, either via n8n Cloud (recommended) or a self-hosted instance.
- A Google Cloud account for Google Drive API access
- A folder in Google Drive to monitor for new audio files (
/audio_files) - A folder in Google Drive to save the formatted
.txttranscript output (/transcripts)
- A folder in Google Drive to monitor for new audio files (
Credentials
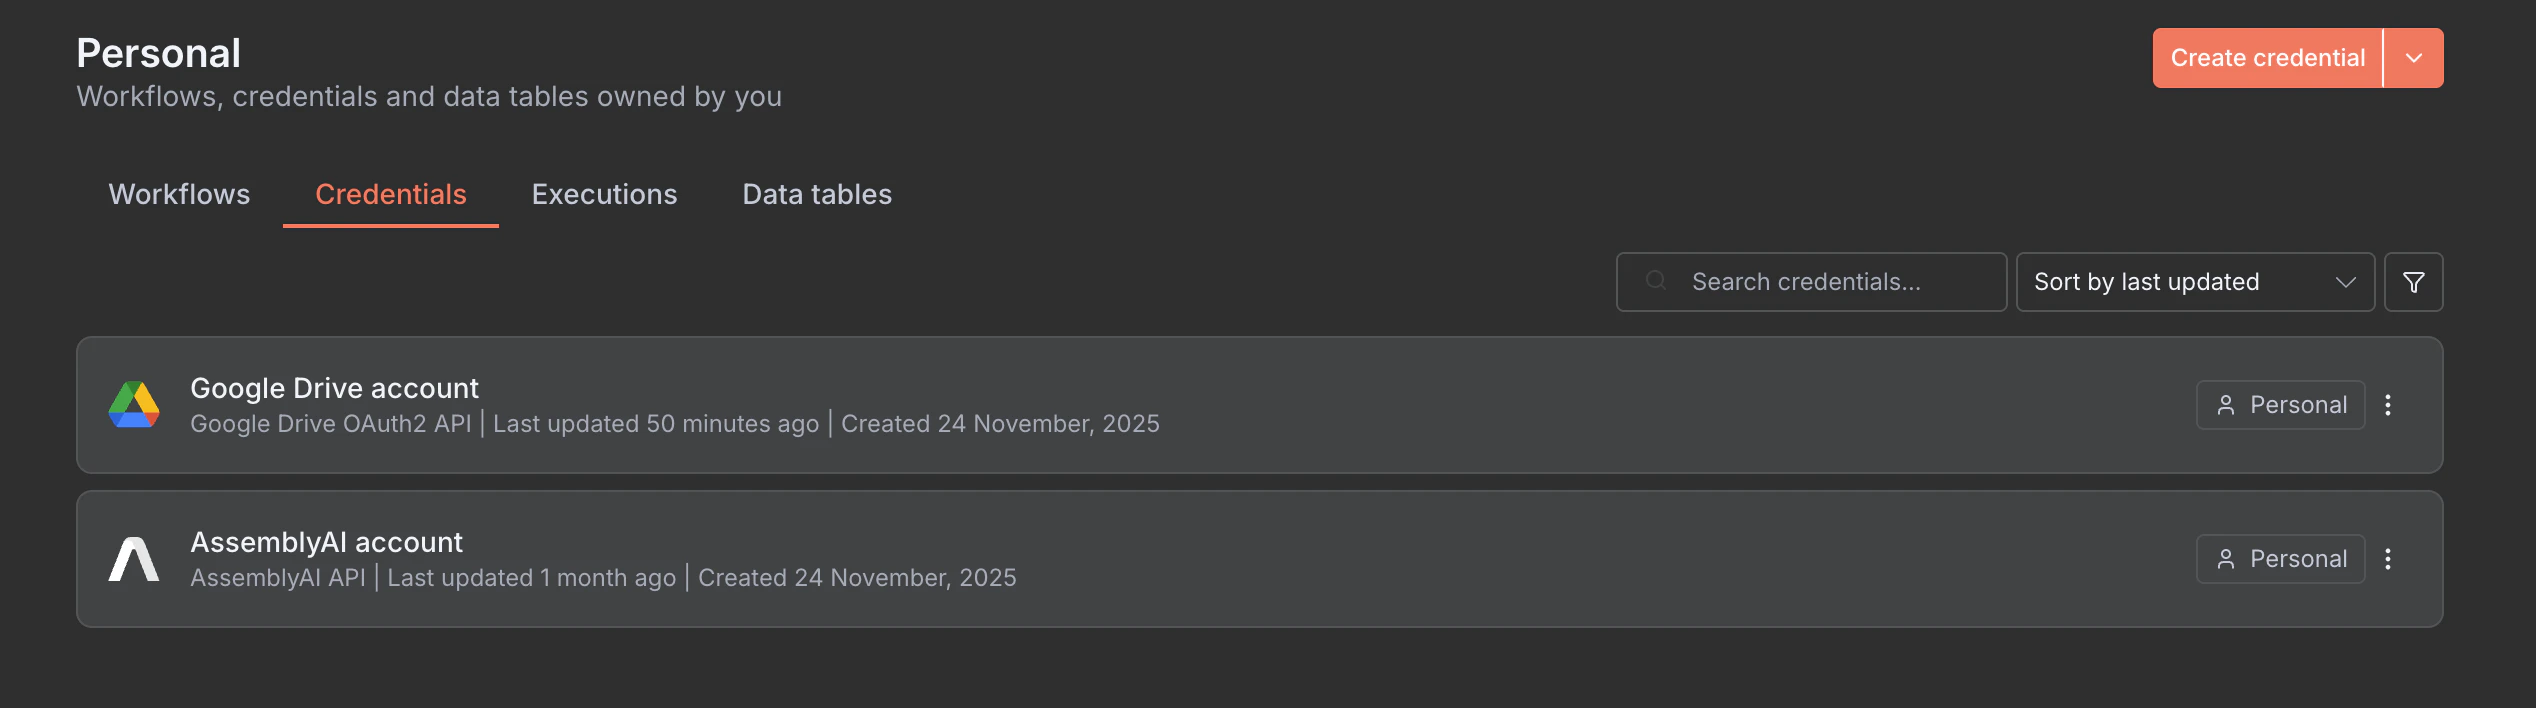
Google Drive OAuth Credentials
- Go to your n8n credentials page
- Click Add Credential and search for “Google Drive OAuth2 API”
- Follow the setup process to connect your Google Drive account with Google Cloud Console:
- Save the credential
AssemblyAI Credentials
- Go to your n8n credentials page
- Click Add Credential and search for “AssemblyAI API”
- Enter your AssemblyAI API key
- Save the credential
Instructions
Step 1: Set Up Your Workflow and Trigger
1
Create a new workflow on n8n
- Log in to your n8n account (either n8n Cloud or your self-hosted instance)
- Click the + icon or New Workflow to create a new workflow
- Give your workflow a descriptive name (e.g., “AssemblyAI Transcription Pipeline”)
- Install the AssemblyAI node:
- Click the + icon to open the nodes panel
- Search for “AssemblyAI”
- Click the Install button next to the AssemblyAI node
2
Choose Your Trigger
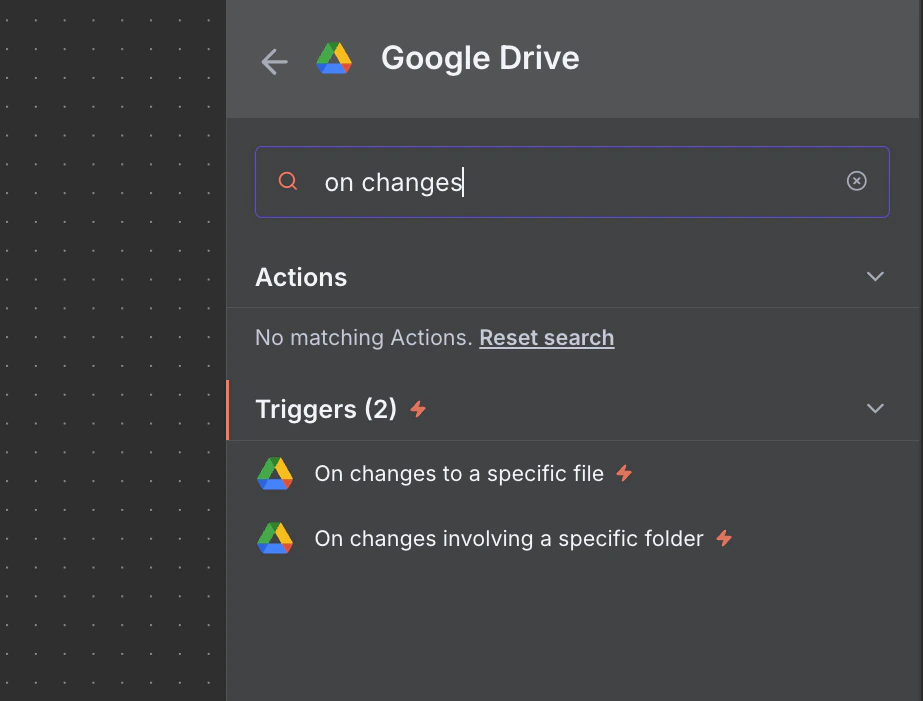
- Link your Google Drive account with the credentials you created in the Credentials step.
- Add a Google Drive trigger node to your workflow
- Select the trigger event:
On changes involving a specific folder - Configure the trigger parameters:
- Credential to connect with: Select your Google Drive credentials
- Poll Times: Set Mode to Every Minute
- Trigger On: Changes Involving a Specific Folder
- Folder: From list + Select the folder in Google Drive to monitor
- Watch For: File Created
Running the workflowTo test the workflow, you can manually trigger it at any time by clicking the orange Execute Workflow button in the n8n editor to populate the nodes with sample data.For the Google Drive trigger to work as intended, you will need to deploy this workflow (to n8n cloud) and then add a new audio file to the monitored folder in Google Drive (
/audio_files). This is handled in a later step.- Can I submit files stored in Google Drive?
- What Is the Recommended File Type for Using Your API?
- What types of audio URLs can I use with the API?
- Are there any limits on file size or duration?
Important Google Drive ConsiderationsFor the sake of simplicity, this tutorial uses a public Google Drive link, so you must ensure your file is 100 MB or less and the Google Drive folder settings are set to Public (anyone with the link can view).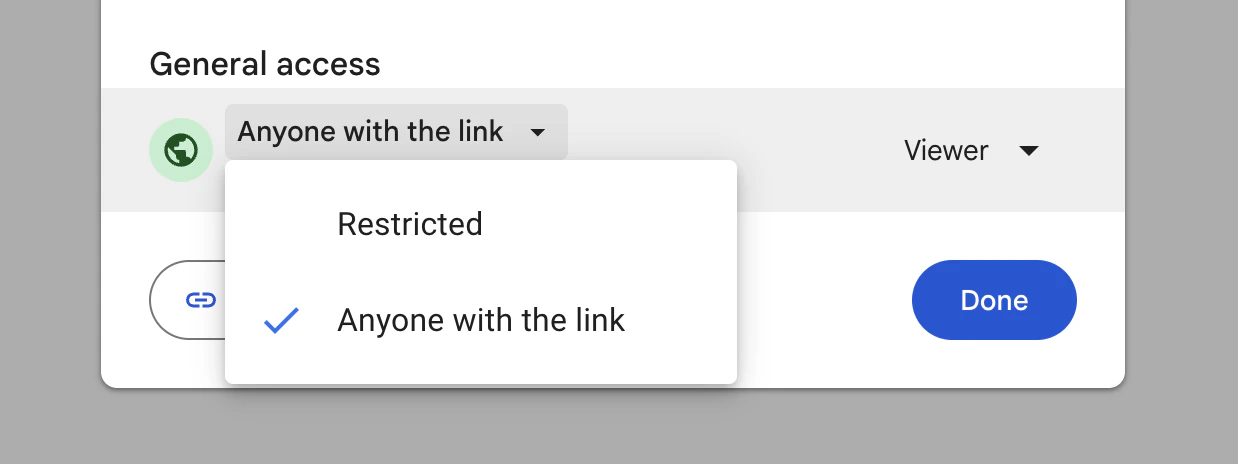
Step 2: Upload Audio File (Optional)
After the Google Drive trigger fires, you have the file’swebContentLink available at {{ $json.webContentLink }}.
For files under 100MB
You can skip this step and use the public Google Drive link directly in Step 3 without uploading. AssemblyAI accepts all Google Drive files below 100MB.For files over 100MB
Use the AssemblyAI Upload node:- Add a Google Drive “Download File” node and configure it to download the file by ID (you can get the file ID from the trigger response)
- Add an AssemblyAI “Upload a file” node
- Configure the credential with your AssemblyAI API key
- The upload will return an
upload_urlto use in the next step
Step 3: Submit Transcription Request
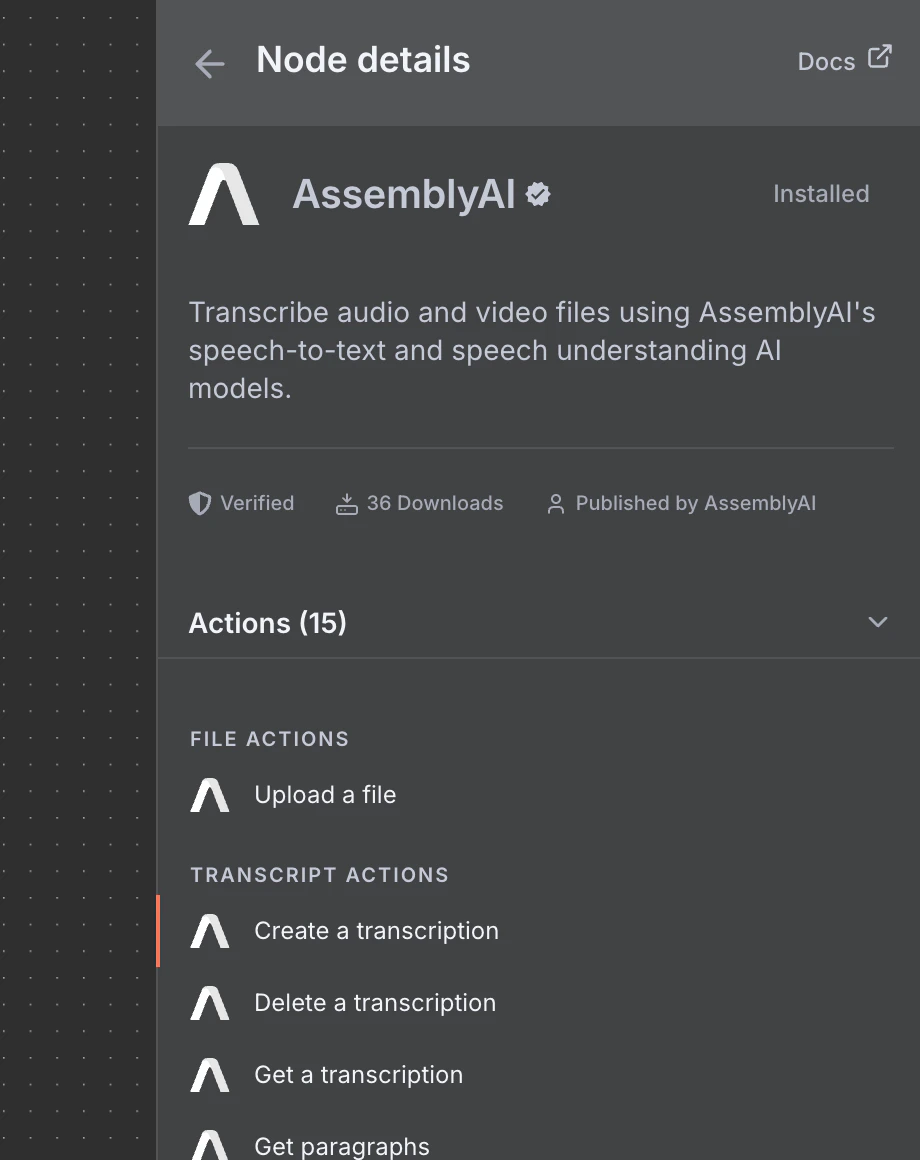
1
Add the transcription (create) node
Using the + sign linked to the Google Drive trigger, add an AssemblyAI
Create a transcription node.2
Configure the node parameters
- Credential to connect with: Select your AssemblyAI Account credential (if you haven’t set this up yet, see Credentials)
- Resource: Transcript
- Operation: Create
- Audio URL:
{{ $json.webContentLink }}- You can also drag and drop the
webContentLinkfield from the Google Drive Trigger response into this field
- You can also drag and drop the
3
Enable features
In Additional Fields, enable the following features for this tutorial: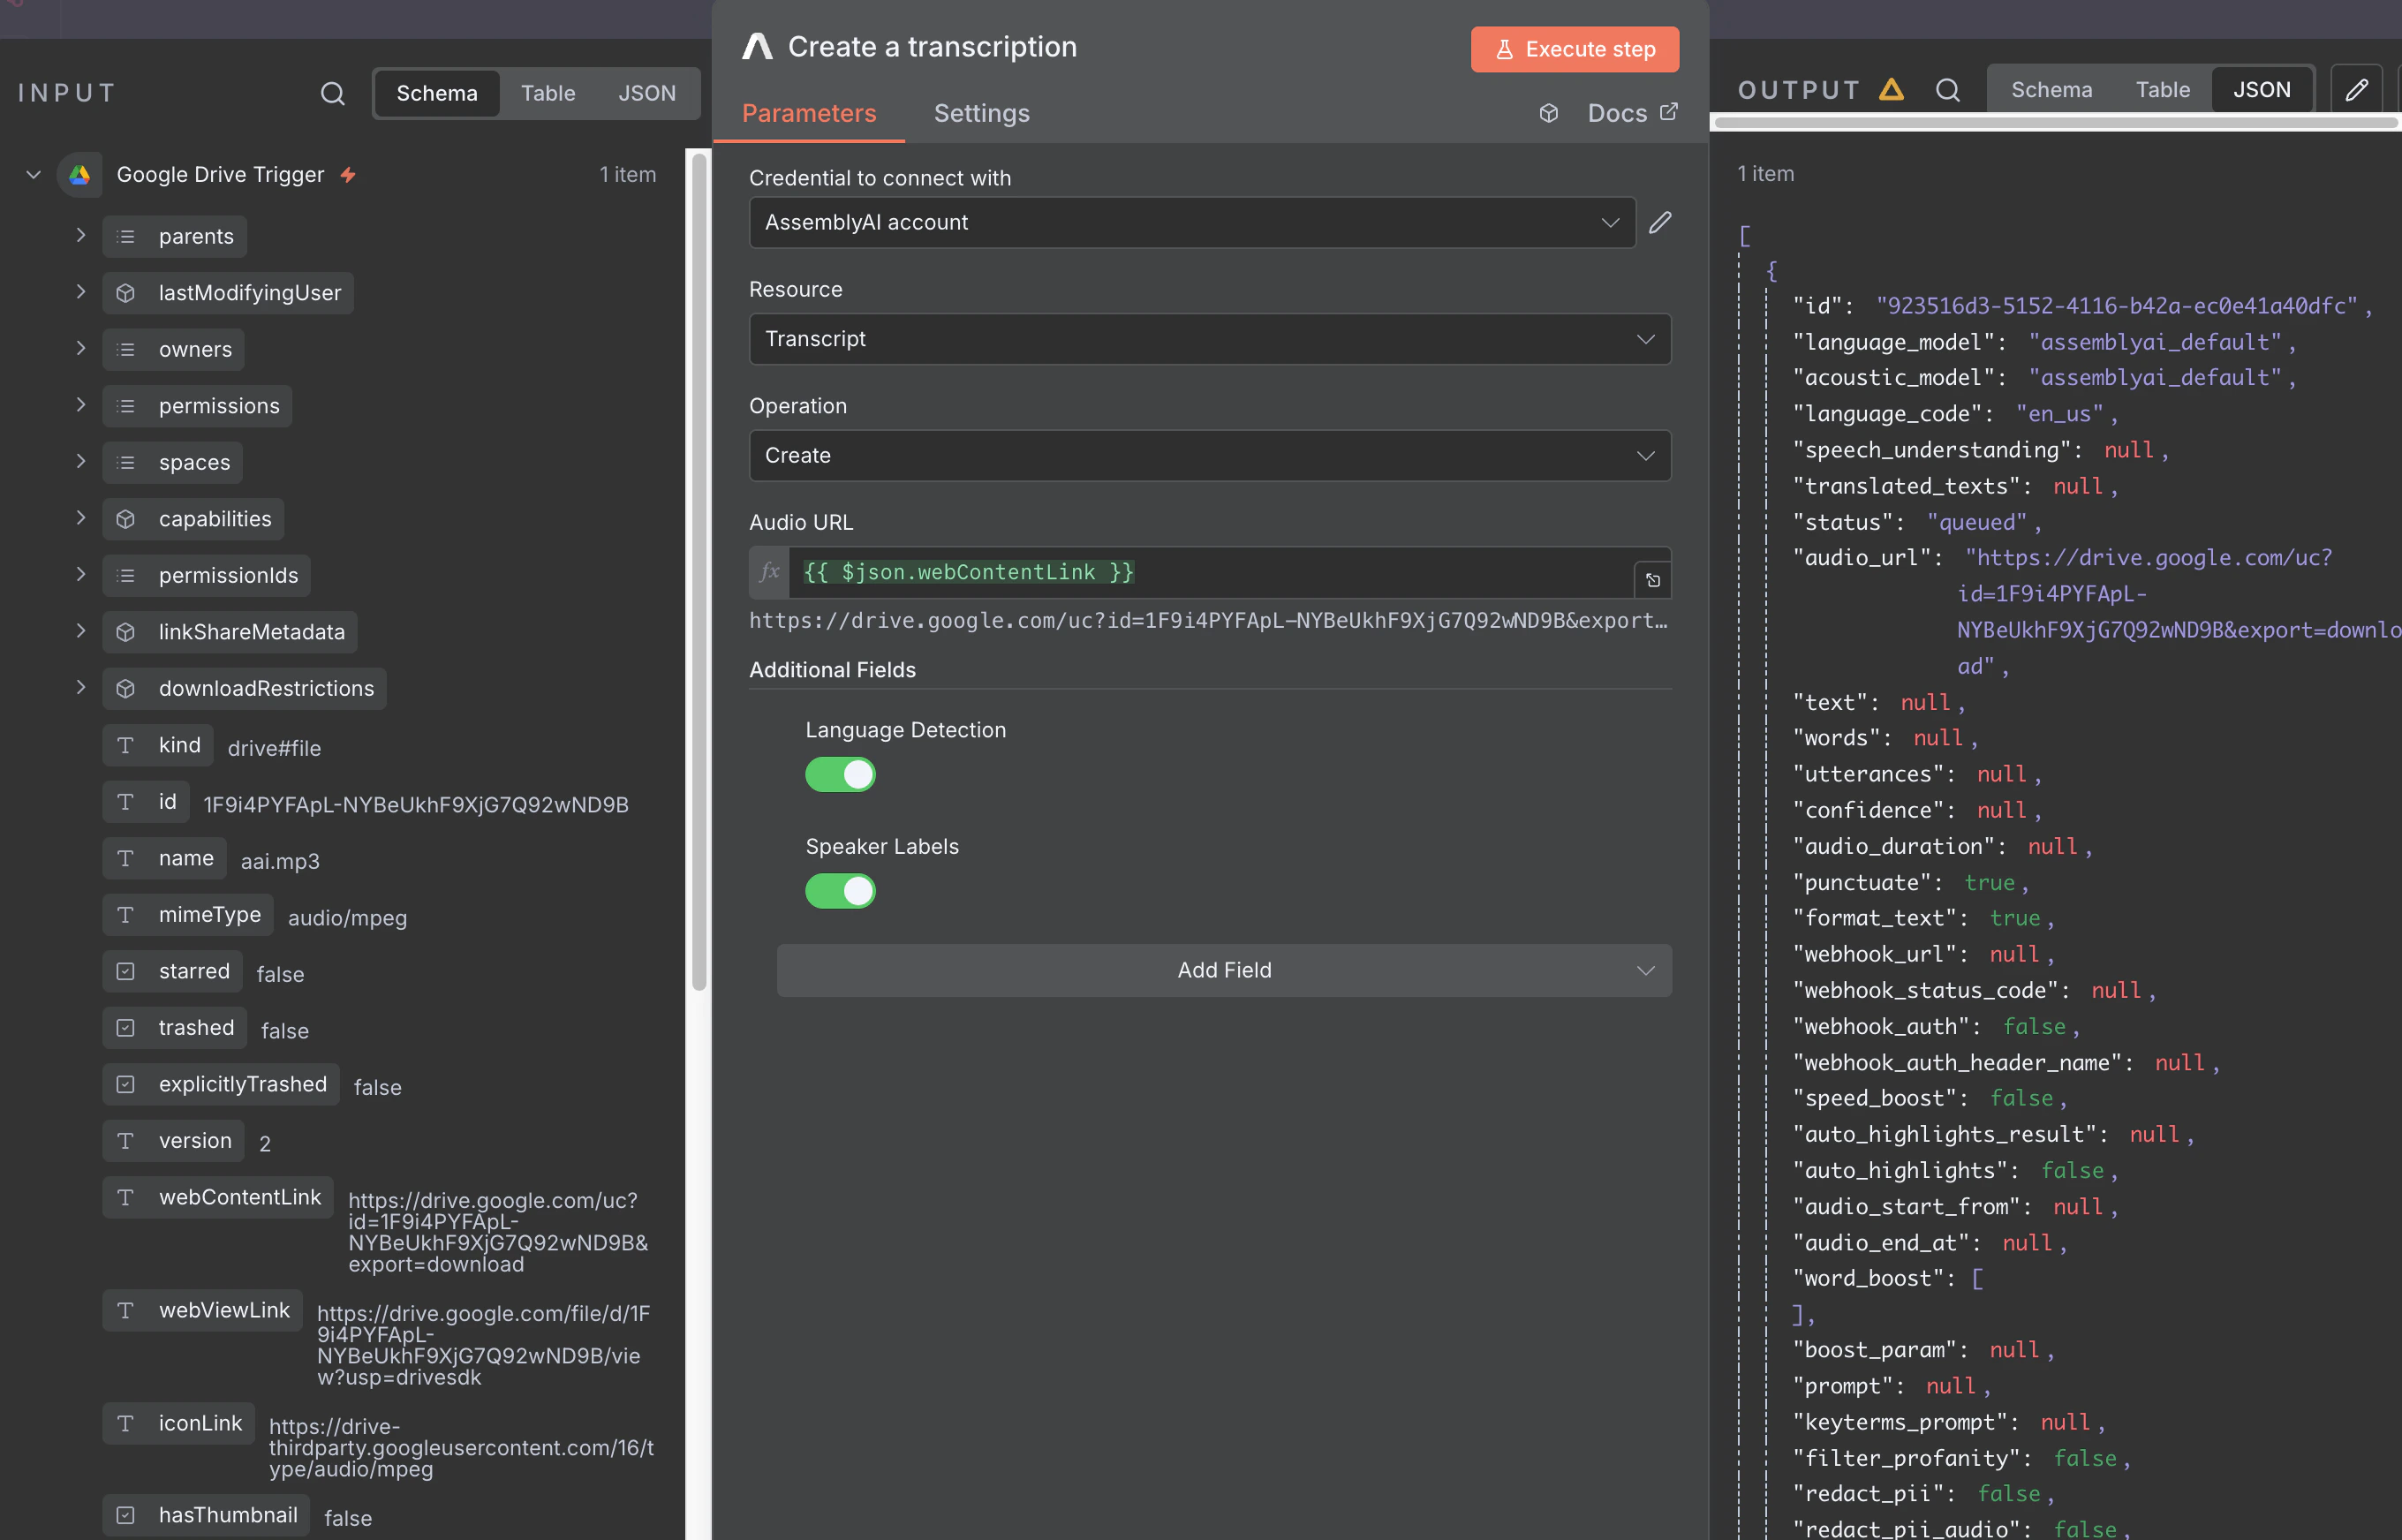
- Speaker Labels:
true(identifies different speakers through diarization) - Language Detection:
true(automatically detects the language, also known as ALD)
transcript_id that you’ll use to poll for completion.
Step 4: Poll for Transcription Completion
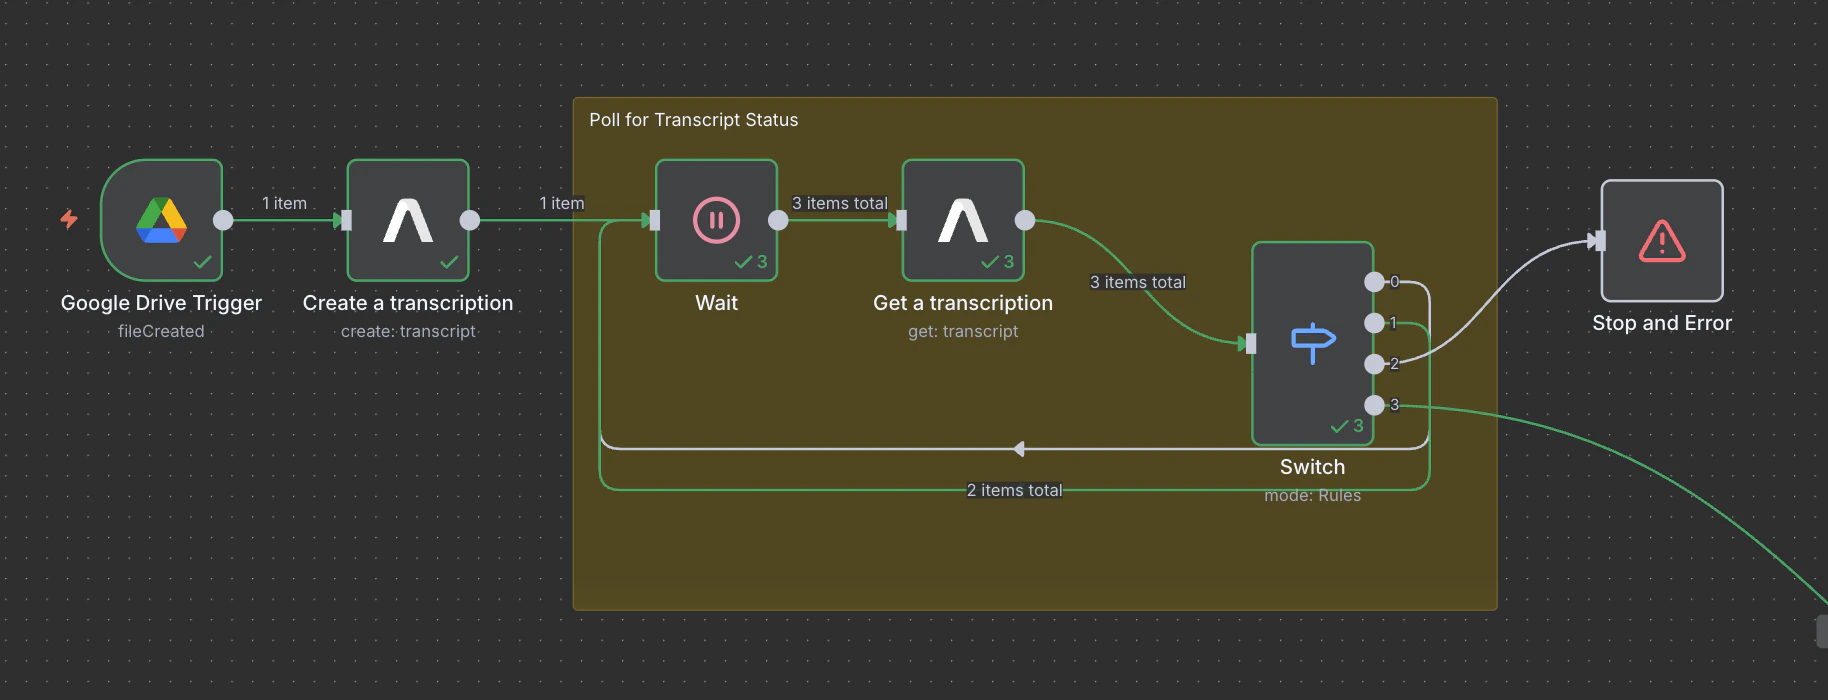
1
Add a Wait node
Add a
Wait node and configure the wait parameters:- Resume: After Time Interval
- Wait Amount: 3.00
- Wait Unit: Seconds
2
Add the transcription (get) node
Add an AssemblyAI 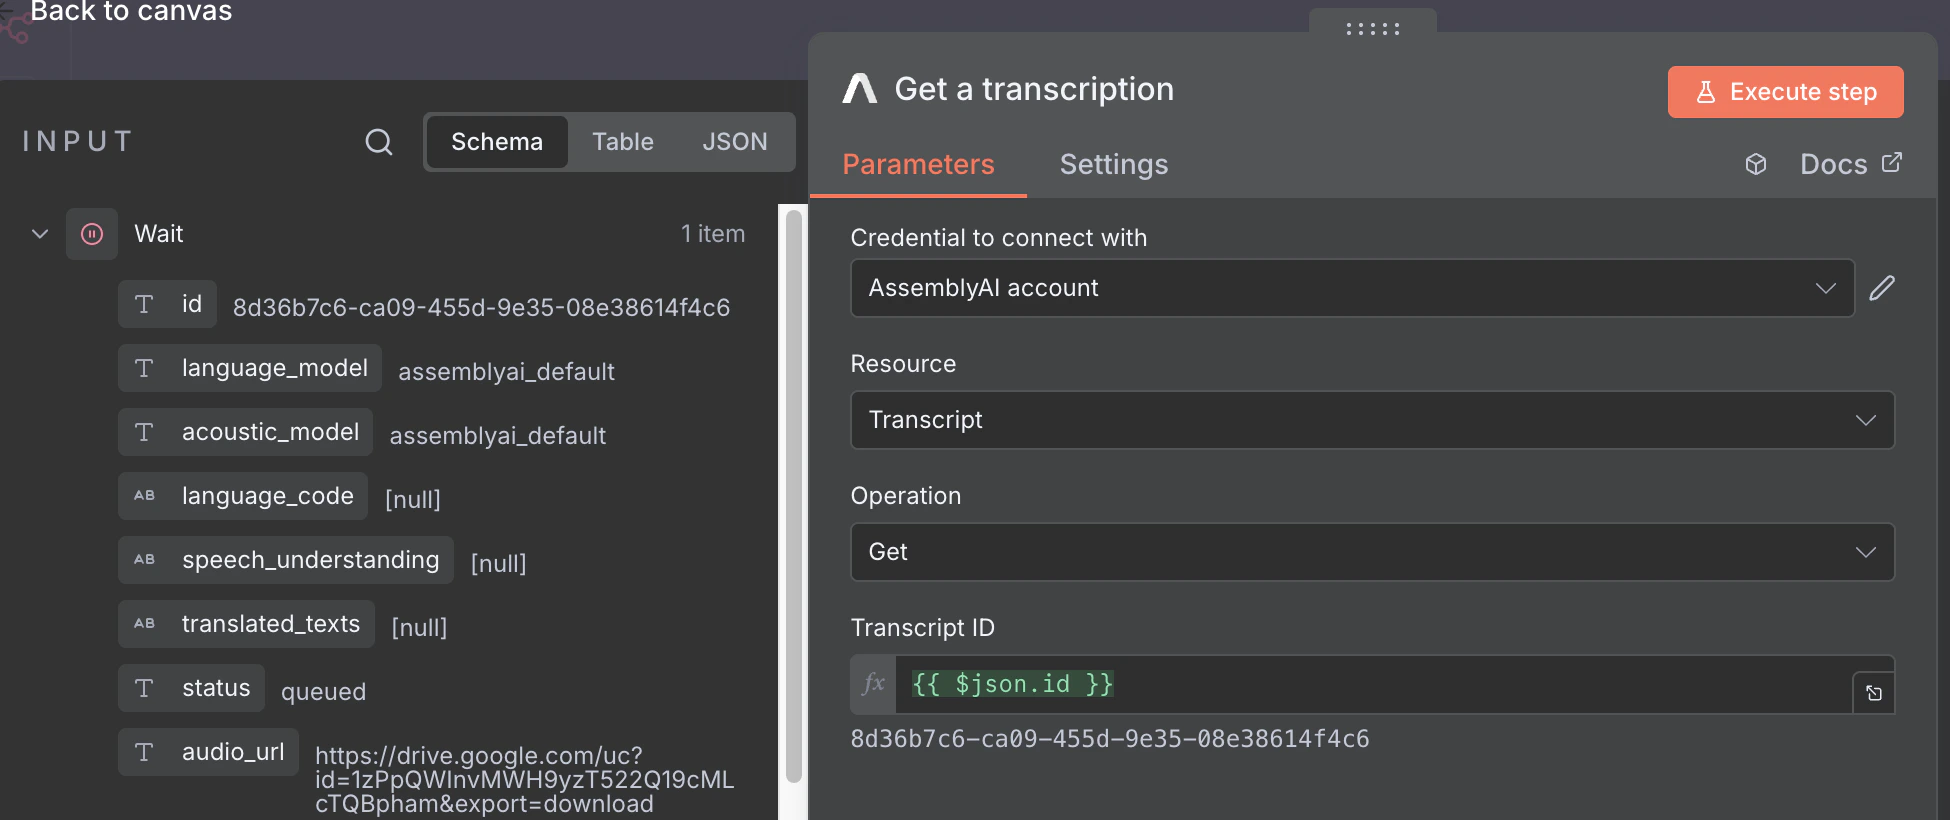
Get a transcription node after the Wait node and configure the node parameters:- Credential to connect with: Select your AssemblyAI Account credential (see Credentials)
- Resource: Transcript
- Operation: Get
- Transcript ID:
{{ $json.id }}- You can drag and drop the
idfield from theCreate a transcriptionresponse into this field
- You can drag and drop the
3
Add a Switch node
Add a 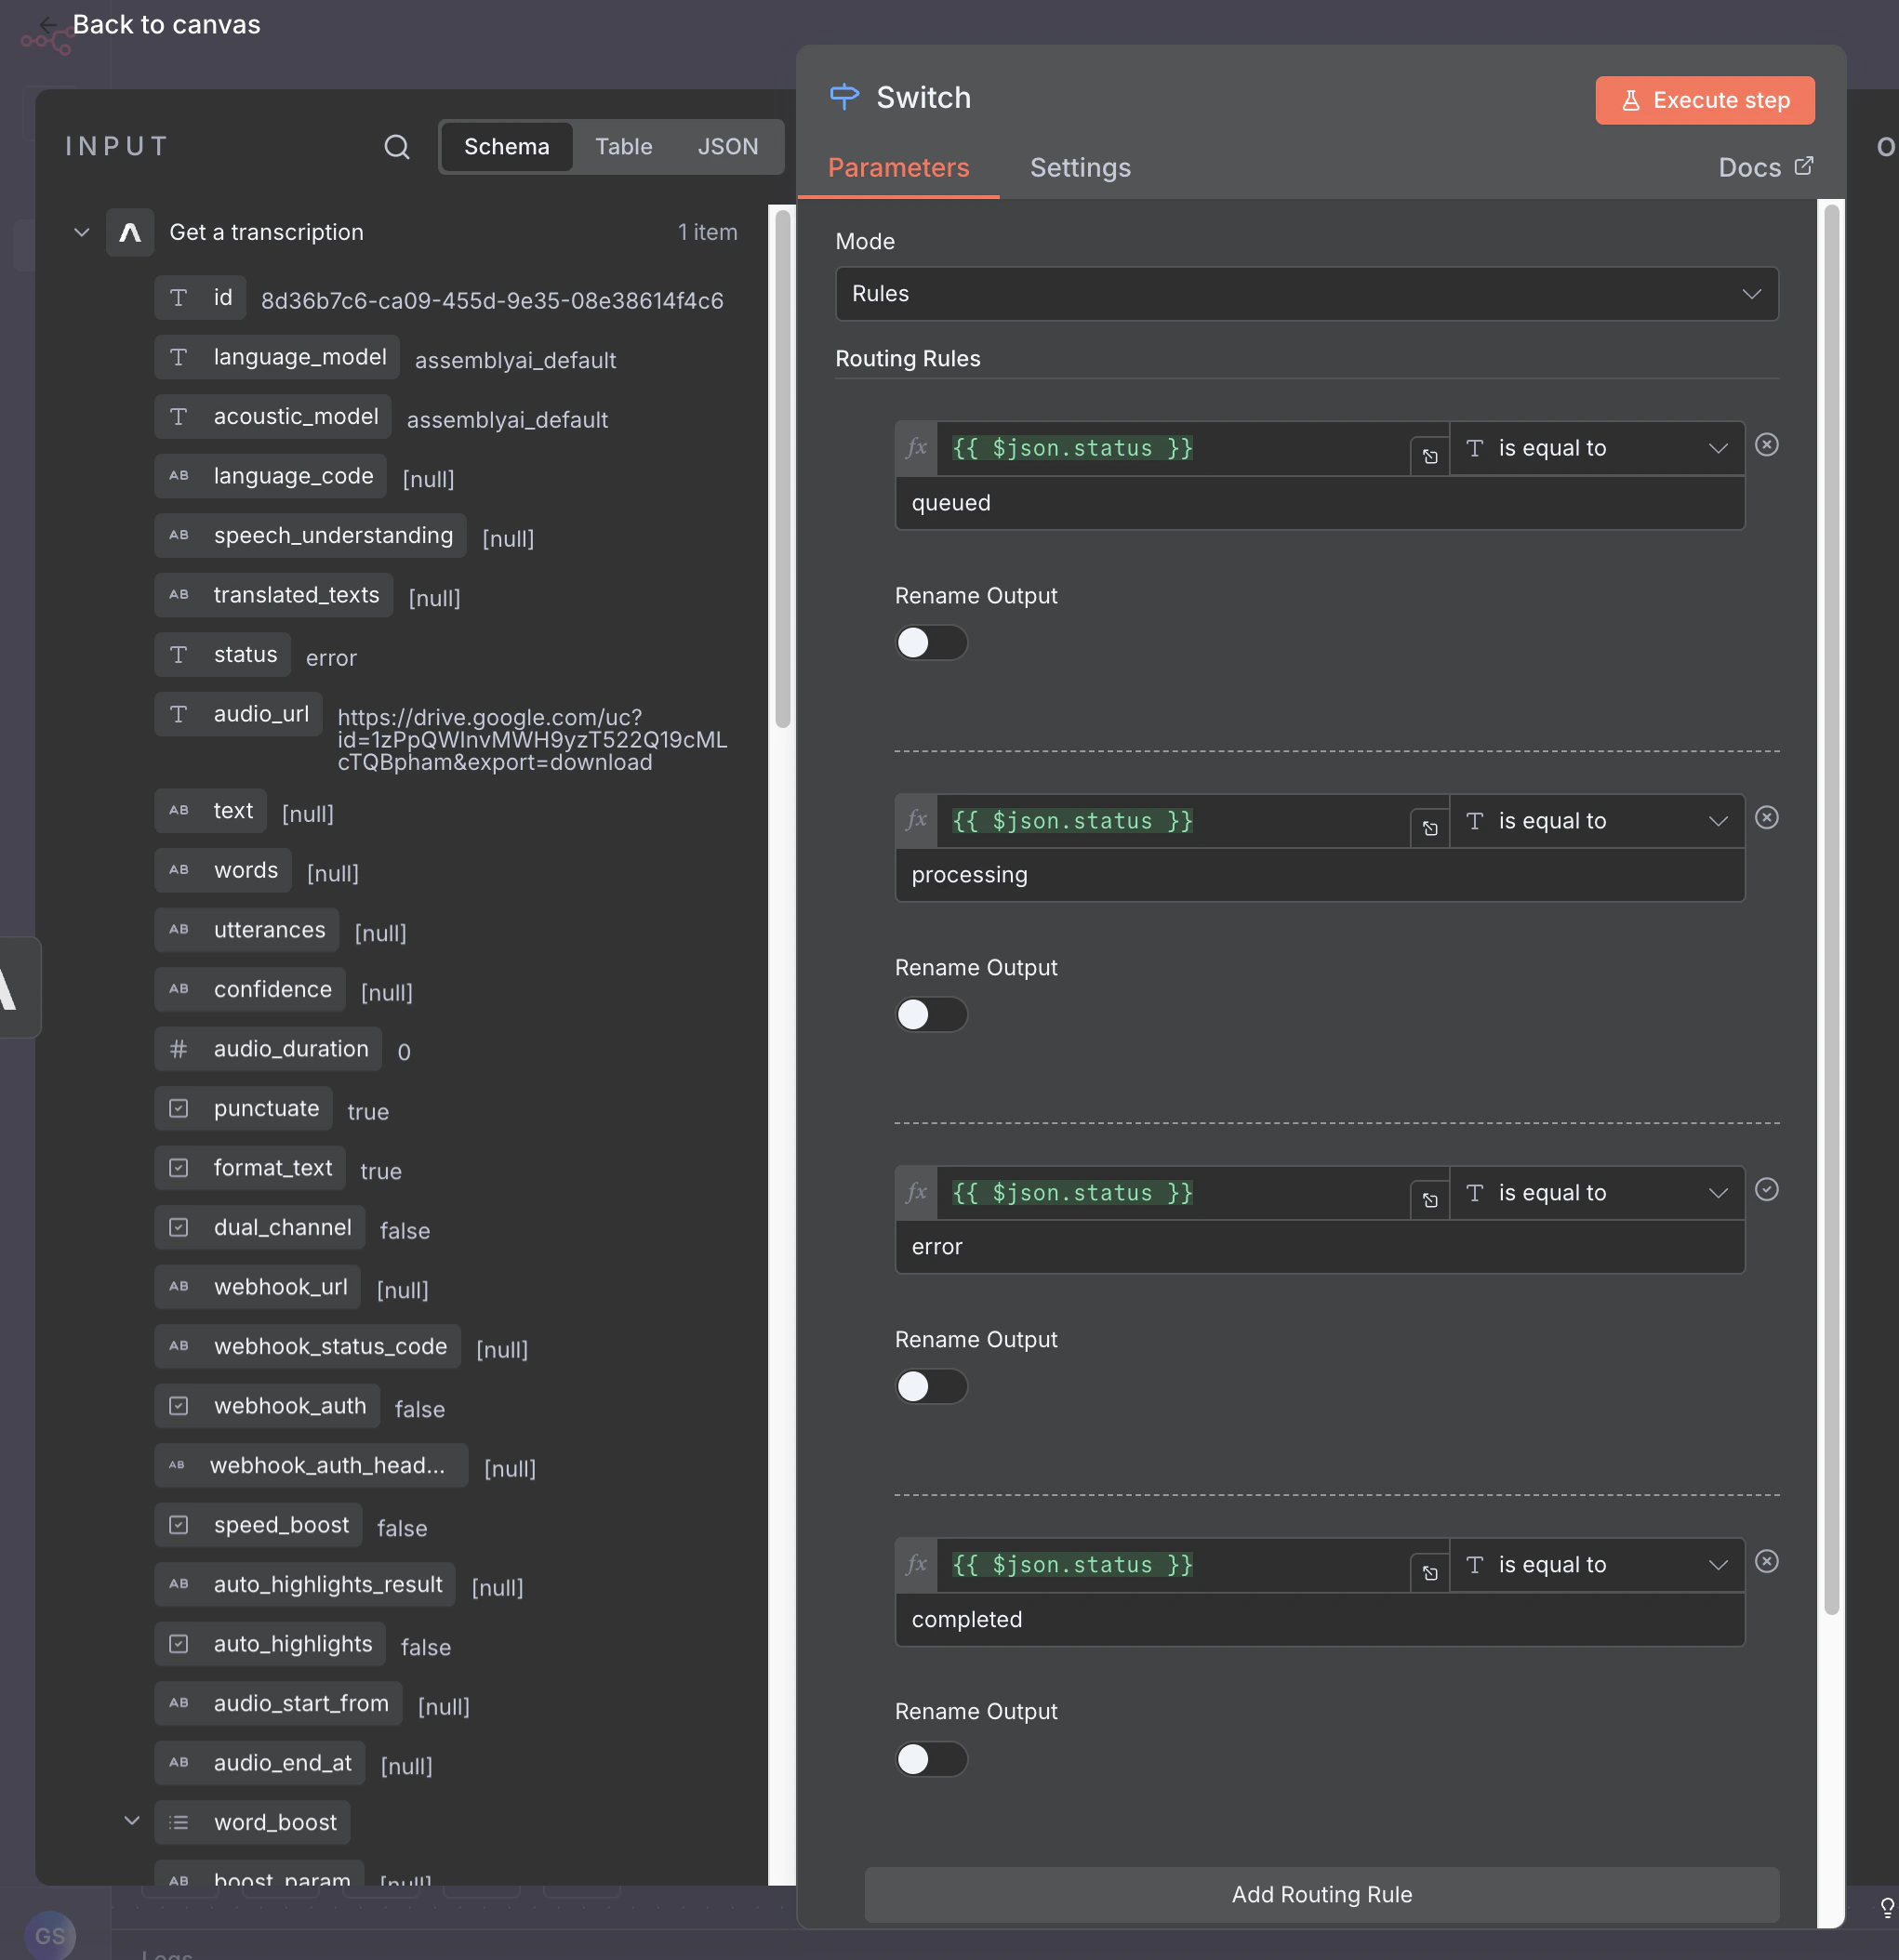
Switch node after the Get a transcription node and configure the switch to check the transcript’s status:Add 4 routing rules, each with:- Value 1:
{{ $json.status }}- Or drag the
statusfield from theGet a transcriptionresponse
- Or drag the
- Condition: “is equal to”
- Value 2: Set one of these for each rule:
queuedprocessingerrorcompleted
Most transcripts go directly to
processing. The queued status is only returned when a job is actually waiting to be processed, such as when you’ve exceeded your rate limit. The routing rule for queued is included so the workflow handles that case correctly when it occurs.4
Handle switch outputs
Handle each switch node output based on the transcript status:
- Output 0 (queued): Connect back to the Wait node to continue polling
- Output 1 (processing): Connect back to the Wait node to continue polling
- Output 2 (error): Add a Stop and Error node to halt the workflow
- Note: You may want to add logging or resubmit the transcript instead
- Output 3 (completed): Continue to the next step to process the completed transcript
processing and queued outputs back to the Get a transcription, you create a polling loop that continues checking (every 3 seconds) until the transcript is complete or encounters an error.
When the transcript is complete, the response will contain the full transcript data.
For this tutorial, we are only using the
Create a transcription, Get a transcription, and Delete a transcription actions from the AssemblyAI node.
However, n8n’s AssemblyAI integration supports all available endpoints,
including uploading files, retrieving redacted audio, getting sentences and
paragraphs, LLM Gateway, and more.Step 5: Process Transcript Output into a Human-Readable Transcript
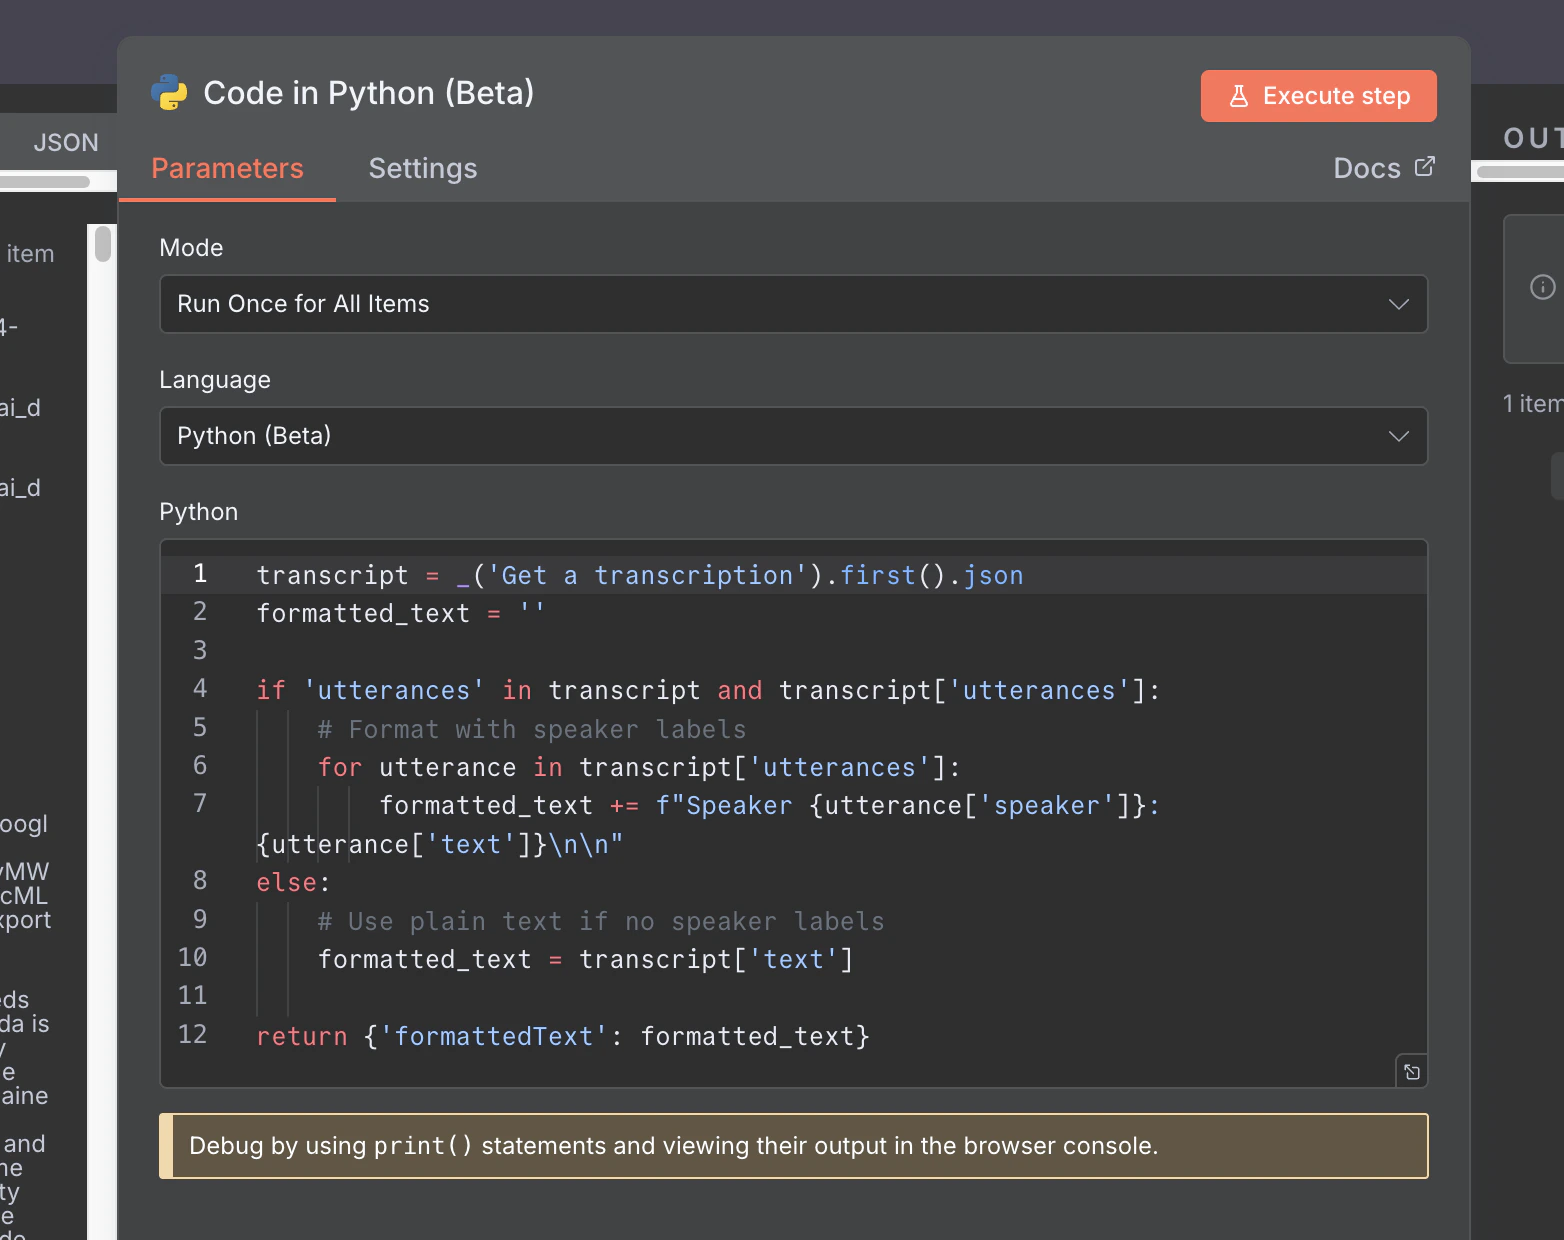
1
Add a Code node (Python)
Add a
Code node (Python) to your workflow.2
Use this code to format utterances
Use this code to format utterances into a readable transcript:This will output a
formattedText field containing the transcript with speaker labels.Step 6: Save to Google Drive
To save the formatted transcript back to Google Drive:1
Add a Convert to File node
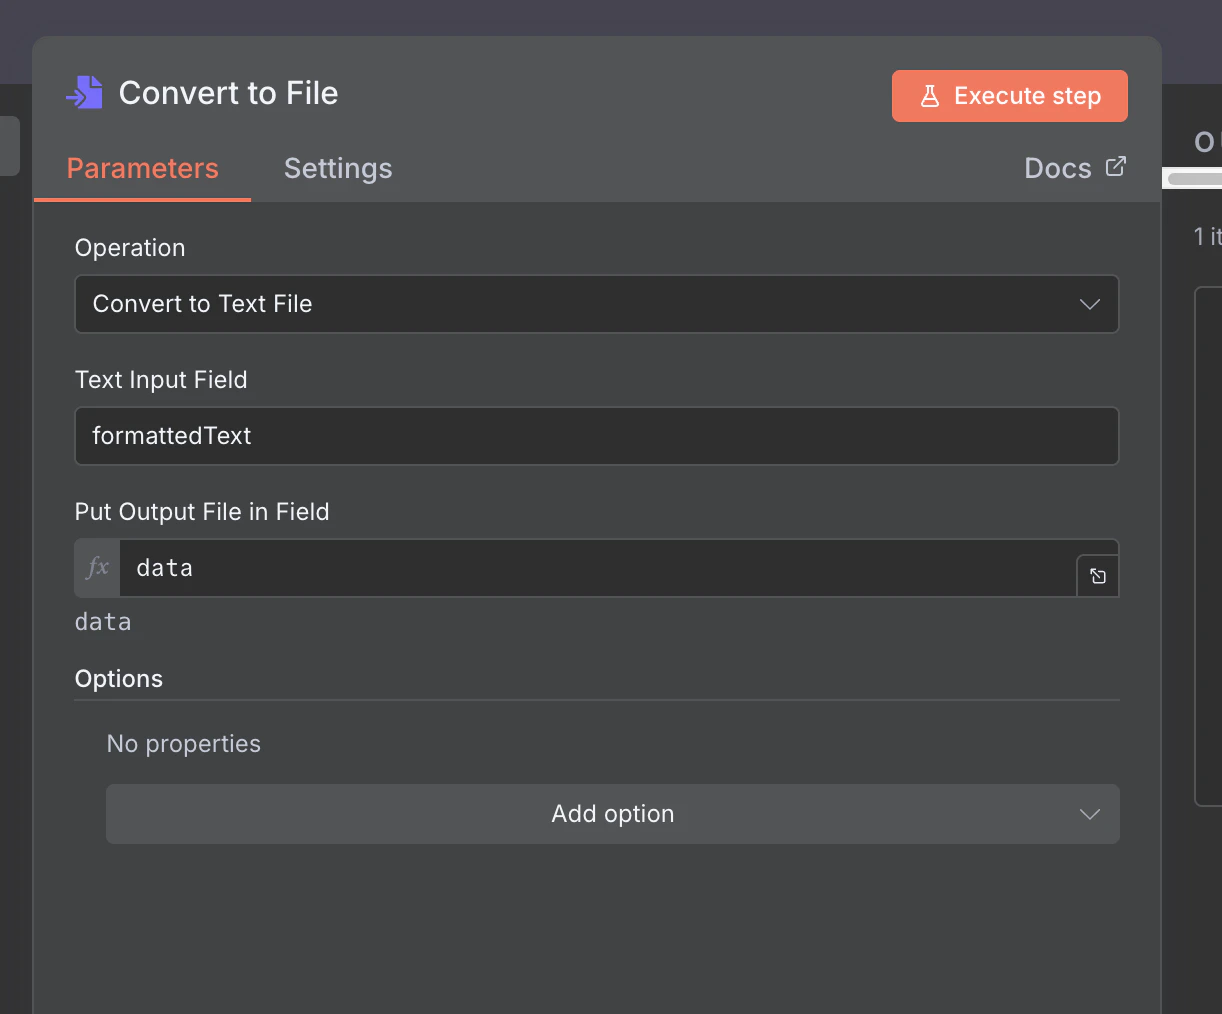
Convert to File node and configure it:- Operation: Convert to Text File
- Text Input Field: formattedText
- Put Output File in Field: data
2
Add a Google Drive Upload file node
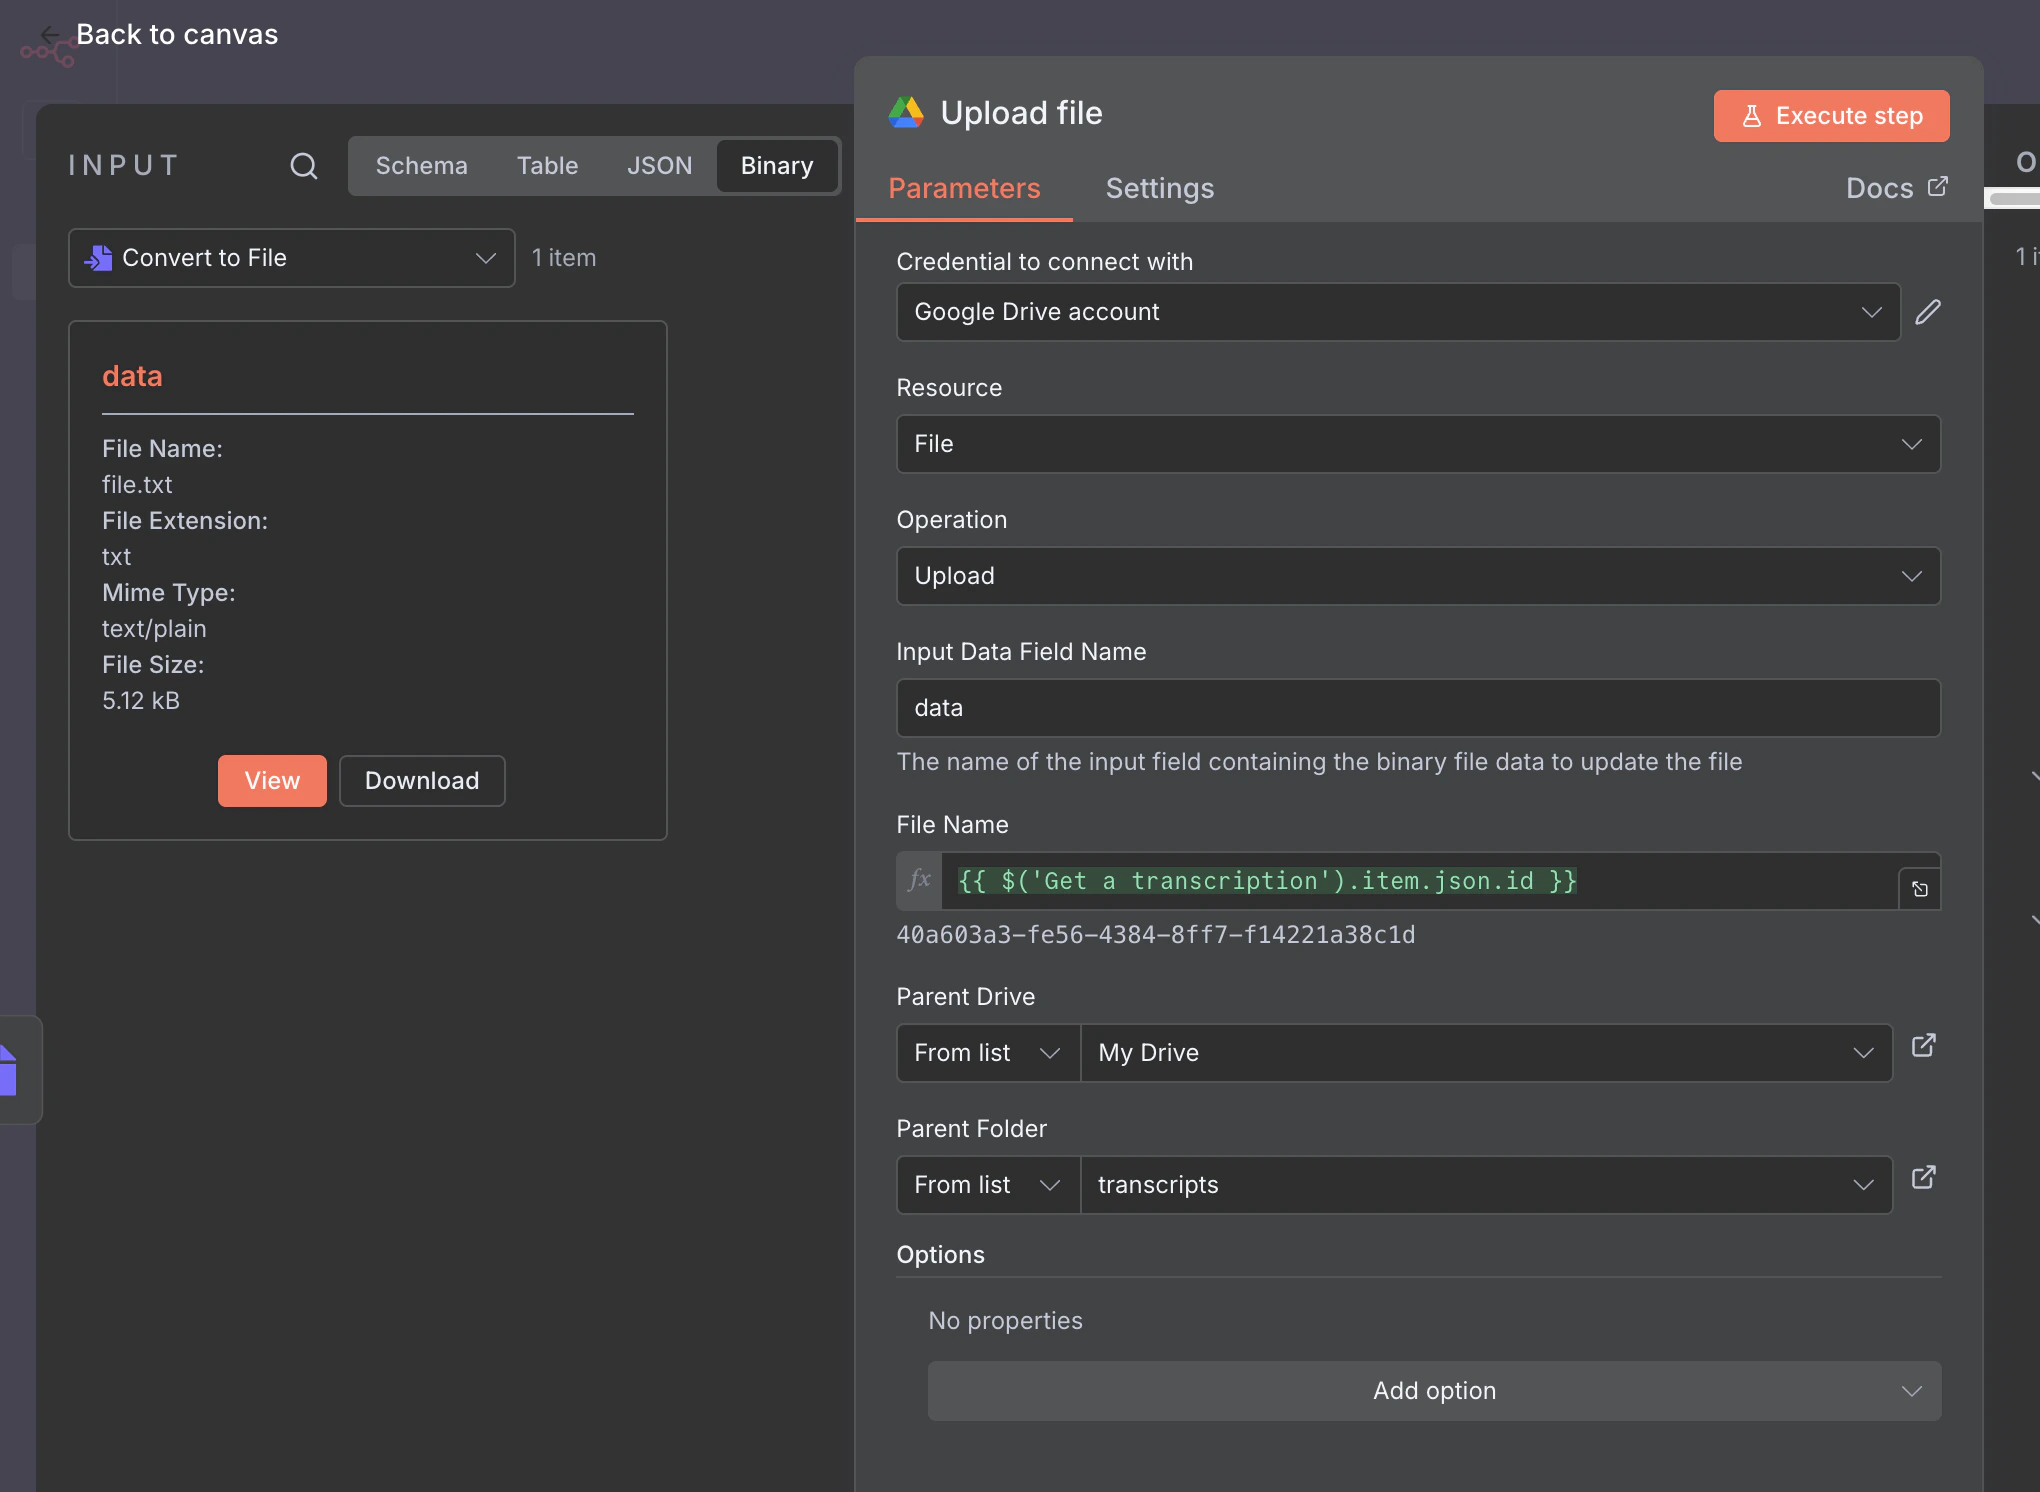
Upload file node and configure it:- Credential to connect with: Select your Google Drive credential
- Resource: File
- Operation: Upload
- Input Data Field Name: data
- File Name:
{{ $('Get a transcription').item.json.id }}(or drag and drop from input data) - Parent Drive: From list > My Drive
- Parent Folder: From list > transcripts
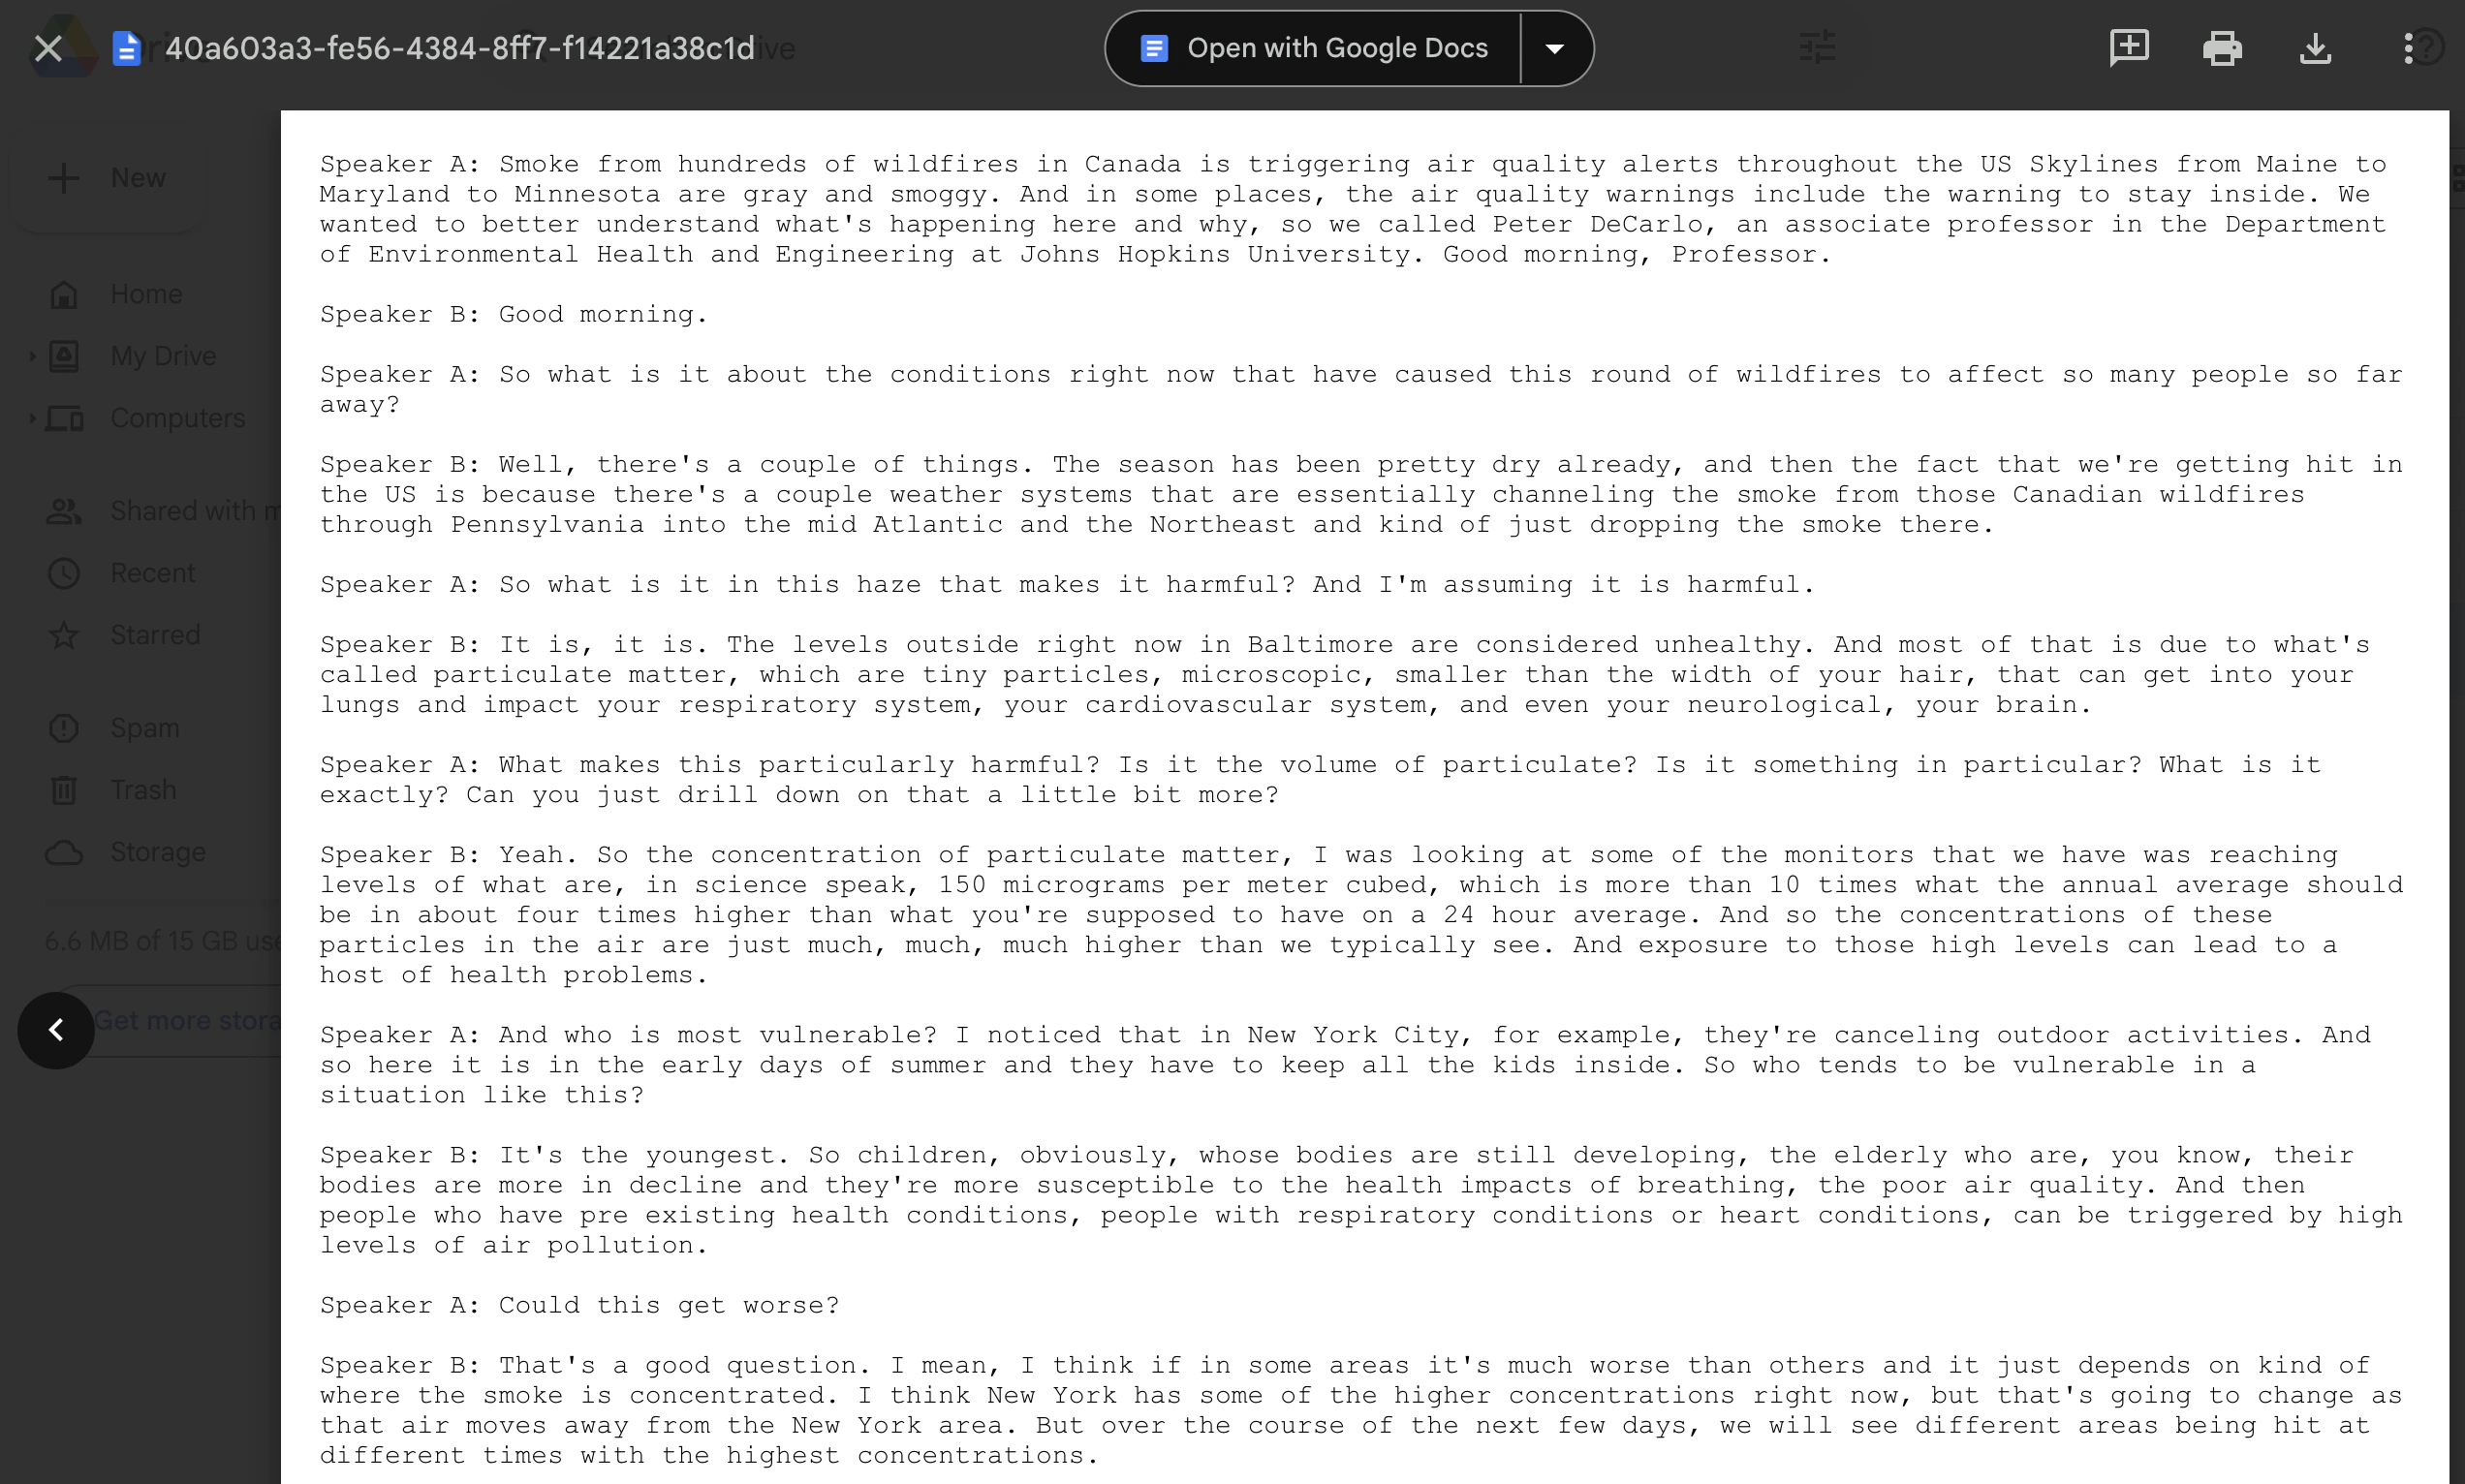
.txt file in your specified Google Drive folder:
Step 7: Delete Transcript (Optional)
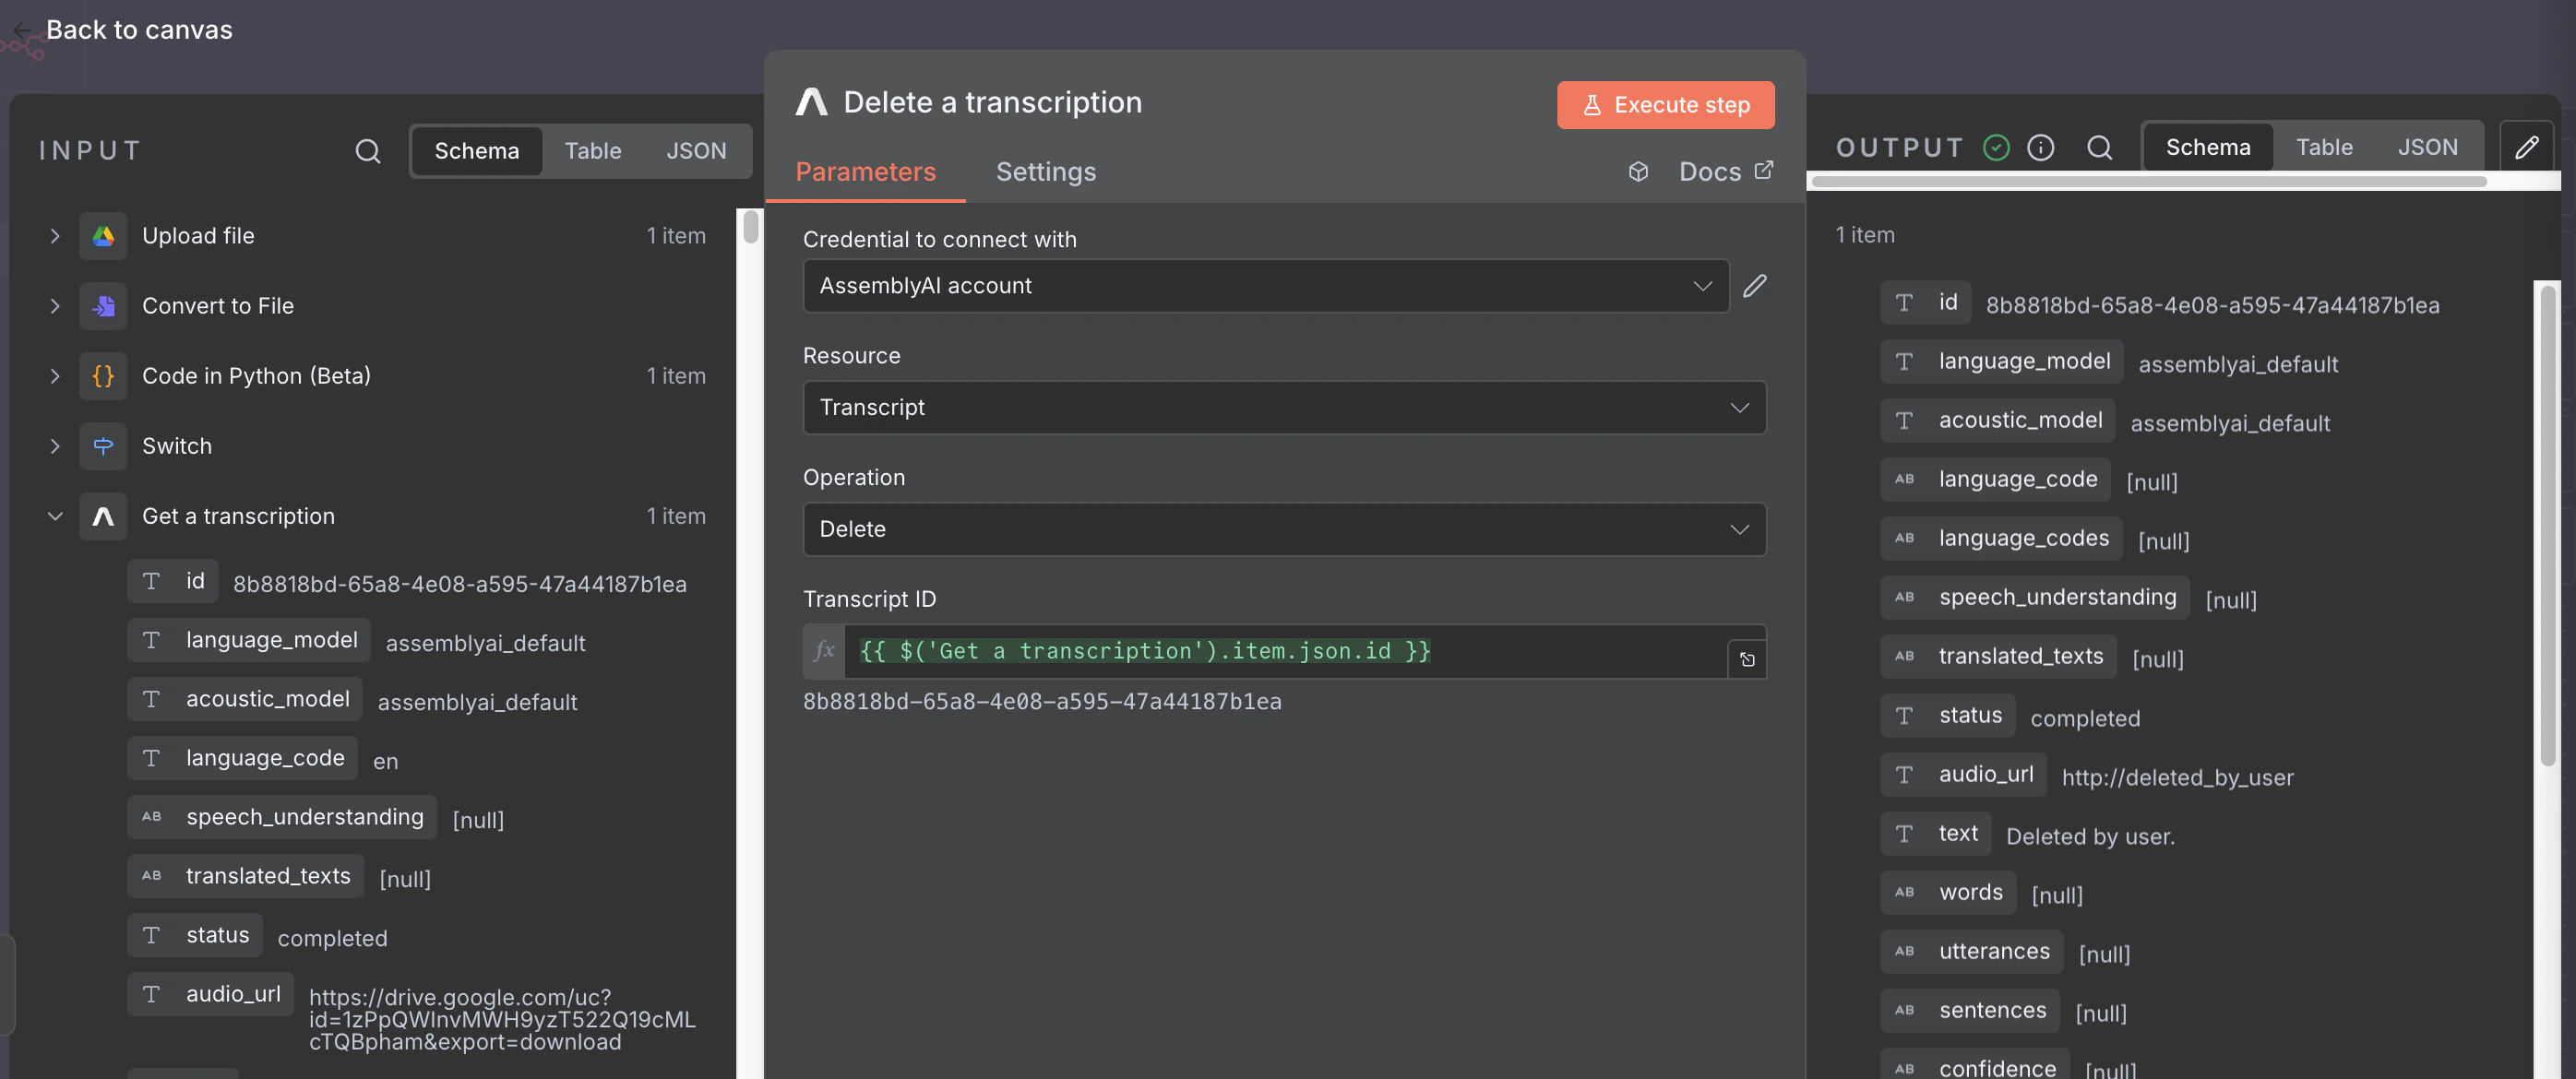
1
Add the transcription (delete) node
Add an AssemblyAI
Delete a transcription node at the end of your workflow.2
Configure the node
Configure the node parameters:
- Credential to connect with: Select your AssemblyAI Account credential
- Resource: Transcript
- Operation: Delete
- Transcript ID:
{{ $('Get a transcription').item.json.id }}- You can drag and drop the
idfield from theGet a transcriptionnode response into this field
- You can drag and drop the
Step 8: Deploy
Once the transcript has been deleted, the workflow is complete! At this point, it should look like this: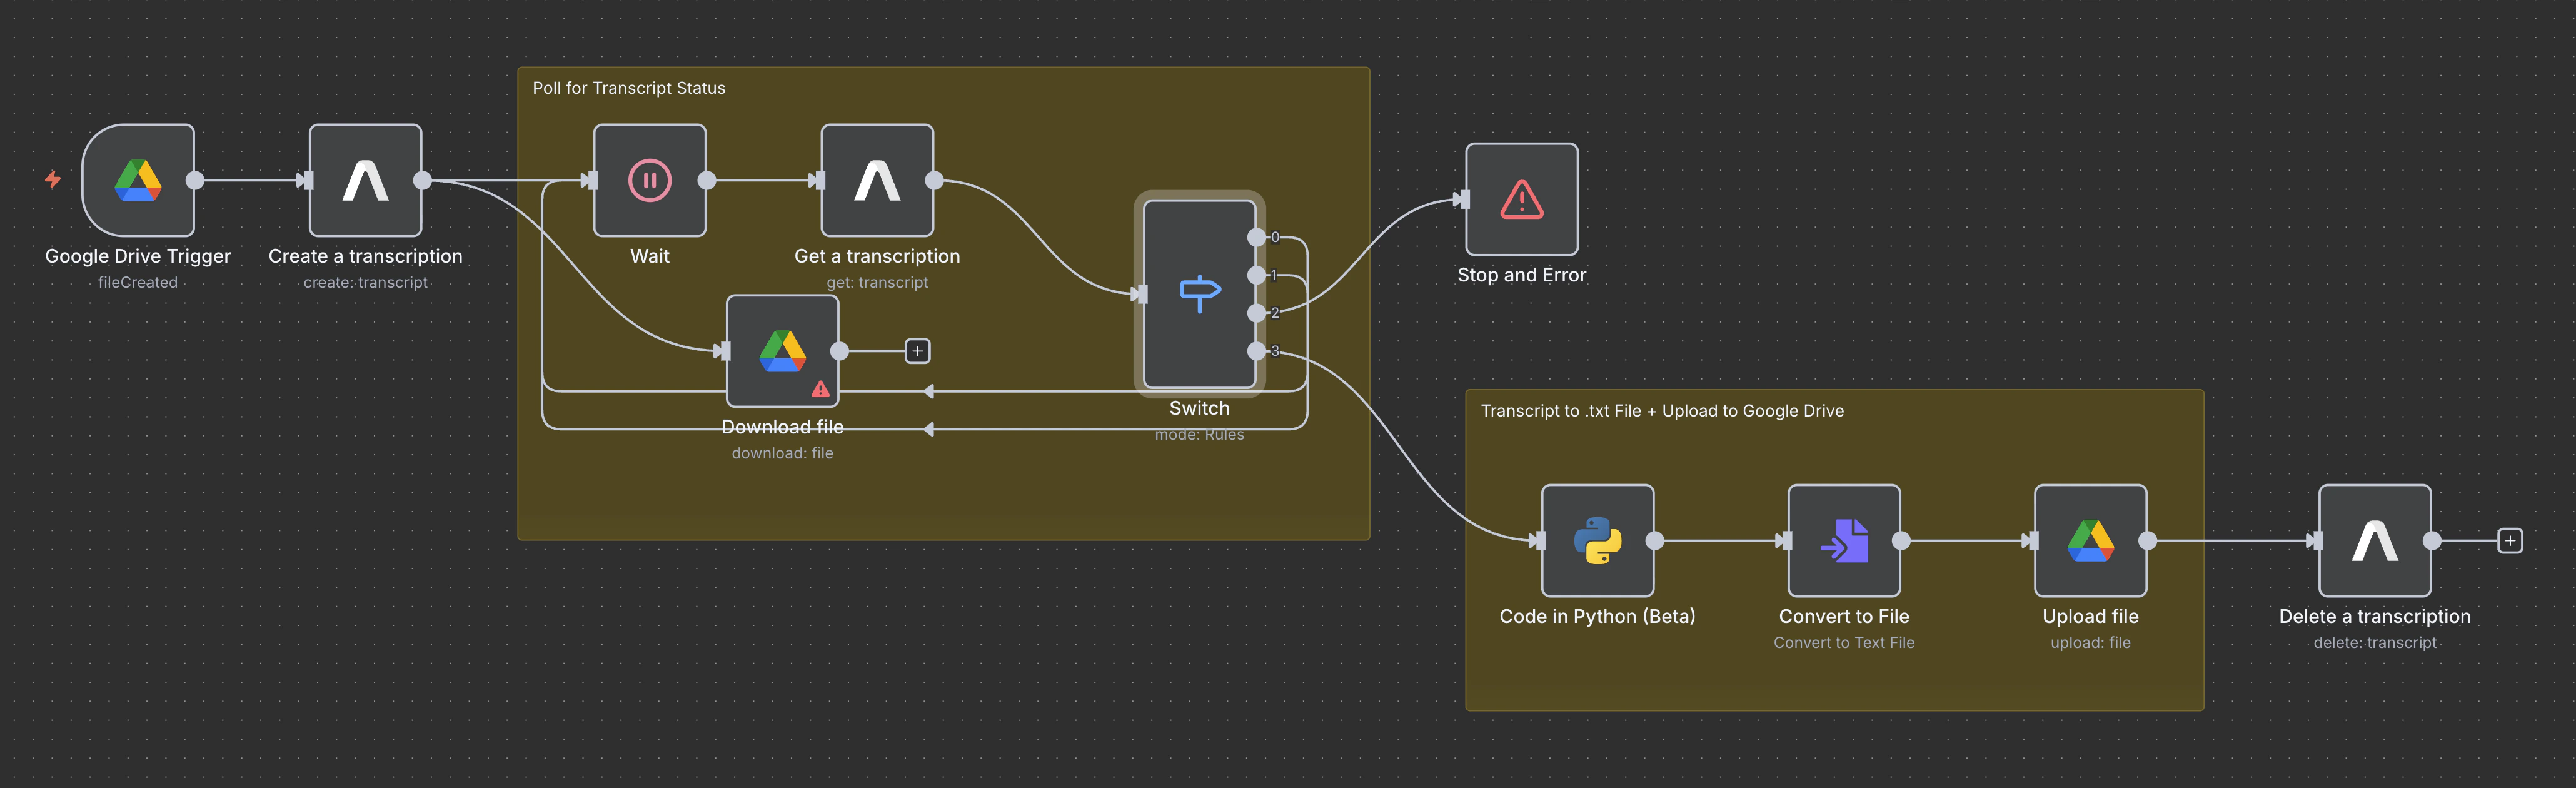
Active position.
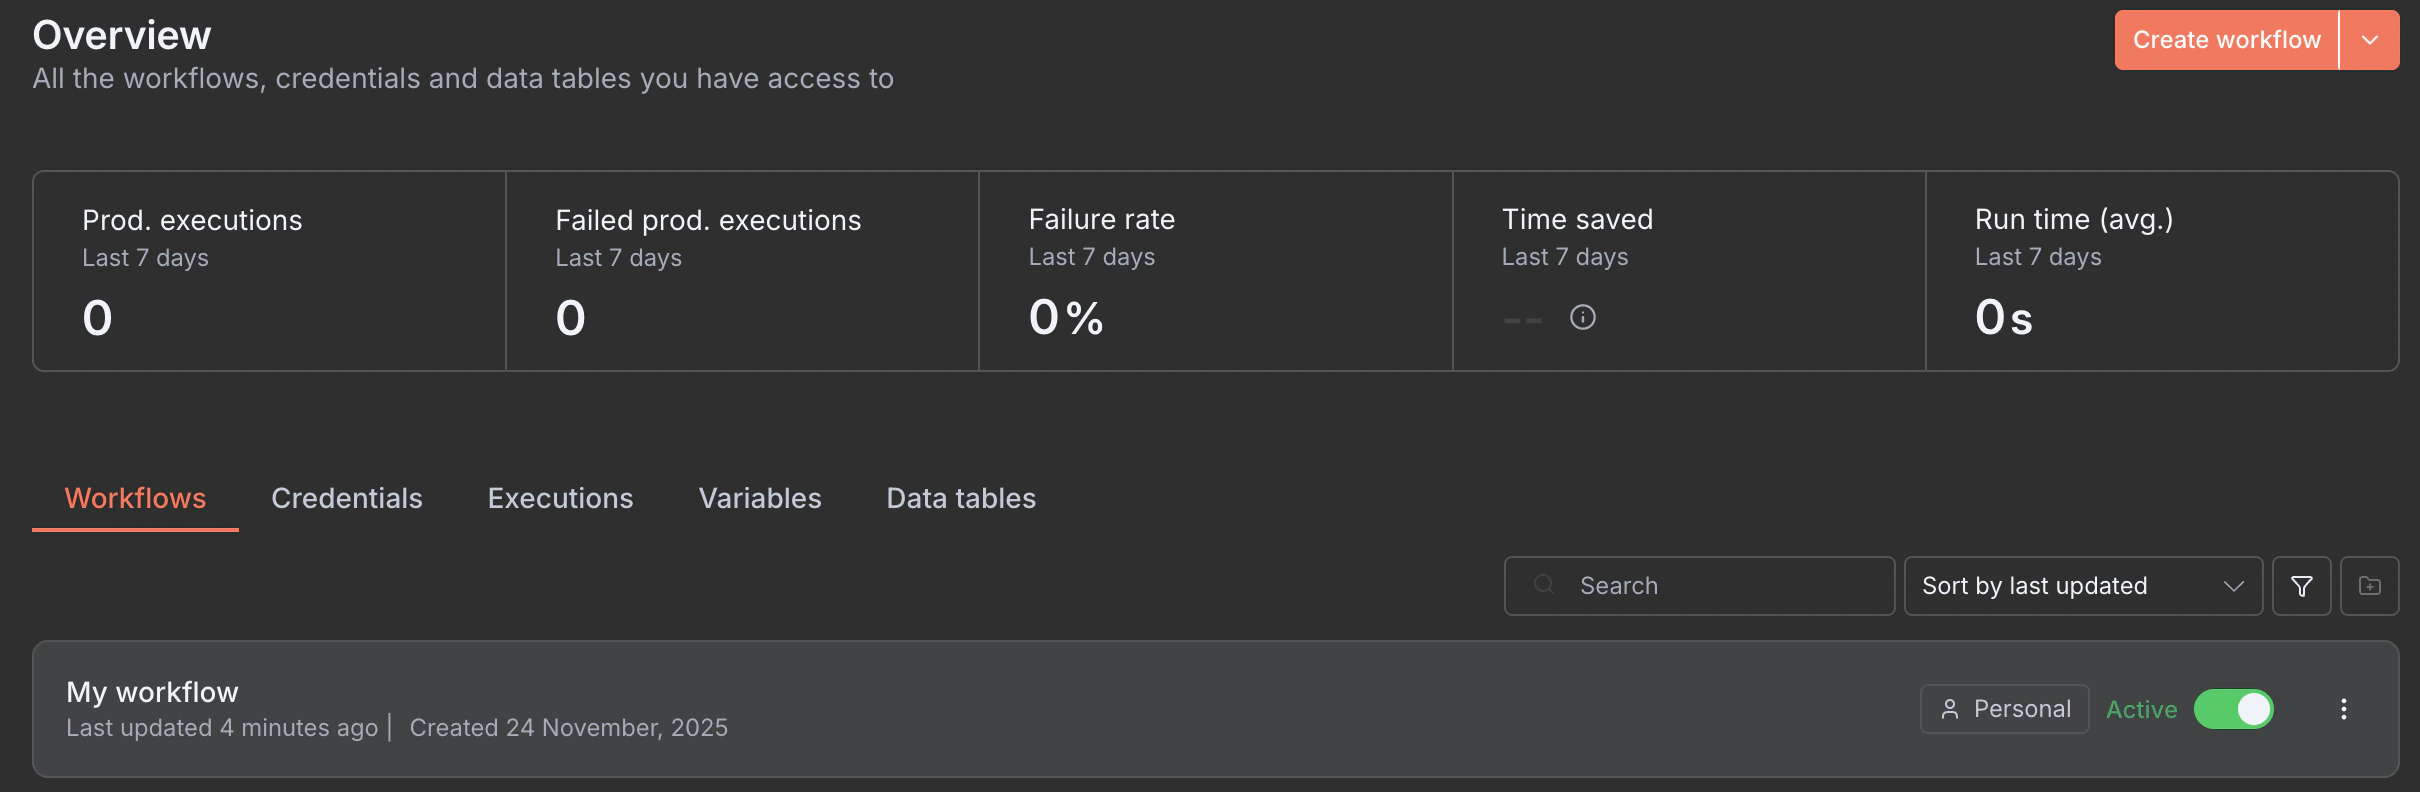
/audio_files in Google Drive, and within a few seconds to a few minutes (depending on the Poll Times set for the Google Drive trigger and the duration of the audio file), you should see the transcript appear in the /transcripts Google Drive folder.
Conclusion
In this tutorial, you built a complete AssemblyAI transcription workflow in n8n that automatically processes audio files from Google Drive, submits them to AssemblyAI for transcription, polls for completion, formats the transcript with speaker labels, saves the output back to Google Drive as a.txt file, and finally deletes the transcript from AssemblyAI’s servers.
This is just one simple idea, but the possibilities are endless! You can customize this workflow further by adding additional AssemblyAI features and products like sentiment analysis, entity detection, and LLM Gateway (see the “What can you do with AssemblyAI?” section of this page for all available actions), or by integrating with other services like Slack, OpenAI, Supabase, and the hundreds of other official n8n integrations.