In this tutorial, we'll learn how to perform Speech-to-Text in 5 minutes using Python and AssemblyAI's Speech-to-Text API. We provide a small library for transcribing both local and non-local files with just a few lines of code, and we also provide a breakdown of the library functions themselves for those who want to learn what's going on under the hood. Let's dive in!
Getting Started
To begin, we'll install Python's requests
package, which will allow us to communicate with the AssemblyAI API in order to submit files for transcription. Open a terminal and install it with the following command:
pip install requests
Next, we'll need to clone the project repository for this article, which contains all of the code we need. Either download the repository from GitHub, or use Git to clone it with the following terminal commands:
git clone https://github.com/AssemblyAI-Examples/assemblyai-and-python-in-5-minutes
cd assemblyai-and-python-in-5-minutes
Terminal Tip
You can paste these commands into the terminal by right clicking inside it.
How to Transcribe an Audio File with Python
Now we can get started transcribing an audio file, which can be stored either locally or non-locally. The project repository includes a sample audio file called audio.mp3
, which is the audio isolated from the AssemblyAI Product Overview video on our YouTube channel. If you instead have a specific audio file that you would like to transcribe, put it in the project folder now.
Get a Speech-to-Text API Key
To perform the transcription, we will be using AssemblyAI's free Speech-to-Text API. If you don't yet have an account, create one here. Log in to your account to see the Dashboard, which provides a snapshot of your account. All we'll need right now is your API key. Click the key under the Your API key section on the Dashboard to copy its value.

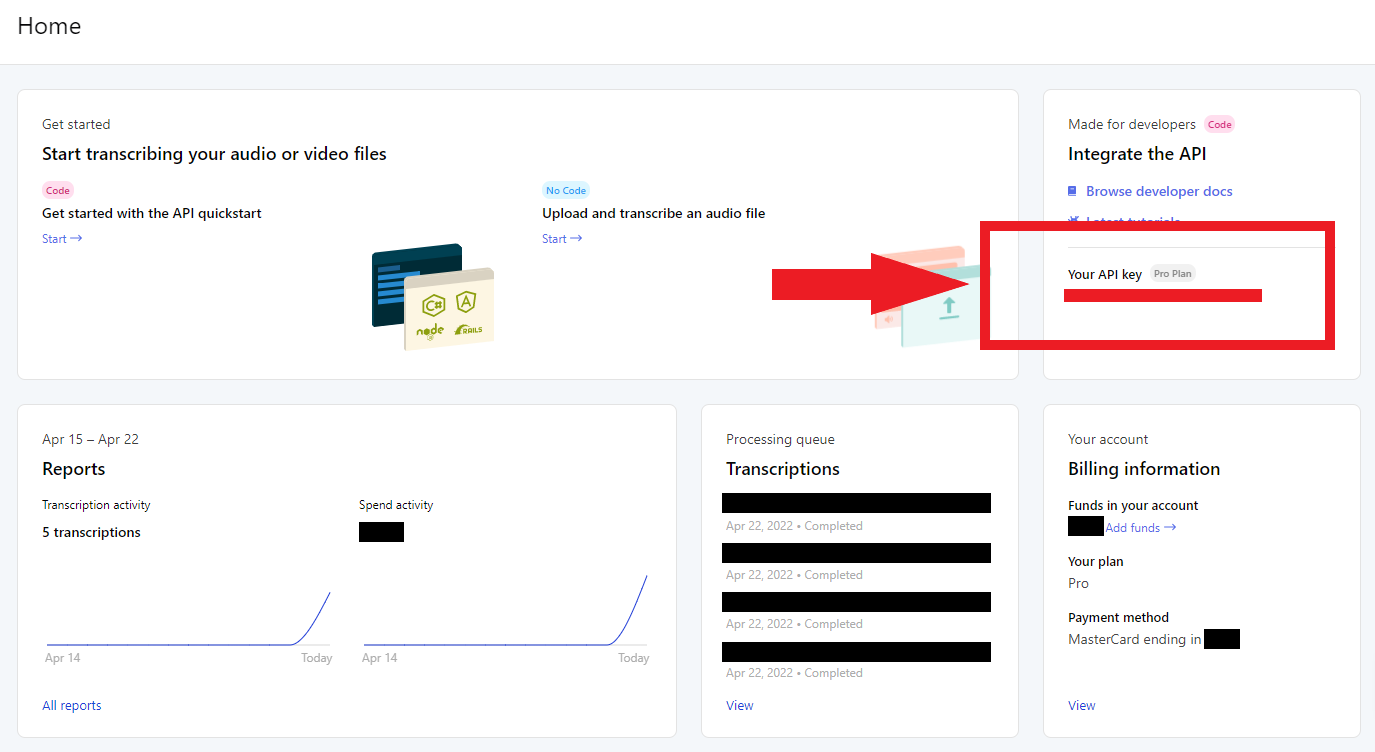
This API key is like a fingerprint associated to your account and lets the API know that you have permission to use it.
Important Note
Never share your API key with anyone or upload it to GitHub. Your key is uniquely associated with your account and should be kept secret.
Store your API Key
We want to avoid hard coding the API key for both security and convenience reasons. Hard coding the key value makes it easy to accidentally share it or upload it to GitHub, and repeatedly passing it as a command-line argument is cumbersome and tedious. To overcome these issues, we'll instead store the API key as an environment variable.
Back in the terminal, execute one of the following commands, depending on your operating system, replacing <YOUR_API_KEY>
with the value copied previously from the AssemblyAI Dashboard:
Windows
set AAI_API_KEY=<YOUR_API_KEY>
UNIX-like Systems
export AAI_API_KEY=<YOUR_API_KEY>
This variable only exists within the scope of the terminal process, so it will be lost upon closing the terminal. To persist this variable, set a permanent user environment variable.
Transcribe the Audio File
Now that the API key is saved as an environment variable, we can transcribe audio files with a single terminal command. Open a terminal within the project repository, and run the following command:
python transcribe.py <AUDIO-FILENAME-OR-URL> [--local]
replacing <AUDIO-FILENAME-OR-URL>
with the audio file's name if it is local or its URL if it is non-local. You can use the default local audio.mp3
file that comes with the repo for a local example, or you can try using the file's GitHub URL for a non-local example. Make sure to include the --local
flag if you are using a local file.
After executing the command simply wait a few moments and your transcription will appear in the console, as well as saved to a file called transcript.txt
. Larger audio files will take longer to process.

HTTPS Note
HTTPS must be used when communicating with the AssemblyAI API. Using e.g. an HTTP proxy will result in errors.
That's all it takes to transcribe a file using AssemblyAI's Speech-to-Text API! To learn more about what's going on under the hood, continue on to the next section.
Alternatively, check out our docs for more information on getting started with AssemblyAI or to learn more about our Audio Intelligence features. Feel free to also check out our blog or subscribe to our newsletter for content on Machine Learning in general.
Get a free API keyCode Breakdown
In the last section we used the transcribe.py
Python file to automatically generate a transcription of our audio file. Let's dig in to this Python file now to better understand what's happening behind the scenes.
As usual, the top of the file lists all necessary imports. We include:
-
argparse
, a native Python library that allows us to parse command-line arguments, os
, another native Python library that allows us to import the API key environment variable we just set, andutils
, which imports the small library of helper functions inutils.py
located within the project repository.
import argparse
import os
import utils
The following code within the main()
function contains all of the logic in transcribe.py
. First, the command-line arguments for transcribe.py
are defined and parsed. The two dashes in --local
and --api_key
indicate that these arguments are optional, and the action
keyword defines what should be done with these values in the case that they are provided.
parser = argparse.ArgumentParser()
parser.add_argument('audio_file', help='url to file or local audio filename')
parser.add_argument('--local', action='store_true', help='must be set if audio_file is a local filename')
parser.add_argument('--api_key', action='store', help='<YOUR-API-KEY>')
args = parser.parse_args()
Additional Details
- The two dashes in
--local
and--api_key
indicate that these arguments are optional action
defines what should be done with these optional arguments in the case that they are provided.--local
acts as a flag indicating that a local file is being passed for transcription (as opposed to a URL), and so we setargs.local=True
to indicate this in the event that--local
is passed.--api_key
provides an AssemblyAI API key in the event that theAAI_API_KEY
environment variable is not set, so we setargs.api_key
equal to the corresponding string that is passed in with the--api_key
argument- Finally,
help
provides help notes regarding the usage oftranscribe.py
. The help information can be seen by runningpython transcribe.py --help
in the terminal.
We leave the option for an API key to be passed as a command-line argument; but, if one is not passed, we want the program to default to the API key stored in the AAI_API_KEY
environment variable. We accomplish this with the below code, where we import AAI_API_KEY
and assign it to args.api_key
. If the environment variable was not set and the API key was not passed as a command-line argument, an error will be thrown.
if args.api_key is None:
args.api_key = os.getenv("AAI_API_KEY")
if args.api_key is None:
raise RuntimeError("AAI_API_KEY environment variable not set. Try setting it now, or passing in your API key as a command line argument with `--api_key`.")
Next, we need to create an HTTP Header, which will be sent along with our API requests. This header contains additional information about the request, in particular including the API key for authentication.
header = {
'authorization': args.api_key,
'content-type': 'application/json'
}
In order to submit a file for transcription, we will need to provide a URL at which the file can be located. If we want to transcribe a local file, we must first upload it to AssemblyAI to generate such a URL. We can do this with the provided utils.upload_file()
function. If we are providing transcribe.py
with a URL instead of a local file, we simply need to create a dictionary that stores this URL to achieve proper formatting for our transcription request. These steps are encapsulated in the below code block:
if args.local:
upload_url = utils.upload_file(args.audio_file, header)
else:
upload_url = {'upload_url': args.audio_file}
We are now prepared to submit our file for transcription, which we can do simply in one line with the provided utils.request_transcript()
function:
transcript_response = utils.request_transcript(upload_url, header)
Now that our file is submitted for transcription, we will need to wait in order for it to finish processing. In order to know when the transcription is complete, we need to create a polling endpoint, which we can use to check on the transcription status. We create the polling endpoint with the provided utils.make_polling_endpoint()
function:
polling_endpoint = utils.make_polling_endpoint(transcript_response)
Now that we have the polling endpoint, we have to actually use it to check in on the transcription. We do this with the provided utils.wait_for_completion()
function, which uses the polling endpoint to get an updated transcription status every 5 seconds. When a completed
transcription status is returned, the function will finish executing.
utils.wait_for_completion(polling_endpoint, header)
The transcription is finally complete, and we can fetch the paragraphs of the transcript with the provided utils.get_paragraphs()
function. This function returns a list containing the paragraphs of the transcript.
paragraphs = utils.get_paragraphs(polling_endpoint, header)
Now that we have the transcript paragraphs, all that's left to do is print them to the terminal and save them to a file called transcript.txt
:
with open('transcript.txt', 'w') as f:
for para in paragraphs:
print(para['text'] + '\n')
f.write(para['text'] + '\n')
All of the above logic is contained within the main()
function, so to conclude we simply execute the main()
function if transcribe.py
is called from the terminal:
if __name__ == '__main__':
main()
This is how transcriptions are generated with AssemblyAI at a high level. If you want a more detailed understanding, continue on to the next section to learn how the helper functions we used above work. Otherwise, if the above explanation is sufficient for your purposes, continue on to the final words.
Library Functions Breakdown
In this section we'll develop a deeper understanding of how transcriptions are generated by looking at utils.py
file, which provides the functionality for our above code.
Imports
As usual, we start with imports. We'll use requests
to execute our API requests to AssemblyAI, and we'll use time
to help use periodically check to see if our transcription is complete.
import requests
import time
Define Variables
Next, we define variables which specify the endpoints that we will use when sending requests to upload or transcribe an audio file.
upload_endpoint = "https://api.assemblyai.com/v2/upload"
transcript_endpoint = "https://api.assemblyai.com/v2/transcript"
Upload an Audio File
The upload_file()
function uploads a local audio file to AssemblyAI in order to generate a URL that can be passed during a transcription request. First, we execute a POST request to the upload_endpoint
that we defined at the beginning of the file, including the audio file to be uploaded and an appropriate header. We return a dictionary which stores the URL under the upload_url
key.
def upload_file(audio_file, header):
upload_response = requests.post(
upload_endpoint,
headers=header, data=_read_file(audio_file)
)
return upload_response.json()
The _read_file()
helper function creates a generator that reads the data stored within the audio file.
def _read_file(filename, chunk_size=5242880):
with open(filename, "rb") as _file:
while True:
data = _file.read(chunk_size)
if not data:
break
yield data
Request a Transcript
The request_transcript()
function submits an audio file to AssemblyAI for transcription. The function simply performs a POST request with the audio upload URL to the transcript_endpoint
that we specified at the beginning of the file and then returns the response.
def request_transcript(upload_url, header):
transcript_request = {
'audio_url': upload_url['upload_url']
}
transcript_response = requests.post(
transcript_endpoint,
json=transcript_request,
headers=header
)
return transcript_response.json()
Wait for the Transcription to Finish
Now that the audio file is submitted for transcription, we need a way to periodically check in on it to see if it is complete. To perform this check, we need to utilize the polling endpoint for this specific transcription. The polling endpoint provides us with the current status of the transcription with each GET request, returning either queued
, processing
, completed
, or error
. We define this endpoint with make_polling_endpoint()
.
def make_polling_endpoint(transcript_response):
polling_endpoint = "https://api.assemblyai.com/v2/transcript/"
polling_endpoint += transcript_response['id']
return polling_endpoint
After we create the polling endpoint, we need to use it to periodically check whether or not the transcription has completed. We use the wait_for_completion()
function for this, which simply checks the status of the transcription every 5 seconds with a GET request until it is completed
.
def wait_for_completion(polling_endpoint, header):
while True:
polling_response = requests.get(polling_endpoint, headers=header)
polling_response = polling_response.json()
if polling_response['status'] == 'completed':
break
time.sleep(5)
Return the Transcript Paragraphs
There is a lot of information that the AssemblyAI API can return, including Audio Intelligence insight into your audio like Sentiment Analysis and Speaker Diarization. Even with just simple transcription, the API still returns a lot of useful extra information like starting and ending times for each paragraph, and confidence level of the transcription.
We use the get_paragraphs()
function to isolate just the paragraphs of the transcription, storing them in a list. The function performs a GET request and then isolates just the paragraph text within the response.
def get_paragraphs(polling_endpoint, header):
paragraphs_response = requests.get(polling_endpoint + "/paragraphs", headers=header)
paragraphs_response = paragraphs_response.json()
paragraphs = []
for para in paragraphs_response['paragraphs']:
paragraphs.append(para)
return paragraphs
After returning the paragraphs, we can print them with empty lines in between to achieve a highly readable transcription of our audio file.

Final Words
That's all it takes to transcribe an audio file with AssemblyAI! To learn about using more advanced features of the AssemblyAI API, check out the docs. If you're interested in more Machine Learning content, consider checking out the rest of our blog and following to our newsletter. If you prefer visual content, check out our YouTube channel.
Follow the AssemblyAI Newsletter