MediaPipe for Dummies
With just a few lines of code, MediaPipe allows you to incorporate State-of-the-Art Machine Learning capabilities into your applications. Learn about MediaPipe and how to use its simple APIs in this beginner's guide.


A wide range of potential Machine Learning applications today rely on several fundamental baseline Machine Learning tasks. For example, both gestural navigation and sign language detectors rely on the ability of a program to identify and track human hands. Given that building something like a hand tracking model is time-consuming and resource-intensive, a developmental bottleneck exists in the creation of all applications that rely on hand tracking. To address this problem, Google invented MediaPipe.

MediaPipe provides cornerstone Machine Learning models for common tasks like hand tracking, therefore removing the same developmental bottleneck that exists for a host of Machine Learning applications. These models, along with their excessively easy-to-use APIs, in turn streamline the development process and reduce project lifetime for many applications that rely on Computer Vision.
In this tutorial, we'll learn how to use some of MediaPipe's Python APIs to accomplish foundational Computer Vision tasks in just a few lines of code, including facial tracking and pose extraction. We'll even see how this data can be used to power tools like facial motion capture in Blender! Let's dive in.
Facial motion capture data in the Blender 3D animation software
Introduction
MediaPipe is a project by Google that offers "open-source, cross-platform, customizable ML solutions for live and streaming media". In other words, MediaPipe provides access to a wide variety of powerful Machine Learning models built with the hardware limitations of mobile devices in mind. These models include:
- Anatomical Models
- Hand Tracking
- Pose Tracking
- Facial Mesh Tracking
- Holstic Tracking (above 3 combined)
- Segmentation Models
- Seflie Segmentation
- Hair Segmentation
- Object Models
- 2D Object Detection/Tracking
- 3D Object Detection and Pose Estimation
Let's take a look at how to employ some of these APIs in Python now!
Getting Started
Before we can get to working with MediaPipe itself, we'll need to perform some preliminary installations / imports. If you just want to follow along without having to do this, you can instead open up this Colab notebook and move on to the next section.
Installations
MediaPipe is available for C++, Android, and more; but, in this tutorial, we will be working only with Python. To install MediaPipe for Python, simply pip install it to your desired environment:
pip install mediapipeIf you wish to follow along with this tutorial exactly, you can skip the above step of installing MediaPipe directly and instead pip install from the requirements file in the associated GitHub. To do this, navigate into the directory in which you would like to clone the project folder and execute the following commands in a command prompt/terminal:
Windows
git clone https://github.com/AssemblyAI-Examples/mediapipe-python.git
cd mediapipe-python
python3 -m venv mp_env
mp_env\Scripts\activate.bat
pip install -r requirements.txt
UNIX-like systems
git clone https://github.com/AssemblyAI-Examples/mediapipe-python.git
cd mediapipe-python
python3 -m venv mp_env
source mp_env/bin/activate
pip install -r requirements.txt
Then, open up the notebook.ipynb Jupyter notebook to follow along with the code, (note that the mp_env virtual environment will need to be added to Jupyter as a kernel).
Imports
Next, we finish the setup with some Python imports and variable declarations:
import cv2
import mediapipe as mp
import urllib.request
import numpy as np
import pickle
import matplotlib as mpl
import matplotlib.pyplot as plt
from matplotlib import animation
import PyQt5
from PIL import Image
from IPython.display import Video
import nb_helpers

mp_drawing = mp.solutions.drawing_utils
mp_drawing_styles = mp.solutions.drawing_styles
mp_holistic = mp.solutions.holistic
mp_pose = mp.solutions.pose
mp_face_mesh = mp.solutions.face_mesh
Face Mesh and Motion Capture with MediaPipe
To begin working with MediaPipe, we'll first explore its Face Mesh API and see how it is used as a backend to power applications like facial motion capture in Blender.
Image Fetching
First, fetch the image with the following command:
face_url = "https://1vw4gb3u6ymm1ev2sp2nlcxf-wpengine.netdna-ssl.com/wp-content/uploads/shutterstock_149962697-946x658.jpg"
urllib.request.urlretrieve(face_url, "face_image.jpg")

img = Image.open('face_image.jpg')
display(img)
This will download the below image as face_image.jpg
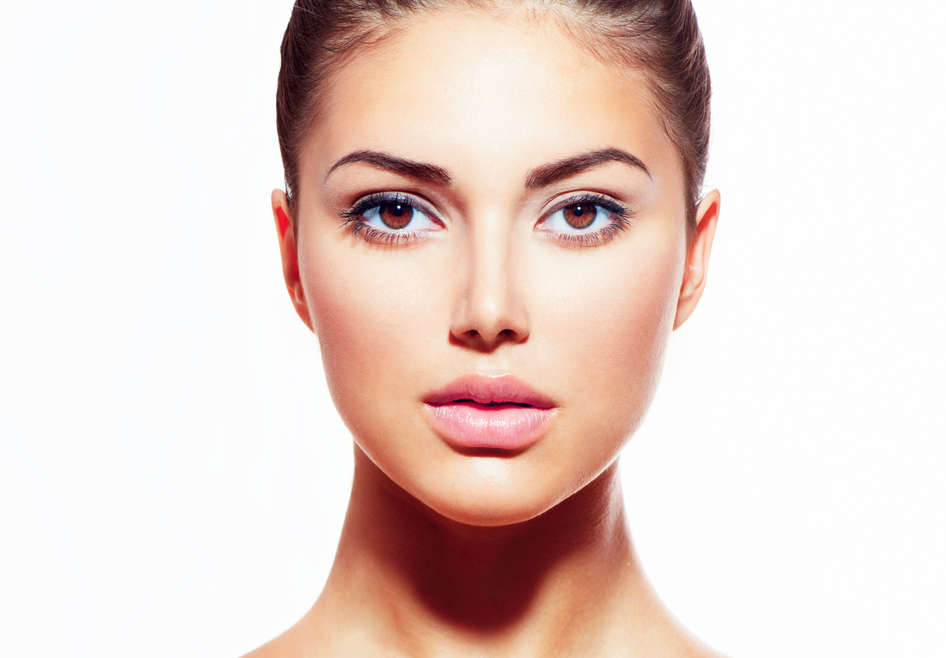
Let's see how we can use MediaPipe to analyze this image!
Face Mesh Processing
We'll use MediaPipe's FaceMesh object to extract a 3D mesh corresponding to the surface of the face in the image.
# Define image filename and drawing specifications
file = 'face_image.jpg'
drawing_spec = mp_drawing.DrawingSpec(thickness=1, circle_radius=1)

# Create a face mesh object
with mp_face_mesh.FaceMesh(
        static_image_mode=True,
        max_num_faces=1,
        refine_landmarks=True,
        min_detection_confidence=0.5) as face_mesh:

    # Read image file with cv2 and process with face_mesh
    image = cv2.imread(file)
    results = face_mesh.process(cv2.cvtColor(image, cv2.COLOR_BGR2RGB))

# Define boolean corresponding to whether or not a face was detected in the image
face_found = bool(results.multi_face_landmarks)Note that the below line is where the magic happens:
results = face_mesh.process(cv2.cvtColor(image, cv2.COLOR_BGR2RGB))All processing is performed with one simple line. After processing, we have highly accurate results that did not require any data gathering, data preparation, model definition, model tuning, model testing, etc. This is the value of MediaPipe - it provides easy access to several very powerful Machine Learning models that produce easy-to-parse results. Let's take a look at what we can do with these results now.
Drawing Face Mesh Tessellation
We can use MediaPipe's drawing utilities to visualize our results on top of our images.
if face_found:
    # Create a copy of the image
    annotated_image = image.copy()

    # Draw landmarks on face
    mp_drawing.draw_landmarks(
        image=annotated_image,
        landmark_list=results.multi_face_landmarks[0],
        connections=mp_face_mesh.FACEMESH_TESSELATION,
        landmark_drawing_spec=None,
        connection_drawing_spec=mp_drawing_styles
            .get_default_face_mesh_tesselation_style())

    # Save image
    cv2.imwrite('face_tesselation_only.png', annotated_image)

# Open image
img = Image.open('face_tesselation_only.png')
display(img)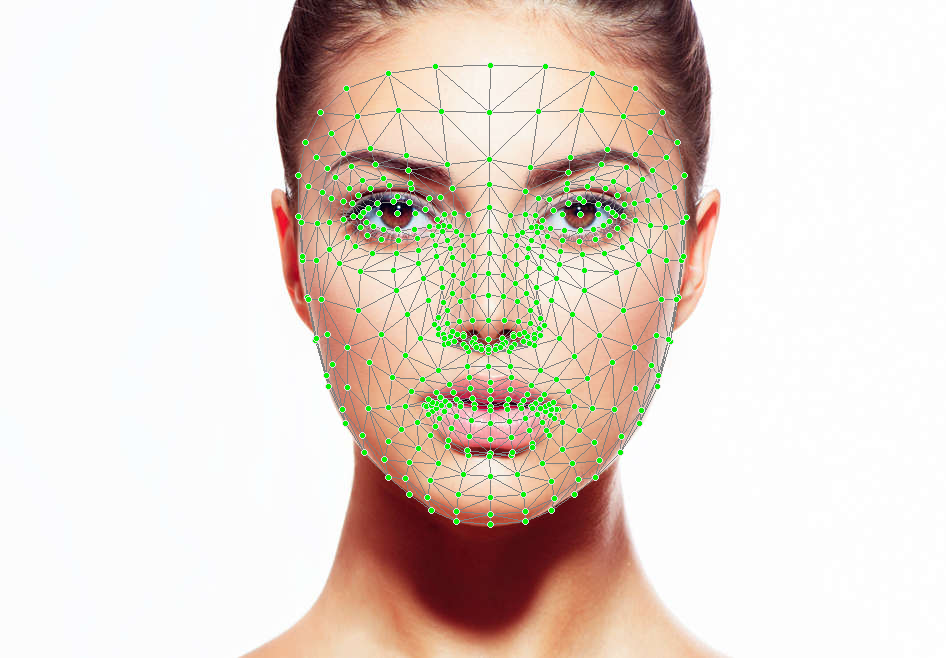
Drawing Face Mesh Contours and Irises
Our results object does not contain only the facial tesselation information. The contours and irises of the face are also identified and can be drawn on separately. Let's drawn both on the original image now:
if face_found:
    # Create a copy of the image
    annotated_image = image.copy()

    # For each face in the image (only one in this case)
    for face_landmarks in results.multi_face_landmarks:

        # Draw the facial contours of the face onto the image
        mp_drawing.draw_landmarks(
            image=annotated_image,
            landmark_list=face_landmarks,
            connections=mp_face_mesh.FACEMESH_CONTOURS,
            landmark_drawing_spec=None,
            connection_drawing_spec=mp_drawing_styles
                .get_default_face_mesh_contours_style())

        # Draw the iris location boxes of the face onto the image
        mp_drawing.draw_landmarks(
            image=annotated_image,
            landmark_list=face_landmarks,
            connections=mp_face_mesh.FACEMESH_IRISES,
            landmark_drawing_spec=None,
            connection_drawing_spec=mp_drawing_styles
                .get_default_face_mesh_iris_connections_style())

	# Save the image
    cv2.imwrite('face_contours_and_irises.png', annotated_image)
The details of this code are very similar to the tessellation code above, so see the "Additional Details" dropdown in the section above to learn more.

Face Mesh Motion Capture with Blender
Simply drawing our results onto the image is all well and good, but what if we want to actually do something with this data. In addition to processing images, MediaPipe can also process videos to acquire time-sequential XYZ spatial facial mesh data. We can then export this data, effectively can using MediaPipe as a "backend" to compute motion capture data. BlendArMocap, an open-source project for the Blender 3D graphics and animation software, does exactly this.
Here are several views of 3D facial mesh data imported into Blender using BlendArMocap:
Facial tracking data imported into Blender
This data can be used to drive a "rig", which defines (in this case) a humanoid anatomy. From here, a character model can be mapped onto the rig in order to animate a character model in 3D.
Blender rig driver by MediaPipe facial tracking data
It is difficult to overstate how impressive this process is - a sequence of 2D image data, which is simply many arrays of RGB values, is processed and a human face is automatically recognized. Salient features of the face are then identified and tracked through time, extracting 3D data at each frame. The data is then used to animate character movements for potentially photo-realistic rendering that can incorporate ray-tracking, VFX, etc.
This entire process is powered by MediaPipe and OpenCV.
While using open-source tools like BlendArMocap is great, some users may want to process videos and work with raw data for their own purposes. Let's check out how to do this now:
Pose Detection and Segmentation with MediaPipe
MediaPipe's Pose Detection is similar to Face Mesh except for the fact that it, unsurprisingly, identifies human poses rather than faces. Let's explore this capability now.
Pose Processing and Drawing
First, as before we download the image we will be using for processing:
img_url = "https://static.turbosquid.com/Preview/2015/11/10__11_56_36/anthonystanding23dmetry3dhuman01.jpg5e774d4d-9b9e-456d-9d7b-fc4d741cf940Large.jpg"
urllib.request.urlretrieve(img_url, "pose.jpg")

img = Image.open('pose.jpg')
display(img)
We can again process this image with a MediaPipe object, this time using a Pose instance, and draw the detected pose on the image. The details of this step are effectively isomorphic to the Face Mesh case, so see the above section for a more in-depth explanation.
# Specify the image filename
file = 'pose.jpg'

# Create a MediaPipe `Pose` object
with mp_pose.Pose(static_image_mode=True,
		  model_complexity=2,
                  enable_segmentation=True) as pose:

    # Read the file in and get dims
    image = cv2.imread(file)

    # Convert the BGR image to RGB and then process with the `Pose` object.
    results = pose.process(cv2.cvtColor(image, cv2.COLOR_BGR2RGB))

# Copy the iamge
annotated_image = image.copy()

# Draw pose, left and right hands, and face landmarks on the image with drawing specification defaults.
mp_drawing.draw_landmarks(annotated_image,
                          results.pose_landmarks,
                          mp_pose.POSE_CONNECTIONS,
                          landmark_drawing_spec=mp_drawing_styles.get_default_pose_landmarks_style())

# Save image with drawing
filename = "pose_wireframe.png"
cv2.imwrite(filename, annotated_image)

# Open image
display(Image.open(filename))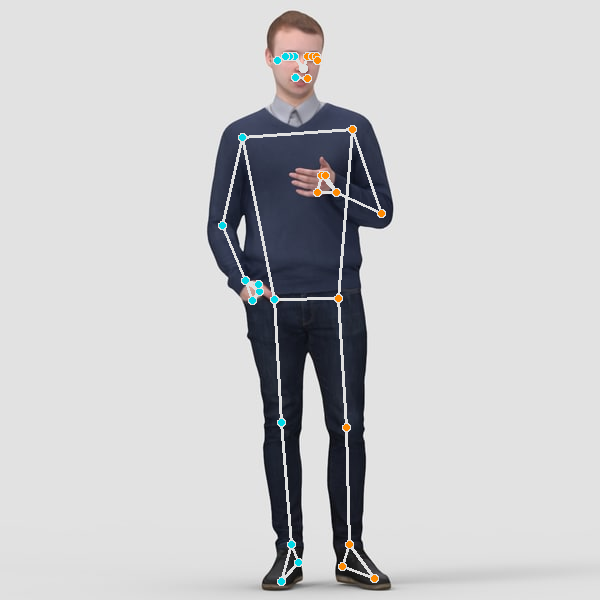
Image Segmentation
Included in our results is the information required to segment our image. Each pixel of the image is given a probability of being within the object whose pose has been identified. We simply need to set a probability threshold and isolate all pixels that are above this threshold to isolate the human. Let's do this now - we'll replace the background with a green screen.
# Copy the image
segmented_image = image.copy()

# Probability threshold in [0, 1] that says how "tight" to make the segmentation. Greater value => tighter.
tightness = .3

# Stack the segmentation mask for 3 RGB channels, and then create a filter for which pixels to keep
condition = np.stack((results.segmentation_mask,) * 3, axis=-1) > tightness

# Creates a black background image
bg_image = np.zeros(image.shape, dtype=np.uint8)

# Can change the color of this background by specifying (0-255) RGB values. We choose green-screen green.
bg_image[:] = [4, 244, 4]

# For every pixel location, display the corresponding pixel from the original imgae if the condition in our filter is met (i.e. the probability of being part of the object is above the inclusiogn threshold), or else display corresponding pixel from the background array (i.e. green)
segmented_image = np.where(condition, segmented_image, bg_image)

filename = "pose_green_screen.png"
cv2.imwrite(filename, segmented_image)
display(Image.open(filename))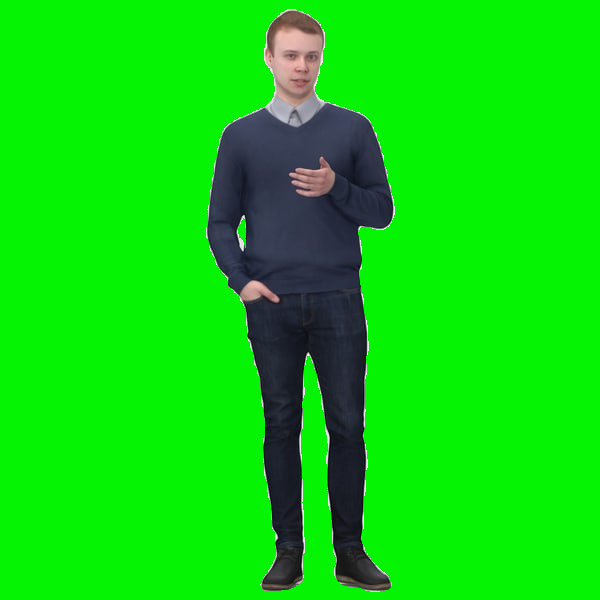
Exporting Raw Data from MediaPipe
Exporting the raw XYZ data from MediaPipe is very easy, but we'll need some additional information to plot the data in a comprehensible way.
In particular, it is important to understand that MediaPipe stores landmarks in a consistently ordered way. That is, mp.solutions.pose.PoseLandmark specifies which XYZ coordinates in results.pose_landmarks (the output after processing an image) correspond to which body landmark (nose, right elbow, etc.). Note that the order of the body landmarks in this list is arbitrary but consistent within MediaPipe from run-to-run. You can access a more readable version of the ordered list of anatomical landmarks with nb_helpers.poselandmarks_list.
MediaPipe's POSE_CONNECTIONS object is a frozen set that contains tuples defining how these landmarks map to each other. For example, the tuple (0, 4) is in POSE_CONNECTIONS, indicating that the zeroth and fourth spatial points in results.pose_landmarks connect with each other (corresponding to "NOSE" and the "LEFT_OUTER_EYE" in mp.solutions.pose.PoseLandmark - the zeroth and fourth body landmarks respectively). Let's print out a few of these connections to make this idea concrete:
poselandmarks_list = nb_helpers.poselandmarks_list

num = 0
for i in mp_holistic.POSE_CONNECTIONS:
    if num < 5:
        print(poselandmarks_list[i[0]], '-->', poselandmarks_list[i[1]])
    else:
        break
    num += 1
LEFT_WRIST --> LEFT_THUMB
RIGHT_WRIST --> RIGHT_INDEX
RIGHT_PINKY --> RIGHT_INDEX
LEFT_EYE_OUTER --> LEFT_EAR
RIGHT_ELBOW --> RIGHT_WRISTThis point having been understood, we are ready to handle the raw MediaPipe spatial data. Let's save the above pose data as a NumPy array and then display it
# Create a 3x33 array to store XYZ data for 33 landmarks
data = np.empty((3, len(mp_holistic.PoseLandmark)))

# Store the XYZ data for each landmark
landmarks = results.pose_world_landmarks.landmark
for i in range(len(mp_holistic.PoseLandmark)):
    data[:, i] = (landmarks[i].x, landmarks[i].y, landmarks[i].z)

# Plot the data
fig = plt.figure()
fig.set_size_inches(5, 5, True)
ax = fig.add_subplot(projection='3d')

nb_helpers.plot_data(data, ax)
nb_helpers.scale_axes(ax)

# Save a rotation animation of the data
filename = 'pose_rotation.mp4'
nb_helpers.rotate_and_save(fig, ax, filename, save=True)We see that we have successfully plotted the raw MediaPipe spatial data and created an animation to observe it. You can save the data NumPy array in whatever export format is required by your downstream task.
Working with Video Data in MediaPipe
The last aspect of MediaPipe that we will look at in-depth is working with video data. We will work with saved video files in particular, but the same principles apply to real-time camera data.
We will use MediaPipe to extract time-sequential poses of a man walking:
# Download the necessary video
url = 'https://github.com/AssemblyAI-Examples/mediapipe-python/blob/main/walking.mp4?raw=true'
urllib.request.urlretrieve(url, 'walking.mp4')

# Specify the video filename and create a `Pose` object as before
file = 'walking.mp4'
with mp_pose.Pose(min_detection_confidence=0.5, min_tracking_confidence=0.5) as pose:

	# Create VideoCapture object
    cap = cv2.VideoCapture(file)

	# Raise error if file cannot be opened
    if cap.isOpened() == False:
        print("Error opening video stream or file")
        raise TypeError

	# Get the number of frames in the video
    length = int(cap.get(cv2.CAP_PROP_FRAME_COUNT))

    # Create a NumPy array to store the pose data as before
    # The shape is 3x33x144 - 3D XYZ data for 33 landmarks across 144 frames
    data = np.empty((3, len(poselandmarks_list), length))

	# For each image in the video, extract the spatial pose data and save it in the appropriate spot in the `data` array
    frame_num = 0
    while cap.isOpened():
        ret, image = cap.read()
        if not ret:
            break

        image = cv2.cvtColor(cv2.flip(image, 1), cv2.COLOR_BGR2RGB)
        results = pose.process(image)

        landmarks = results.pose_world_landmarks.landmark
        for i in range(len(mp_pose.PoseLandmark)):
            data[:, i, frame_num] = (landmarks[i].x, landmarks[i].y, landmarks[i].z)

        frame_num += 1

    # Close the video file
    cap.release()
The shape of the data is (3, 33, 144) - 3-dimensional XYZ data for 33 anatomical locations across 144 frames. Again, we plot the data and animate it, except in this instance we animate over time with another helper function. We also plot the original video. Note that the plotted data looks mirrored - this is because the pose detection works on images that were captured by a video frame,
fig = plt.figure()
fig.set_size_inches(5, 5, True)
ax = fig.add_subplot(projection='3d')

anim = nb_helpers.time_animate(data, fig, ax)

# Save
anim.save('walking_wireframe.mp4', fps=30, extra_args=['-vcodec', 'libx264'], dpi=300)
More MediaPipe Solutions for Python
So far, we have viewed the Face Mesh and Pose Detection features of MediaPipe using Python. We've seen how we can directly use MediaPipe by displaying landmarks on images or encapsulating spatial data it in a NumPy array, or how we can indirectly use MediaPipe through tools built on top of it, such as using BlendArMocap to transfer motion capture data to Blender. While we have only explored two MediaPipe solutions, it has many more up its sleeve.
Face Detection
If your application does not require face meshes but only face detection, you can use MediaPipe Face Detection. This solution can identify faces and return 6 landmarks in a fraction of the time of Face Mesh. It even works for multiple faces! If you need low-latency face detection, this is the solution for you.
Hand Tracking
While MediaPipe Pose provides only a crude model of the hand with two landmarks simply to measure orientation, MediaPipe Hands offers a much more detailed model of the hand. Hands identifies twenty-one 3D landmarks, and even works for multiple hands. There are a huge number of applications for this solution, including accessibility solutions like Sign Language Recognition.
Holistic Tracking
MediaPipe Holistic is the heaviest anatomical MediaPipe model, combining Hands, Pose, and Face Mesh into one solution. While certainly not a lightweight solution, Holistic provides a highly detailed snapshot of a person at a given time. Just as before with Face Mesh, Holistic could be used for low-cost motion capture.
Below you see a full-body rig animated via BlendArMocap. I can barely be considered a beginner at Blender and therefore did not have the skill to smoothen the body animations sufficiently. Even with this, the head/face movements and especially hand movements look extremely natural and are impressive results for working only on a laptop with a simple webcam.
As mentioned above, you can ultimately use this 2D video data to drive a 3D character model. This is what the results look like for someone with 4 cumulative hours of experience using Blender working on a laptop:
While certainly not perfect, the results are serviceable as a baseline for refinement. The leg tracking in MediaPipe can be finicky as you may have noticed from the above example of extracting pose information from the video of the walking man. The resulting error propagates through the model, so focusing on solving this problem is a good starting point for those interested in taking the concept further. Note that BlendArMocap is an open-source project, so improvements of this kind can be explored can be made (although the real power ultimately stems from MediaPipe is therefore bottlenecked by MediaPipe/hardware).
Selfie Segmentation
MediaPipe Selfie Segmentation segments the foremost human in an image/video, allowing for virtual backgrounds like the one seen below or the ones in Zoom. This solution works both on smartphones and laptops.
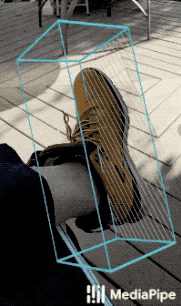
Objectron
MediaPipe Objectron is a real-time 3D object detection solution that works on everyday objects and can be run on mobile platforms. Objectron both detects objects and estimates their poses.
Non-Python MediaPipe Solutions
As mentioned previously, MediaPipe has a host of other solutions with varying availability across Android, iOS, C++, JavaScript, and Coral.
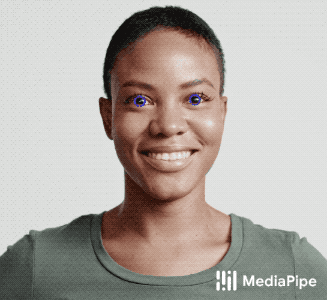
Iris
MediaPipe Iris is a solution for accurate iris estimation, and is able to track iris, pupil, and eye contour landmarks with just a camera. This task is generally difficult due to variable light conditions and occlusions, especially in a limited-compute environment like a smartphone. MediaPipe Iris offers a solution that overcomes these hurdles.
Hair Segmentation
MediaPipe Hair Segmentation is just like Selfie Segmentation, except it segments only a person's hair. Such a solution can be used to power augmented reality applications such as SnapChat Lens.
Object Detection
MediaPipe Object Detection is similar to Objectron, except for the face that it does not do pose estimation and instead identifies only bounding boxes. This solution is more lightweight and is therefore preferred for applications where object pose is not required.
Box Tracking
MediaPipe Box Tracking is similar to object detection, except it provides much more robust bounding box capabilities. Box Tracking records bounding boxes with time stamps.
Instant Motion Tracking
MediaPipe Instant Motion Tracking is valuable for augmented reality applications, and the uses for low-cost VFX are immediately obvious. Motion Tracking is actually built on top of Box Tracking.
KNIFT
MediaPipe KNIFT, or Keypoint Neural Invariant Feature Transform, is a template-based solution for feature matching. Being able to understand spatial relationships from different perspectives is a difficult problem and lies at the foundation of a wide variety of applications. KNIFT is a general-purpose solution for this problem, and is robust to changes in illumination, orientation, and scaling.

AutoFlip
AutoFlip is a simple solution that allows for the smart cropping of videos to arbitrary aspect ratios.
Final Words
MediaPipe is a very powerful tool that can facilitate the development of apps built on a number of Machine Learning capabilities. MediaPipe's exceedingly simple API provides access to several State-of-the-Art (SOTA) models built specifically with the hardware limitations of mobile computing in mind.
While MediaPipe provides many great solutions for Computer Vision and Visual Intelligence, there are many applications today that rely instead on Audio Intelligence. AssemblyAI's easy-to-use APIs provide access to a range of SOTA models for Audio Intelligence, just as MediaPipe provides access to SOTA Visual Intelligence models. Grab an API token below for free access to a host of Audio Intelligence solutions for Sentiment Analysis, Entity Detection, PII Redaction, and more.
Lorem ipsum dolor sit amet, consectetur adipiscing elit, sed do eiusmod tempor incididunt ut labore et dolore magna aliqua. Ut enim ad minim veniam, quis nostrud exercitation ullamco laboris nisi ut aliquip ex ea commodo consequat. Duis aute irure dolor in reprehenderit in voluptate velit esse cillum dolore eu fugiat nulla pariatur.
Related posts