A Beginner's Guide to TorchStudio, The PyTorch IDE
Learn how to build, train, and compare models with TorchStudio - the IDE built specifically for PyTorch.


IDEs like PyCharm are great for general purpose coding, but if someone's focus is just on Deep Learning, is there a better alternative? The team behind TorchStudio - the IDE built specifically for PyTorch and its ecosystem - thinks so.
In this article, we'll outline what TorchStudio is, go through an example TorchStudio workflow to see how we can use it to build and compare models, and finally give an overview of pros and cons of TorchStudio, along with some feature suggestions that we think would bring it to the next level. Let's dive in!
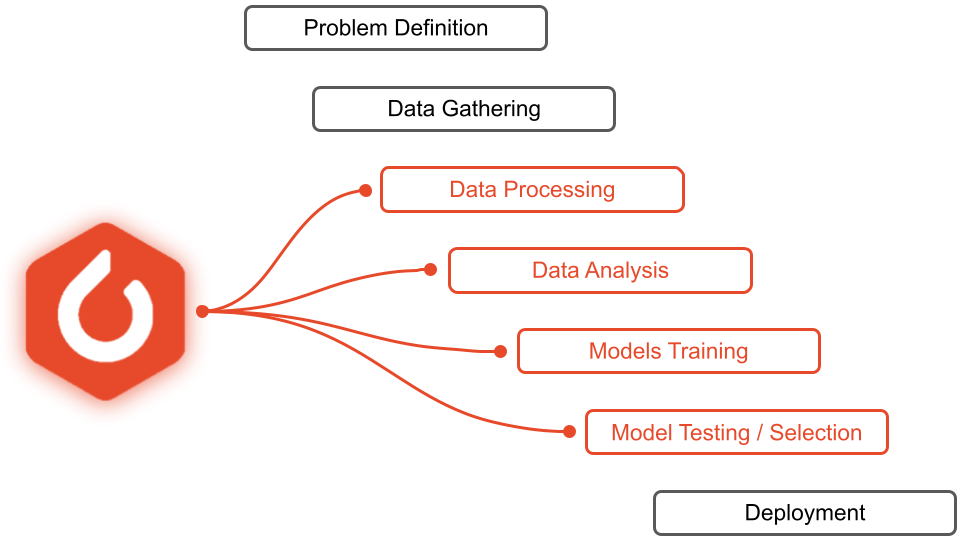
Where TorchStudio fits into the Machine Learning lifecycle, and some images from its GUI
#What is TorchStudio?
TorchStudio is an open-source project by Robin Lobel that seeks to make it easier to build and compare models in PyTorch, calling itself an "IDE for PyTorch and its ecosystem". An IDE, or Integrated Development Environment, is an application that provides a set of tools to make programming faster and easier.
While IDEs like PyCharm boast database tools, safe refactoring, code completion, version control integration, and more, TorchStudio instead focuses on tools that expedite the model development process.
#What Makes TorchStudio Different?
While other tools like PyTorch Lightning seek to simplify using PyTorch by abstracting away boilerplate code, TorchStudio takes the unique approach of instead wrapping it up in a simple-to-use GUI-based IDE.
Using a host of native models (or custom ones), editing a model is as simple as adjusting sliders and clicking on graphs. Add in data handling and model comparison features, and you have an IDE that makes several steps of the Machine Learning lifecycle more efficient.
Below you can see the steps of taking a Machine Learning project from start to finish and the steps that TorchStudio expedites highlighted in red.
Let's go through an example workflow in TorchStudio to highlight its key features. First, we'll learn how to install TorchStudio for those who want to follow along. Next, we'll learn how to load, transform, and subclass PyTorch dataset objects. After that, we'll go on to training several models, both from scratch and using transfer learning, to classify the CIFAR10 dataset, and then use TorchStudio to compare the models.
#How to Install TorchStudio
Installing TorchStudio takes only about 10 minutes and between 6 Gb and 16 Gb of drive space, depending on whether you want to add local NVIDIA GPU support.
To install TorchStudio, simply go to the downloads page of the TorchStudio website and select your OS in order to download either an .exe, .pkg, or .deb file. From there, all you need to do is open the file and follow the prompts.
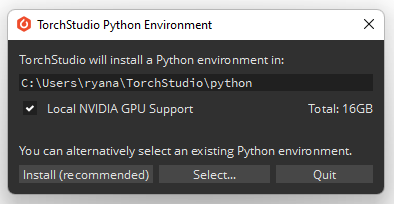
TorchStudio will install a new environment with Python, PyTorch, and additional packages/dependencies.
#TorchStudio Workflow
To understand the TorchStudio workflow, we'll run throughthe process of training and comparing models to classify the CIFAR10 images. Luckily, the workflow is very simple and intuitive, so it will be very easy to follow along!
#Dataset Tab
Upon opening TorchStudio we see a window that looks like this:
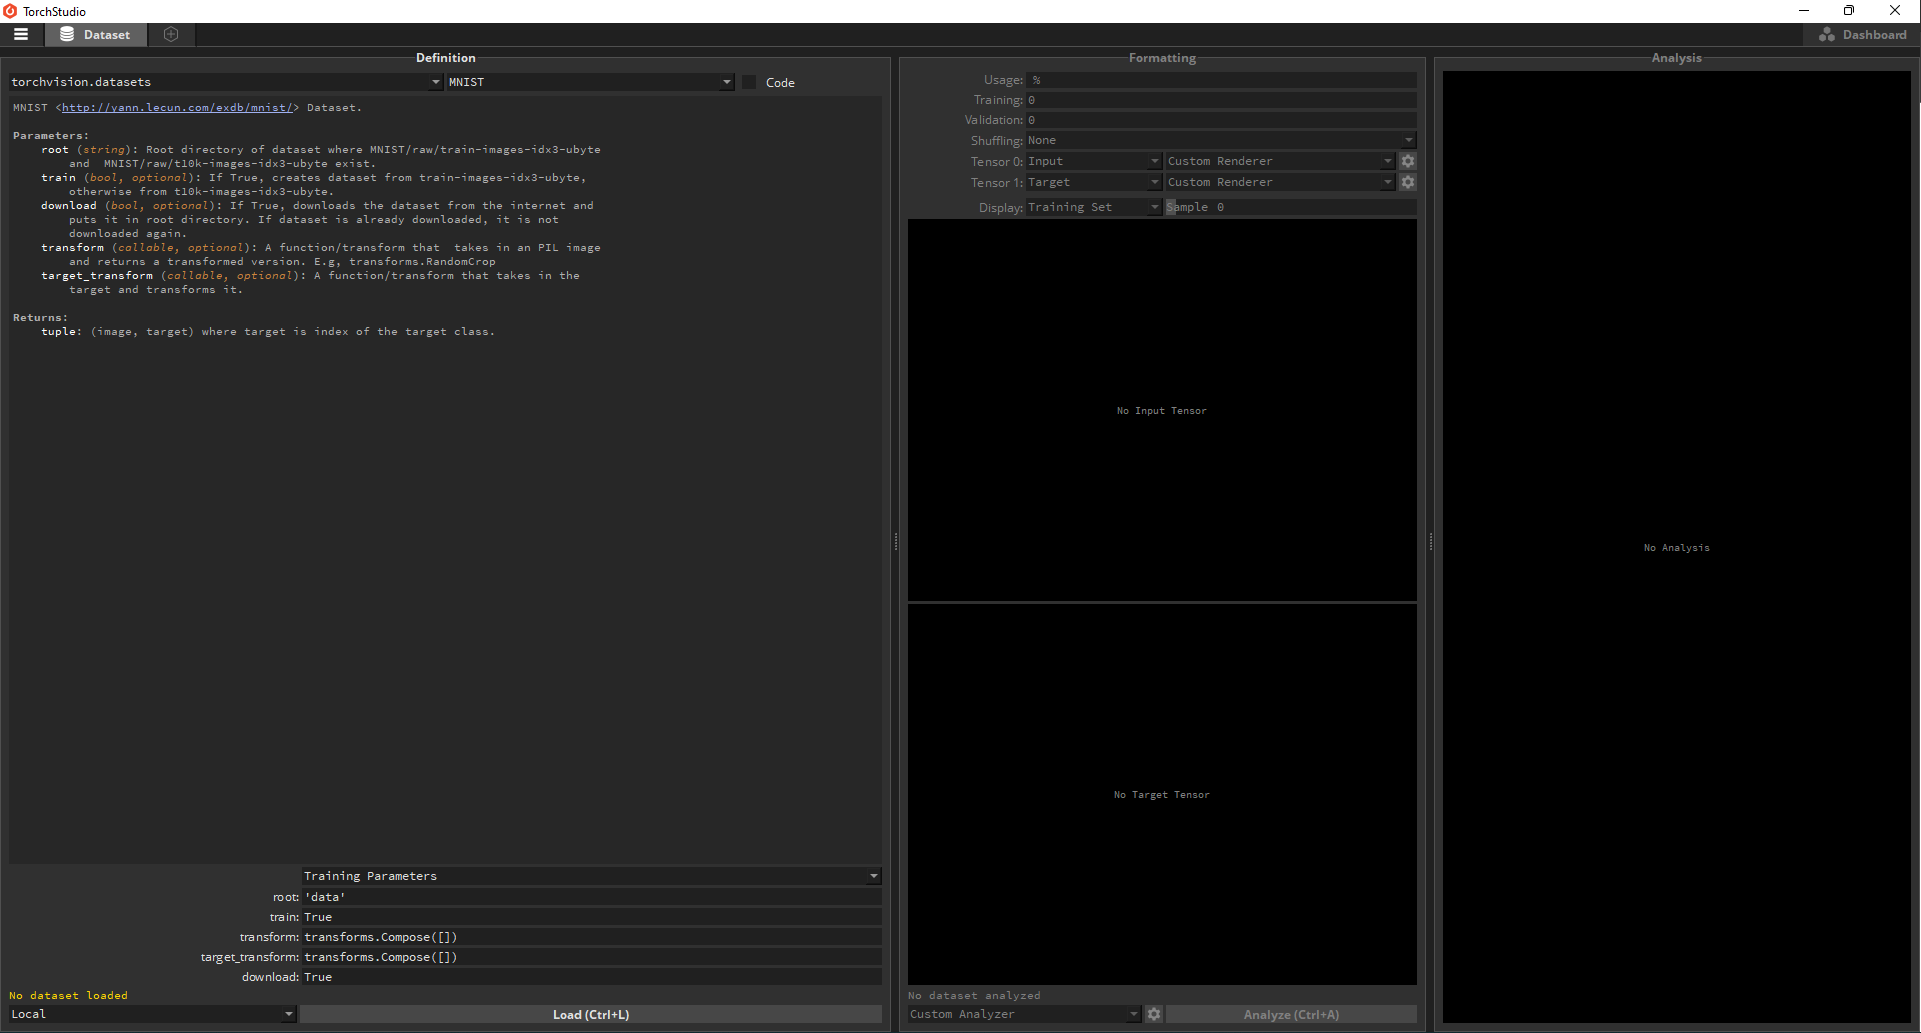
This is the Dataset tab which houses all information regarding the dataset for a given project. A TorchStudio project has only one dataset but can have several different models.
Dataset Definition
As mentioned above, we'll be using the CIFAR10 dataset for this project. On the left-hand side of the screen is the dataset Definition frame. This is where you select a dataset and define transformations before loading the data into TorchStudio. By default, TorchStudio will open up to the MNIST dataset. You can click on the dropdown in the upper left-hand corner of the Definition frame to choose a different dataset source, although for now we will be sticking with torchvision.datasets. To the right of this dropdown is another dropdown that hosts all of the datasets available in that dataset source. Click on it to change the dataset from MNIST to CIFAR10.
Selecting the CIFAR10 dataset
Dataset Transformations
We'll be classifying the 32 x 32 CIFAR10 images using a model which requires 64 x 64 images, so we'll have to resize the CIFAR10 images. At the bottom of the Definition frame, add the transform transforms.Resize(64) in order to accomplish this. Make sure the download parameter is set to True, and then load the data.
Resizing the CIFAR10 images from 32 x 32 to 64 x 64
In the below image you can see both the upsampled version of a CIFAR10 image on the left, as well as the original image on the right. The images are upsampled using bilinear interpolation by default.

Editing Dataset Code
While TorchStudio is very visual and has a well-structured GUI, at any point you can click on the Code checkbox in order to customize the relevant code directly.
In the example below, we edit the __getitem__() function of the CIFAR10 class to return images with noise as added as inputs and the original images themselves as targets for our input/target pairs. This is in contrast to the default of using the original images themselves as inputs and corresponding class labels as targets. You might want to override the default in this way in order to train a denoising autoencoder rather than a classification network.
Editing the input/output pairs of the CIFAR10 dataset
Below you can see the results of our code edits, with the original frog image on the left and its noisy version on the right:

In the same way, you could return grayscaled images and original images as input/target pairs if you wanted to train a recolorization network:

For our example, we will be sticking to the original images and their labels as input/target pairs in order to train a classification network - the above code editing was included only for completeness.
With the upsampled data having been loaded and our class label targets ready, we can move on to the next frame in the Dataset tab - Dataset Formatting.
Dataset Formatting
The Formatting frame allows you to explore your data and prepare it for training. In the Formatting frame, you can adjust the train/validation ratio of the data, where the original CIFAR10 50k training images and 10k validation images are used by default. You can also adjust the total data usage, so you can e.g. do coarse trains on models to make sure everything is copacetic before beginning the full-fledged train using all available data. Shuffling allows you to randomly shuffle your data.

Below these options, TorchStudio will display the inputs and targets according to whichever renderer it thinks makes sense for the given data. In this case, TorchStudio sensed that each training datum is a 3D tensor with one axis having length 3 (corresponding to RGB color channels), so it correctly chose the Bitmap renderer. The targets, on the other hand, are simply integers that correspond to classes, and so the Labels renderer was correctly chosen.
We can easily explore the data by simply clicking and dragging on the relevant slider:
Exploring the CIFAR10 dataset
Renderers for other types of data, such as spectrograms, volume, and bounding boxes, come native with TorchStudio. Alternatively, you can define your own renderer by clicking on the gear icon next to the renderer dropdown. Anywhere in TorchStudio, the gear icon means that you can implement your own custom module.
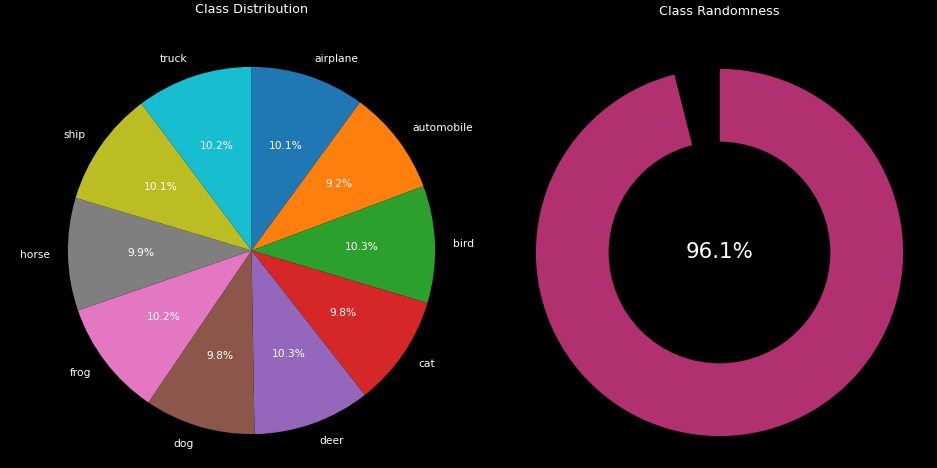
Dataset Analysis
The last frame in the Dataset tab is the Analysis frame, which allows us to generate a summary of our data through the Analyze function. In this case, we can see class ratios and randomness, determining that our dataset is well-balanced.
#Training a Model in TorchStudio
Now that we have our dataset in order, we can move on to training a model with TorchStudio. First, click on the hexagonal icon next to the Dataset tab in the upper left-hand corner of the screen. This will create a new Model tab, of which there is one for each model you create.
Model Definition
Within the new Model tab you created, select a model source and then a model architecture from the dropdowns in the upper left-hand corner, similar to the process of choosing a dataset in the Dataset tab. We will be using MobileNetV2.
Choosing a model
At the bottom left-hand corner of the model Definition frame are the parameters for the selected model. By default, the MobileNetV2 classifier is designed to accommodate 1,000 classes. Change the num_classes parameter to 10 (given that CIFAR10 has 10 classes) and leave the remaining parameters alone. Finally, click Build in order to construct this model.
Model Graph
To the right of the Definition frame is the Graph frame, in which you can explore the graph of the model you just defined. You can scroll up and down to examine how layers are connected, or hold Ctrl and scroll to zoom in and out. You can also change the view type to Module Level 1 for a lower resolution view of the model, or Module Level 2 for an even lower resolution view.
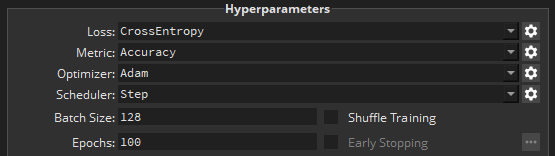
Hyperparameters
To the right of the Graph frame is the Hyperparameters frame. TorchStudio once again automatically detects values that it thinks are most appropriate for the situation at hand. In our case, we change the number of epochs to 15 (for quick training) and leave everything else as is. You'll again notice the gear icons, which means that you can design custom modules to use here.
Just like in the Formatting frame of the Dataset tab, you can adjust the slider in the Hyperparameters frame to view different inputs; however, in this case we see the model's output for the shown input image, rather than the image's label. In this case, there is a roughly even distribution on the probability of each class given that the network has not been trained and has only been randomly initialized.
Viewing the model output distribution given different inputs
At the bottom of the frame, select the hardware that you would like to train on. In our case, we train locally on the CPU. Remote servers can also be added to TorchStudio for training by going into TorchStudio's settings. Finally, click Train to begin the training process.
Analysis
In the Metrics frame, to the right of the Hyperparameters frame, you will see the training and validation curves for both loss and the chosen metric (in this case accuracy) updated dynamically as the model trains. At any point, you can pause and then resume training.
Training curves in TorchStudio
#Training Multiple Models with TorchStudio
While training just one model may be good enough for some applications, the real power of TorchStudio comes in the speed at which you can instantiate and train multiple models. Let's create 2 more models and train them on our dataset.
Again, click the small hexagon icon in the top bar of the TorchStudio window to create a new model. Whenever you create a new Model tab, it will be a copy of the Model tab that you are currently on (or the last one you were on if you are on the Dataset tab). Create two more Model tabs now.

Edit the model parameters and click Build to rebuild them with the new parameters. In our case, we chose to use round_nearest=8 and dropout=0.3 and round_nearest=10 and dropout=0.3 for Model 2 and Model 3 respectively. After the models have been built, hit Train on each of the tabs.
Since we are training on CPU, the models are trained sequentially. The colored tab icons give you an indication of where you are during training. The red Model 1 icon contains a Stop symbol, which means that we have either paused or finished training (the latter, in this case) for this model. The blue Model 2 icon contains a Play symbol, which means that Model 2 is currently training. The yellow Model 3 icon contains a Pause symbol, which means that Model 3 is currently queued and waiting to train.

#Using Pretrained Models for Transfer Learning with TorchStudio
We're going to create one final model, in this case using a pretrained version of MobileNetV2. Create a new tab and select the mobilenet_v2 model from the torchvision.models source. Note that the name here is lowercase, as opposed to the untrained MobileNetV2 model. This holds true for all models in TorchStudio - pretrained models have lowercase names, and untrained models have uppercase names.

In the model options, change the value of pretrained to True, and then Build the model.

Editing a Pretrained Model
As we mentioned above, MobileNetV2 defaults to 1,000 classes, which means the pretrained weights correspond to a model designed for 1,000 classes. We have no num_classes parameter to edit this time, so how can we adapt the model to our needs?
TorchStudio makes it extremely easy to edit the model to overcome this problem. Simply scroll down to the bottom of the model graph in the Graph frame, and click on the last Linear layer. This will open the model code which we can edit to change the model, similarly to how we edited the dataset code to add noise or grayscale the CIFAR10 images in the Dataset tab.
Automatically inserted into the code upon clicking the Linear layer is a line corresponding to the clicked layer, which we can use to override the model's number of classes. Simply change out_features from 1,000 to 10 and then Build the model.
Editing a pretrained model
While the mobilenet_v2 model has pretrained weights, they will not work perfectly for our data out-of-the-gate. The pretrained weights allow us to transfer over the pretrained low-level feature extractors to our task, but we still need to train the model on our data to meaningfully map these extracted features to the CIFAR10 classes. This process is called Transfer Learning.
Simply click Train as was done for the other models, and wait for the training to complete.
#Comparing Runs in TorchStudio
Now that we have several trained models, we can compare them to gain insight using the Dashboard tab. Click on the Dashboard icon at the top right-hand corner of the TorchStudio window.

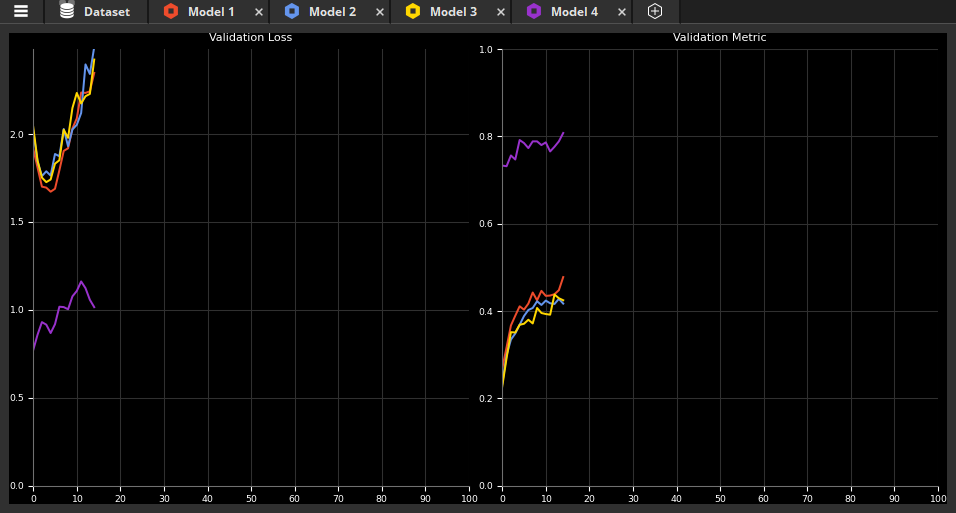
On the left, you'll see the validation loss curves for each model overlaid and the validation metric curves for each model overlaid so that you can easily compare performance between models. The curve colors match the colors seen in the Model tab icons so that it is easy to identify which model maps to which performance curve. In our case, we see (unsurprisingly) that the model with pretrained weights outperforms the models trained from scratch after 15 training epochs.
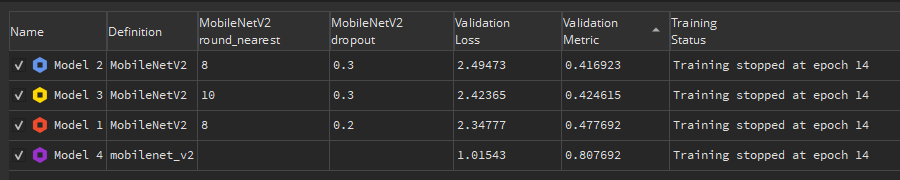
Below these graphs you will see tabulated information for each model, including the architecture definition and parameters, validation loss & metric, and training status. You can sort the table by clicking on a column header. Below, we have sorted the models by validation metric.
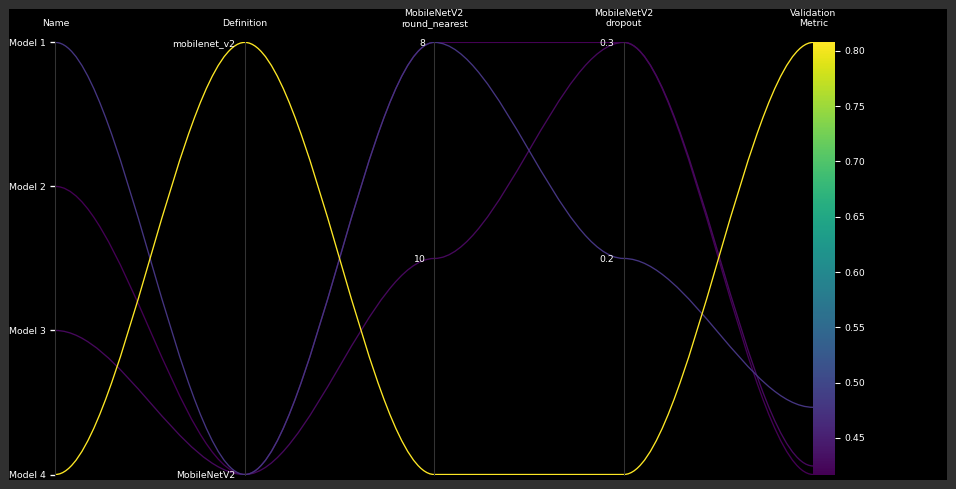
The final frame in the Dashboard tab houses a visualization of the tabulated information, which makes it easy to identify trends in how architectures or their definition parameters affect the validation metric. Below we see that the model with pretrained weights significantly outperformed the models trained from scratch, regardless of their definition parameters.
That's all the "how-to" for this tutorial! If you're interested in reading about some pros, cons, and suggested features for TorchStudio, read on! Otherwise, you can jump down to our Final Words.
#What Works Well in TorchStudio
While many of the benefits of TorchStudio are obvious upon inspection, we have compiled a list of several notable things that work well in TorchStudio listed in no particular order:
1. TorchStudio makes it easy to rapidly prototype for well-defined and popular Deep Learning tasks.
2. TorchStudio makes it easy to export models in Python, PyTorch, or ONNX formats.
3. Being able to see input-output pairs for the model dynamically as it trains can help you identify categorical training failures during training.
4. Training happens in the background and can be paused at any time, allowing models to train while new ones are being defined.
5. HuggingFace and PyTorch Hub integration are coming soon.
6. TorchStudio has remote server integration.
#TorchStudio Elements That Could Use Work
As of writing, TorchStudio is in open beta, so it's to be expected that not everything works perfectly. We ran into a few issues when using TorchStudio that could use some attention:
1. Stability. TorchStudio crashed several times during testing, at times a result of something as innocuous as clicking and dragging an MNIST image plot.
2. Error messaging. An execution failure in TorchStudio can leave you with a relatively cryptic error message, and pinning down where the problem lies can be difficult. There are error logs in the TorchStudio folder, but opening them up and trying to parse them can be a bit headache-inducing. Figuring out an efficient way to pin down and fix errors would be a huge plus for upcoming versions of TorchStudio.
3. Plot resizing. Several times during testing, data plots had resizing problems in which they would shrink to a fraction of the space available to them.

#Features TorchStudio Could Use
TorchStudio is a very cool project, and we've compiled a list of several features that we think would help bring it to the next level in upcoming versions. Remember, TorchStudio is an open-source project, so anyone in the community could implement any of these!
1. GUI model-building. Being able to drag and drop graph elements like convolution layers, pooling layers, etc. to visually build a model which is then automatically translated into PyTorch code would be a nice feature to add to TorchStudio.
2. Better error messaging / debugger. As mentioned above, pinning down the source of errors can be a little bit difficult. Having better error messaging and/or a debugger would help alleviate this issue.
3. Model tab groups. Being able to group models into tab groups based on architecture or some other salient feature would be convenient.
4. Model classifications. It would be nice to organize the available TorchStudio models into classes based on task, e.g. Image Segmentation, Image Denoising, etc.
5. Dataset management. Being able to view and manage what datasets have been downloaded by TorchStudio would be convenient, as well as the ability to cancel downloads in progress.
6. Automatic inference. TorchStudio could use automatic inference in a couple of ways. The first way is automatically inferring shape changes when a layer is edited. That is, if there are two fully-connected layers in a row, changing the output shape of the first should automatically change the input shape of the next layer. The second way is automatically inferring changes to models based on the project dataset. In the example above, we had to change the last layer of our pretrained classifier because the data had only 10 classes instead of the default 1,000. Automatically inferring this change would be a nice plus.
7. Sensitivity to changes in dataset. You can change the dataset you are working with in a TorchStudio project, but the Model tabs trained on the old dataset remain active. It would be nice if these were automatically grayed out or grouped into a Tab group by themselves so you are not comparing models in the dashboard that were trained on different datasets
8. Warning before closing. The dashboard button is very close to the button to close the TorchStudio window, and currently t,here is no "are you sure?" prompt when closing the window. It is easy to see how work could accidentally be lost because of this, so a warning prompt before closing could prevent this.
9. Export training graph data. It would be nice if there were a way to easily export either (i) PNGs of the training loss/metric graphs, or (ii) the data of these graphs for plotting with custom formatting.
Lastly, the abilities to set random seeds and display multiple metrics would be great plusses!
#Final Words
That's all for our beginner TorchStudio guide! While we covered only the basics in this tutorial, TorchStudio is an extensible system for simplifying the PyTorch development process, and it is worth trying out or keeping an eye on for anyone that uses PyTorch.
If you enjoyed this post, consider following our newsletter for more Deep Learning content!
Lorem ipsum dolor sit amet, consectetur adipiscing elit, sed do eiusmod tempor incididunt ut labore et dolore magna aliqua. Ut enim ad minim veniam, quis nostrud exercitation ullamco laboris nisi ut aliquip ex ea commodo consequat. Duis aute irure dolor in reprehenderit in voluptate velit esse cillum dolore eu fugiat nulla pariatur.