How to use Whisper API to transcribe audio in JavaScript
In part two of this 3-part blog series, we’ll learn how to build a full-stack JavaScript app with the Whisper API. This tutorial covers file uploads, secure API calls, and live transcription using Node.js and Express.


Express.
Note: This blog post is part 2 of a 3-part series. See OpenAI Whisper for Developers: Choosing Between API, Local, or Server-Side Transcription for the first in the series.
Using the OpenAI Whisper API
The OpenAI Whisper API offers several advantages for developers looking for speech-to-text capabilities. From an infrastructure perspective, the API brings typical advantages of cloud-based platforms—it eliminates the need for hardware provisioning and maintenance while providing automatic access to the latest model updates. This approach significantly reduces the technical overhead associated with deploying machine learning models. Additional features such as model prompting and real-time audio support enable developers to focus on application logic rather than on nuances of model deployment and infrastructure, with pricing at $0.006 per minute of audio, making it accessible for many use cases.
Despite these advantages, the API-based approach introduces several trade-offs worth considering. Data governance challenges emerge as sensitive audio content must leave your controlled environment, potentially complicating compliance with privacy regulations. External dependency on OpenAI's infrastructure and business decisions reduces operational autonomy and introduces potential vendor lock-in risks. Additionally, technical constraints, including network throughput requirements and unavoidable latency, create boundaries that cannot be overcome through additional investment, potentially limiting applications where the offline processing is critical.
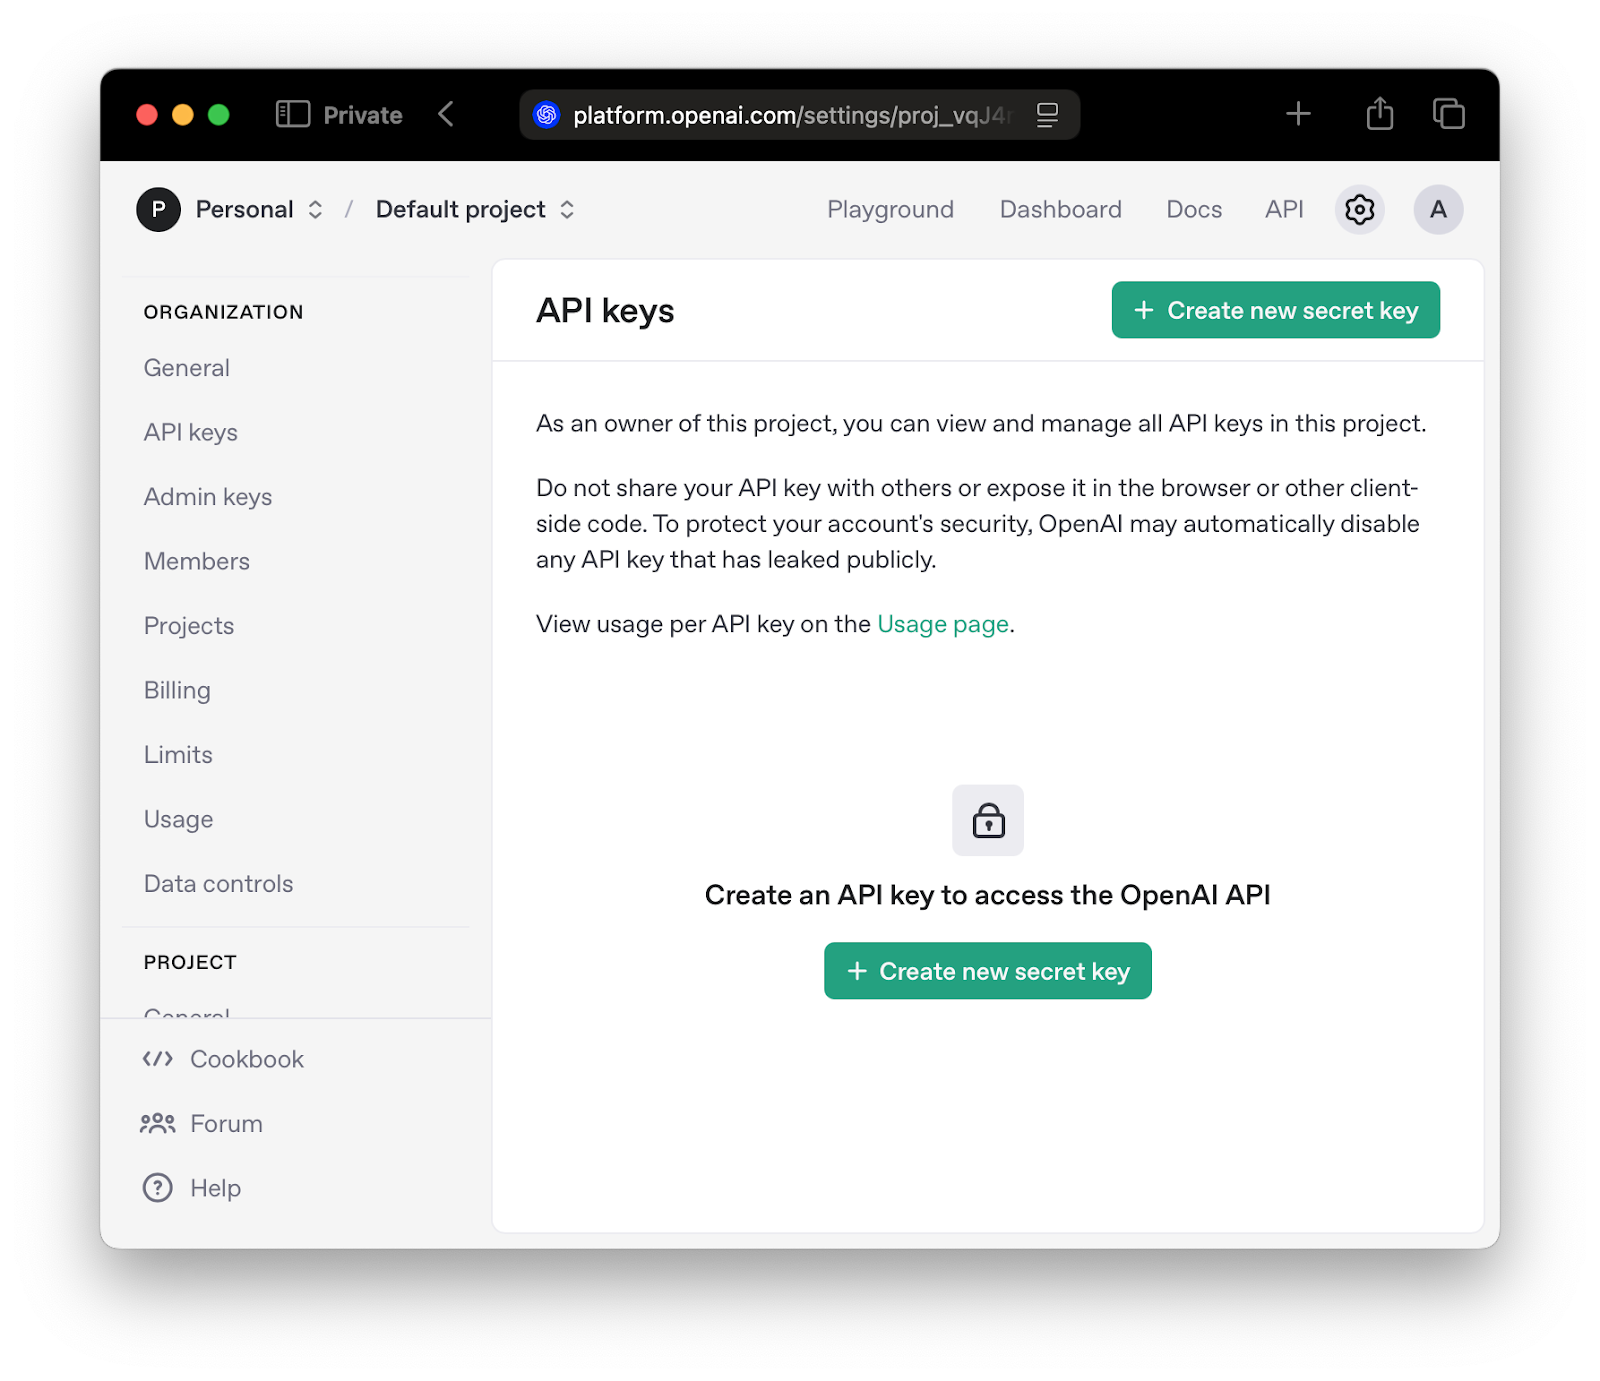
To start integration with the OpenAI API, you need to sign up for the OpenAI API Platform. After signing up on the Create Account page, navigate to the API keys section and press the “Create new secret key” button:
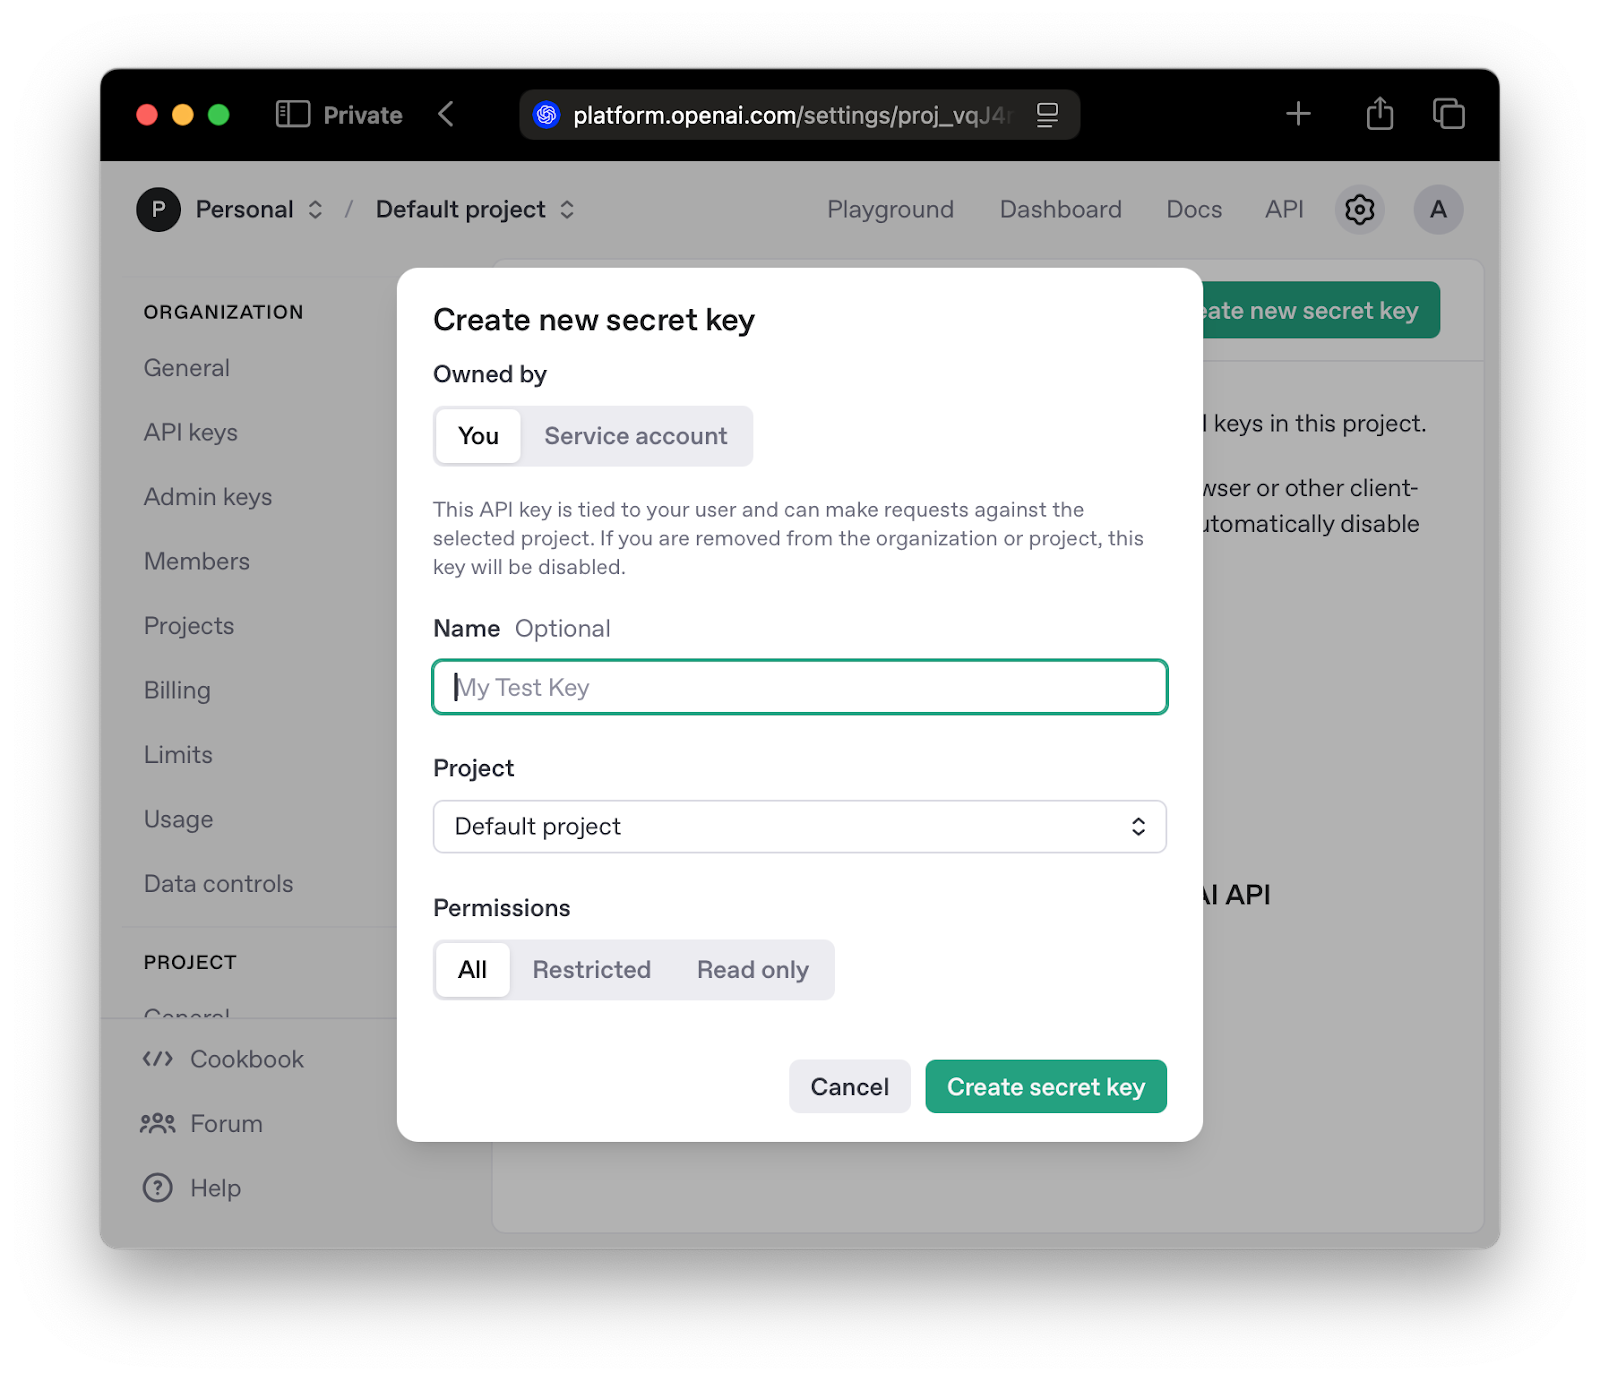
On the key creation model, select a project, and proceed with key creation by pressing the “Create secret key button.”
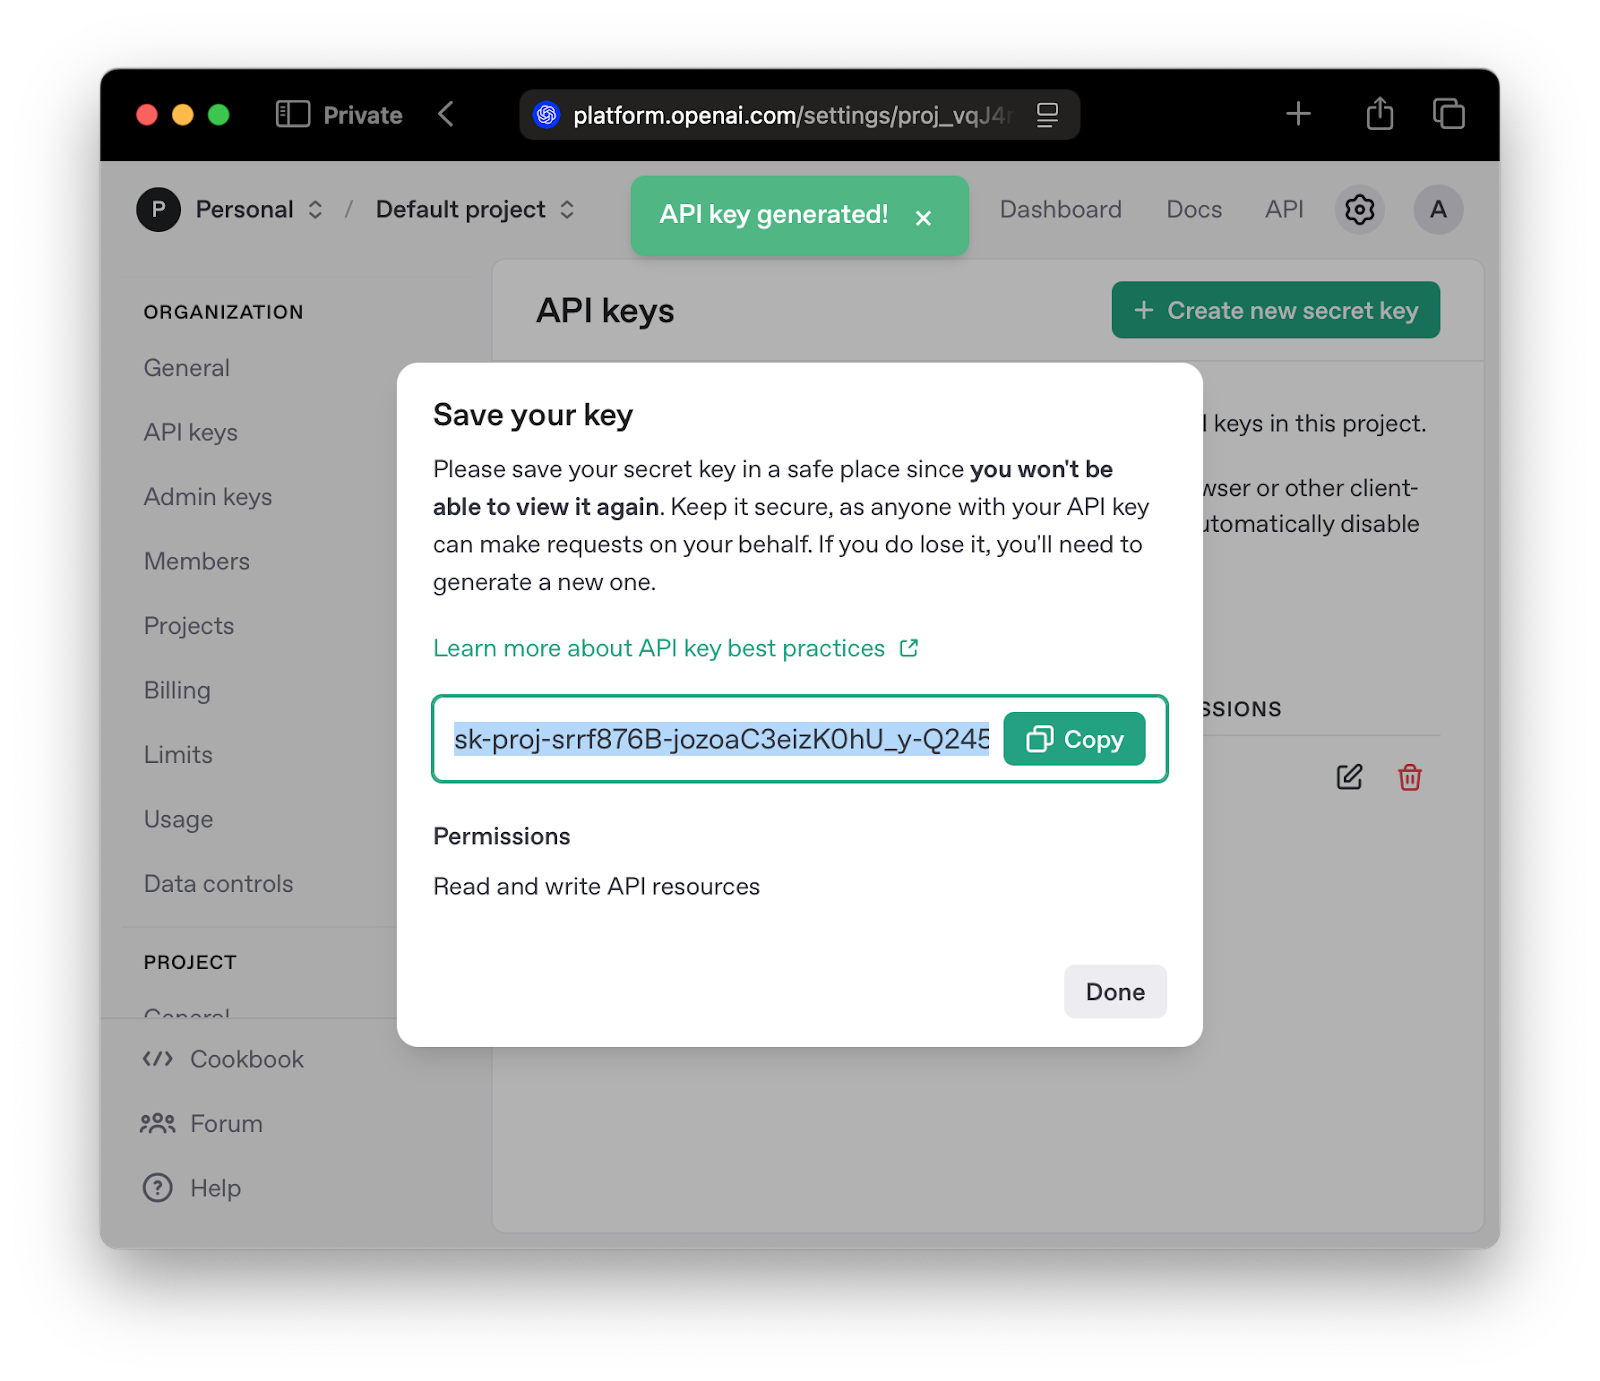
Make sure to copy the key and store it securely.
When all the necessary preparations are done, let’s try to build something useful using the OpenAI API. For the purpose of this tutorial, we'll build a simple browser-based application that transcribes audio input.
Let's start with a simple task – building an application that allows users to upload audio files for transcription using OpenAI's Whisper API. When working with the OpenAI API, you'll need to provide an API key which should never be exposed in front-end code. Exposing this key would make it vulnerable to unauthorized usage and potential abuse, resulting in unexpected charges to your account. Even for this relatively simple application, we'll need to implement a proper front-end to back-end communication architecture where the API key remains securely stored on the server side, ensuring that only authorized requests can access the transcription service.
For this exercise, we will be using Node.js as our backend runtime environment. If you don't have Node.js installed on your system, please consult the installation instructions on the official Node.js website. After installation, verify your setup by running the following commands in your terminal.
$ node -v

v24.0.2

$ npm -v

11.3.0
Your version numbers may differ slightly, but ensure you have Node.js version 18 or higher for compatibility with modern JavaScript features. The Node Package Manager (npm) comes bundled with Node.js and will be used to manage project's dependencies.
Project Initialization
Begin by creating a project directory and initializing a new Node.js project. The npm init -y command creates a package.json file with default values, which serves as the manifest for your project's dependencies and configuration:
mkdir whisper-js-demo

cd whisper-js-demo

npm init -y

npm pkg set type=module
The npm pkg set type=module command configures the project to use ES6 modules, allowing us to use modern import and export statements instead of the older CommonJS require() syntax. Next, install the necessary dependencies for our project:
npm install express

npm install --save-dev webpack webpack-cli webpack-dev-server babel-loader @babel/core @babel/preset-env file-loader html-webpack-plugin
[Express.js] is a minimal and flexible Node.js web application framework. The development dependencies include [Webpack] (a module bundler that packages our JavaScript files for the browser), [Babel] (a JavaScript compiler that allows us to use modern JavaScript features while maintaining compatibility with older browsers), and various loaders and plugins that help process our files during the build process.
Project Structure
Create the following directory structure to organize your code:
mkdir -p src/client src/server src/uploads
touch src/client/index.js src/client/index.html src/server/index.js src/uploads/.keep .envrc
This structure separates client-side and server-side code into distinct directories. The src/client directory contains the frontend code, src/server holds the backend API logic, and src/uploads will store temporarily uploaded audio files. The .envrc file will store environment variables, including sensitive information like API keys.
Version Control Configuration
Before proceeding, it's important to configure Git to ignore files that should not be committed to version control. Create a .gitignore file in your project root with the following content:
# Environment variables (contains sensitive API keys)

.envrc

# Uploaded files (temporary user data)

src/uploads/*

!src/uploads/.keep

# Dependencies (can be reinstalled via npm)

node_modules/

# Build output (generated files)

dist/
This configuration prevents sensitive information (API keys in .envrc), temporary files (user uploads), installed dependencies (node_modules), and build artifacts (dist) from being committed to your repository.
Configuring Build Tools
To use modern JavaScript features across different browsers, create a Babel configuration file in your project root:
// .babelrc

{

  "presets": [

    ["@babel/preset-env", {

      "targets": {

        "browsers": [

          "last 2 Chrome versions",

          "last 2 Firefox versions",

          "last 2 Safari versions",

          "last 2 Edge versions"

        ]

      }

    }]

  ]

}
This configuration tells Babel to transpile our JavaScript code to be compatible with the last two versions of major browsers. Next, configure Webpack to bundle our client-side code by creating a [webpack.config.cjs] file:
const path = require('path');

const HtmlWebpackPlugin = require('html-webpack-plugin');

module.exports = {

  mode: 'development',

  entry: './src/client/index.js',

  output: {

    filename: 'bundle.js',

    path: path.resolve(__dirname, 'dist'),

    clean: true,

  },

  module: {

    rules: [

      {

        test: /\.js$/,

        exclude: /node_modules/,

        use: {

          loader: 'babel-loader',

          options: {

            presets: ['@babel/preset-env']

          }

        }

      }

    ]

  },

  plugins: [

    new HtmlWebpackPlugin({

      template: './src/client/index.html',

      filename: 'index.html'

    })

  ]

};
Add a build script to your package.json and test the configuration:
npm pkg set scripts.build="webpack --config webpack.config.cjs"

npm run build
You should see output similar to this, confirming that Webpack successfully bundled your (currently empty) client-side code:
> whisper-js-demo@1.0.0 build

> webpack --config webpack.config.cjs

asset bundle.js 2.08 KiB [emitted] (name: main)

asset index.html 52 bytes [emitted]

runtime modules 274 bytes 1 module

./src/client/index.js 1 bytes [built] [code generated]

webpack 5.99.9 compiled successfully in 488 ms
Configure Environment Variables
Sensitive information like API keys should never be hardcoded in your application. Instead, we'll use environment variables to store this information securely. We'll use direnv, a tool that automatically loads environment variables when you enter a project directory. If you don't have direnv installed, follow the [official direnv installation instructions].
Add the following content to your .envrc file:
export PORT=3000  # The port on which our Express server will run

export OPENAI_API_KEY=sk-your-openai-api-key  # Your OpenAI API key
Replace sk-your-openai-api-key with your actual OpenAI API key, which you can obtain from the OpenAI platform dashboard. Important: Never commit this file to version control or share your API key publicly. Add .envrc to your .gitignore file to prevent accidental commits.
After saving the .envrc file, you'll need to approve it:
direnv allow
You should see confirmation that the environment variables are loaded:
direnv: loading ~/path/to/whisper-js-demo/.envrc

direnv: export +OPENAI_API_KEY +PORT
Your development environment is now properly configured with all necessary dependencies and security measures in place.
Building the Application Foundation
With our development environment configured, we'll now create the foundation of our application. We need to set up both the server-side Express application and the client-side user interface.
Open the src/server/index.js file and add the following code to create a basic Express server:
import express from 'express';

import url from 'url';

import path from 'path';

// Initialize Express app

const app = express();

const port = process.env.PORT || 3000;

// Set up directory references

const rootDir = path.dirname(url.fileURLToPath(import.meta.url));

// Configure Middleware

app.use(express.json());

// Start server

app.listen(port, () => {

  console.log(`Server running at http://localhost:${port}`);

});
This code initializes an Express application, sets up middleware for JSON parsing and serving static files, and starts the server on the specified port.
For the user interface, we'll use [Flowbite], a component library built on top of [Tailwind CSS]. Flowbite provides pre-built UI components that follow modern design patterns, while Tailwind CSS is a utility-first CSS framework that allows us to style elements directly in our HTML using predefined classes, to quickly create a clean and responsive interface.
Open the src/client/index.html file and add the following markup:
<!DOCTYPE >
<html lang="en">
<head>
<meta charset="UTF-8">
<meta name="viewport" content="width=device-width, initial-scale=1.0">
<title>Audio Transcription with Whisper API</title>
<link href="https://cdnjs.cloudflare.com/ajax/libs/flowbite/2.1.1/flowbite.min.css" rel="stylesheet" />
</head>
<body class="bg-gray-50 dark:bg-gray-900">
<div class="container max-w-4xl mx-auto px-4 py-8">
<div class="text-center mb-10">
<h1 class="text-3xl font-extrabold text-gray-900 dark:text-white md:text-5xl lg:text-6xl mb-4">
<span class="text-transparent bg-clip-text bg-gradient-to-r to-blue-600 from-sky-400">Audio Transcription</span>
</h1>
</div>
</div>
<script src="https://cdnjs.cloudflare.com/ajax/libs/flowbite/2.1.1/flowbite.min.js"></script>
</body>
</html>
To simplify development, we'll set up scripts that automatically reload our server when we make changes and serve our client-side code through Webpack's development server. First, install concurrently, a tool that allows us to run multiple npm scripts simultaneously:
npm install --save-dev concurrently
Then update your package.json with the following scripts:
npm pkg set scripts.dev:client="webpack serve --config webpack.config.cjs"

npm pkg set scripts.dev:server="node --watch src/server/index.js"

npm pkg set scripts.dev="concurrently "npm run dev:server" "npm run dev:client""
These scripts configure our development environment as follows:
- The dev:server script uses Node.js's built-in --watch flag to automatically restart the server when files change.
- The dev:client script starts Webpack's development server, which serves our client-side code.
- The dev script uses concurrently to run both servers simultaneously.
Additionally, update your webpack.config.cjs to include the development server configuration:
// Add this to your existing webpack.config.cjs

module.exports = {

  // ... existing configuration ...

  devServer: {

    port: 8080,

    proxy: [{

      context: ['/api'],

      target: 'http://localhost:3000',

    }],

    static: {

      directory: path.join(__dirname, 'dist'),

    },

  },

};
To verify the setup, start the development environment by running:
npm run build

npm run dev
You should see output indicating both servers are running:
> whisper-js-demo@1.0.0 dev

> concurrently "npm run dev:server" "npm run dev:client"

[1]

[1] > whisper-js-demo@1.0.0 dev:client

[1] > webpack serve --config webpack.config.cjs

[1]

[0]

[0] > whisper-js-demo@1.0.0 dev:server

[0] > node --watch src/server/index.js
Navigate to http://localhost:8000 in your browser. You should see the heading "Audio Transcription". This confirms that our basic application structure is working correctly. This foundation establishes the structure for our audio transcription application.
Adding File Upload Functionality
Now that we have a basic application structure, let's add the ability to upload audio files. We'll use multer, a middleware for handling multipart/form-data in Express applications. Install it if you haven't already and create the uploads directory:
$ npm install multer

Update the src/server/index.js file to import multer at the top and add the configuration after your existing middleware setup:

const filename = url.fileURLToPath(import.meta.url);

const dirname = path.dirname(filename);

const uploadsDir = path.join(dirname, '..', 'uploads');

const distDir = path.join(dirname, '..', '..', 'dist');

// Ensure uploads directory exists

if (!fs.existsSync(uploadsDir)) {

  fs.mkdirSync(uploadsDir, { recursive: true });

}

// Configure multer for file uploads

const storage = multer.diskStorage({

  destination: (req, file, cb) => {

    cb(null, uploadsDir);

  },

  filename: (req, file, cb) => {

    const ext = path.extname(file.originalname) || '.webm';

    const uniqueSuffix = Date.now() + '-' + Math.round(Math.random() * 1E9);

    cb(null, file.fieldname + '-' + uniqueSuffix + ext);

  }

});

const upload = multer({storage, limits: { fileSize: 25 * 1024 * 1024 }});
This configuration creates a storage system that saves files to our uploads directory with unique filenames, restricts uploads to 25MB size limit. The upload object we've created will be used as middleware in our API endpoint for handling file uploads, which we'll implement next.
Implementing File Upload and Transcription
With the application foundation in place, we'll now implement the core functionality: handling audio file uploads and integrating with OpenAI's Whisper API for transcription. First, install the necessary packages for file handling and OpenAI integration:
npm install multer openai
[Multer] is a Node.js middleware specifically designed for handling multipart/form-data, which is the encoding type used when uploading files through HTML forms. The openai package provides the official JavaScript client for interacting with OpenAI's APIs, including the Whisper transcription service.
Update your src/server/index.js file to import the required modules and configure the file upload system:
import fs from "fs";

// Set up directory paths

const filename = url.fileURLToPath(import.meta.url);

const dirname = path.dirname(filename);

const uploadsDir = path.join(dirname, '..', 'uploads');

// After middleware setup...

app.post('/api/transcribe', upload.single('audio'), async (request, response) => {

  if (!request.file) {

    return response.status(400).json({ success: false, error: 'No audio file uploaded' });

  }


  const filePath = request.file.path;


  console.log(`Transcribing file: ${filePath} (${request.file.size} bytes)`);


  try {

    // ...

    response.json({success: true, transcription: "to be implemented"});

  } catch (error) {

    console.error('Transcription error:', error);

    response.status(500).json({success: false, error: error.message});

  } finally {

    fs.unlinkSync(filePath);

  }

});
This endpoint uses upload.single('audio') middleware from multer, which expects a form field named 'audio' containing a single file. When a file is uploaded, multer processes it according to our configuration, saves it to the uploads directory, and makes the file data available via request.file. The endpoint validates the upload, logs the file path, and removes the file to avoid accumulating temporary files.
You can test this endpoint using curl to ensure it's working correctly before building the frontend:
curl -X POST http://localhost:3000/api/transcribe \

  -F "audio=@/path/to/your/audio.wav" \

  -H "Content-Type: multipart/form-data"

{"success":true,"transcription":"to be implemented"}%
Replace /path/to/your/audio.mp3 with the actual path to an audio file on your system. If everything is configured correctly, you should receive a JSON response with {"success":true} and see the file path logged in your server console. This confirms that our file upload system is working properly and that we're ready to integrate the OpenAI Whisper API for transcription in the next section.
Now, let's update the API endpoint to handle both file uploads and transcription. Add the following code after your middleware configuration:
const openai = new OpenAI({ apiKey: process.env.OPENAI_API_KEY });

and update the contents of the try block:

try {

  const transcription = await openai.audio.transcriptions.create({

    file: fs.createReadStream(filePath),

    model: 'whisper-1',

    language: 'en'

  });

  response.json({success: true, transcription: transcription.text});

} catch (error) {

  // the same as before

}
This implementation sends the uploaded file directly to the OpenAI API using the Whisper model and returns the transcribed text to the client. The language parameter is set to English (en) to ensure accurate transcriptions; without this parameter, Whisper attempts to auto-detect the language, which can lead to unexpected results when an audio has an unusual accent or features. For example, English speech might be incorrectly transcribed as another language entirely. You can test this endpoint using curl to confirm it's working correctly before building the frontend interface.
$ curl -X POST http://localhost:3000/api/transcribe \

  -F "audio=@/path/to/your/audio.wav" \

  -H "Content-Type: multipart/form-data"

{"success": true, "transcription": "The whisper model thinks I'm talking to a toaster, testing one, two dead jokes coming through."}
If you encounter an error, check that your OpenAI API key is correctly set in the environment variables and that your audio file is in a supported format. The server logs will provide additional debugging information, including the file path and size for each transcription request.
Creating the User Interface
With our transcription API endpoint in place, let's build a frontend that allows users to upload audio files and view the transcription results. We'll update the HTML structure and add JavaScript to handle the user interaction and API communication.
First, create a new file src/client/transcriber.js that defines an abstract base class for handling transcriptions:
class Transcriber {

  constructor(loadingIndicator, resultsBox, transcriptionText) {

    this.loadingIndicator = loadingIndicator;

    this.resultsBox = resultsBox;

    this.transcriptionText = transcriptionText;

  }


  async transcribeAudio(audioFile) {

    throw new Error('transcribeAudio method must be implemented by subclass');

  }


  async transcribe(audioFile)  {

    this.loadingIndicator.classList.remove('hidden');

    this.resultsBox.classList.add('hidden');


    await this.transcribeAudio(audioFile, (transcription) => {

      this.resultsBox.classList.remove('hidden');

      this.transcriptionText.textContent = transcription;

      this.loadingIndicator.classList.add('hidden');

    });

  }

}
This base class establishes an interface for transcription operations. The constructor accepts DOM elements for the loading indicator, results container, and transcription text display. The .transcribe method manages the UI state during the transcription process—showing a loading indicator while processing and updating the results when complete. By using an abstract .transcribeAudio method, we enable different transcription implementations (such as server-side via our API or client-side using alternative methods.)
export class OpenAITranscriber extends Transcriber {

  constructor(loadingIndicator, resultsBox, transcriptionText) {

    super(loadingIndicator, resultsBox, transcriptionText);

    this.apiUrl = '/api/transcribe';

  }


  transcribeAudio(audioFile, onFinish) {

    const formData = new FormData();

    formData.append('audio', audioFile);


    fetch(this.apiUrl, {method: 'POST', body: formData})

      .then(response => {

        if (!response.ok) {

          throw new Error('Transcription failed');

        }

        return response.json();

      }).then(data => {

        onFinish(data.transcription)

      })

  }

}
The OpenAITranscriber class extends our base Transcriber class to provide concrete implementation for server-side transcription using our Express API endpoint. The class uses the [FormData API] to encode the audio file for multipart upload. The asynchronous .transcribeAudio method calls the onFinish callback with the transcribed text, allowing the base class to handle all UI updates in a centralized manner.
Now let's complete our application by creating the HTML interface and connecting it to our transcription functionality. This involves building an upload interface, handling user interactions, and properly managing the application state during transcription. Update your src/client/index.html file to include the complete user interface:
  <!-- Upload Section -->

  <div class="p-6 bg-white border border-gray-200 rounded-lg shadow dark:bg-gray-800 dark:border-gray-700">

    <h5 class="mb-4 text-xl font-bold tracking-tight text-gray-900 dark:text-white">Upload Audio File</h5>

    <label class="block mb-6" for="audioFileInput">

      <span class="sr-only">Choose audio file</span>

      <input type="file" id="audioFileInput" accept="audio/*" class="block w-full text-sm text-gray-500 file:mr-4 file:py-2 file:px-4 file:rounded-lg file:border-0 file:text-sm file:font-medium file:bg-blue-50 file:text-blue-700 hover:file:bg-blue-100 dark:file:bg-blue-900 dark:file:text-blue-400 dark:text-gray-400" />

    </label>

    <button id="uploadButton" type="button" class="w-full text-white bg-blue-600 hover:bg-blue-700 focus:ring-4 focus:outline-none focus:ring-blue-300 dark:focus:ring-blue-800 font-medium rounded-lg text-sm px-5 py-2.5 text-center mb-2">

      Transcribe File

    </button>

  </div>

</div>

<!-- Loading Indicator -->

<div id="loadingIndicator" class="hidden flex flex-col items-center justify-center my-8">

  <div role="status" class="mb-4">

    <svg aria-hidden="true" class="w-12 h-12 text-gray-200 animate-spin dark:text-gray-600 fill-blue-600" viewBox="0 0 100 101" fill="none" xmlns="http://www.w3.org/2000/svg">

      <path d="M100 50.5908C100 78.2051 77.6142 100.591 50 100.591C22.3858 100.591 0 78.2051 0 50.5908C0 22.9766 22.3858 0.59082 50 0.59082C77.6142 0.59082 100 22.9766 100 50.5908ZM9.08144 50.5908C9.08144 73.1895 27.4013 91.5094 50 91.5094C72.5987 91.5094 90.9186 73.1895 90.9186 50.5908C90.9186 27.9921 72.5987 9.67226 50 9.67226C27.4013 9.67226 9.08144 27.9921 9.08144 50.5908Z" fill="currentColor"/>

      <path d="M93.9676 39.0409C96.393 38.4038 97.8624 35.9116 97.0079 33.5539C95.2932 28.8227 92.871 24.3692 89.8167 20.348C85.8452 15.1192 80.8826 10.7238 75.2124 7.41289C69.5422 4.10194 63.2754 1.94025 56.7698 1.05124C51.7666 0.367541 46.6976 0.446843 41.7345 1.27873C39.2613 1.69328 37.813 4.19778 38.4501 6.62326C39.0873 9.04874 41.5694 10.4717 44.0505 10.1071C47.8511 9.54855 51.7191 9.52689 55.5402 10.0491C60.8642 10.7766 65.9928 12.5457 70.6331 15.2552C75.2735 17.9648 79.3347 21.5619 82.5849 25.841C84.9175 28.9121 86.7997 32.2913 88.1811 35.8758C89.083 38.2158 91.5421 39.6781 93.9676 39.0409Z" fill="currentFill"/>

    </svg>

    <span class="sr-only">Loading...</span>

  </div>

  <p class="text-lg font-semibold text-gray-900 dark:text-white">Transcribing your audio...</p>

  <p class="text-sm text-gray-500 dark:text-gray-400">This may take a moment depending on the file size</p>

</div>

<!-- Results Section -->

<div id="resultsBox" class="hidden mt-8 p-6 bg-white border border-gray-200 rounded-lg shadow dark:bg-gray-800 dark:border-gray-700">

  <div class="flex justify-between items-center mb-4">

    <h5 class="text-xl font-bold leading-none text-gray-900 dark:text-white">Transcription Results</h5>

  </div>

  <div id="transcriptionText" class="p-4 bg-gray-50 rounded-lg border border-gray-100 dark:bg-gray-700 dark:border-gray-600 min-h-40 text-gray-900 dark:text-white"></div>

</div>
This interface provides three sections that guide users through the transcription process. The upload section includes a file input that accepts any audio format (through the accept="audio/*" attribute) and a call-to-action button. The loading indicator uses an animated SVG spinner with accompanying text to inform users that processing is underway. The results section remains hidden until transcription completes, then displays the transcribed text in a separate container.
To connecting the frontend logic, create the main application file in src/client/index.js:
import {OpenAITranscriber} from './transcriber.js';

document.addEventListener('DOMContentLoaded', () => {

  // DOM Elements

  const audioFileInput = document.getElementById('audioFileInput');

  const uploadButton = document.getElementById('uploadButton');

  const resultsBox = document.getElementById('resultsBox');

  const transcriptionText = document.getElementById('transcriptionText');

  const loadingIndicator = document.getElementById('loadingIndicator');


  let transcriber = new OpenAITranscriber(loadingIndicator, resultsBox, transcriptionText);


  // Handle file upload transcription

  uploadButton.addEventListener('click', () => {

    const file = audioFileInput.files[0];

    if (!file) {

      alert('Please select an audio file first.');

      return;

    }


    transcriber.transcribe(file)

  });

});
To forward any request to /api/* routes to the Express server running on port 3000 and allow the frontend and backend to work together seamlessly during development while avoiding CORS issues, add the following configuration to the webpack.config.cjs file:
module.exports = {

  // ... existing configuration ...

  devServer: {

    static: './dist',

    proxy: [

      {

        context: ['/api'],

        target: 'http://localhost:3000',

      }

    ],

    hot: true,

    port: 8080

  }

}
With all components in place, build and start both servers and open your browser to http://localhost:8080.
npm run dev
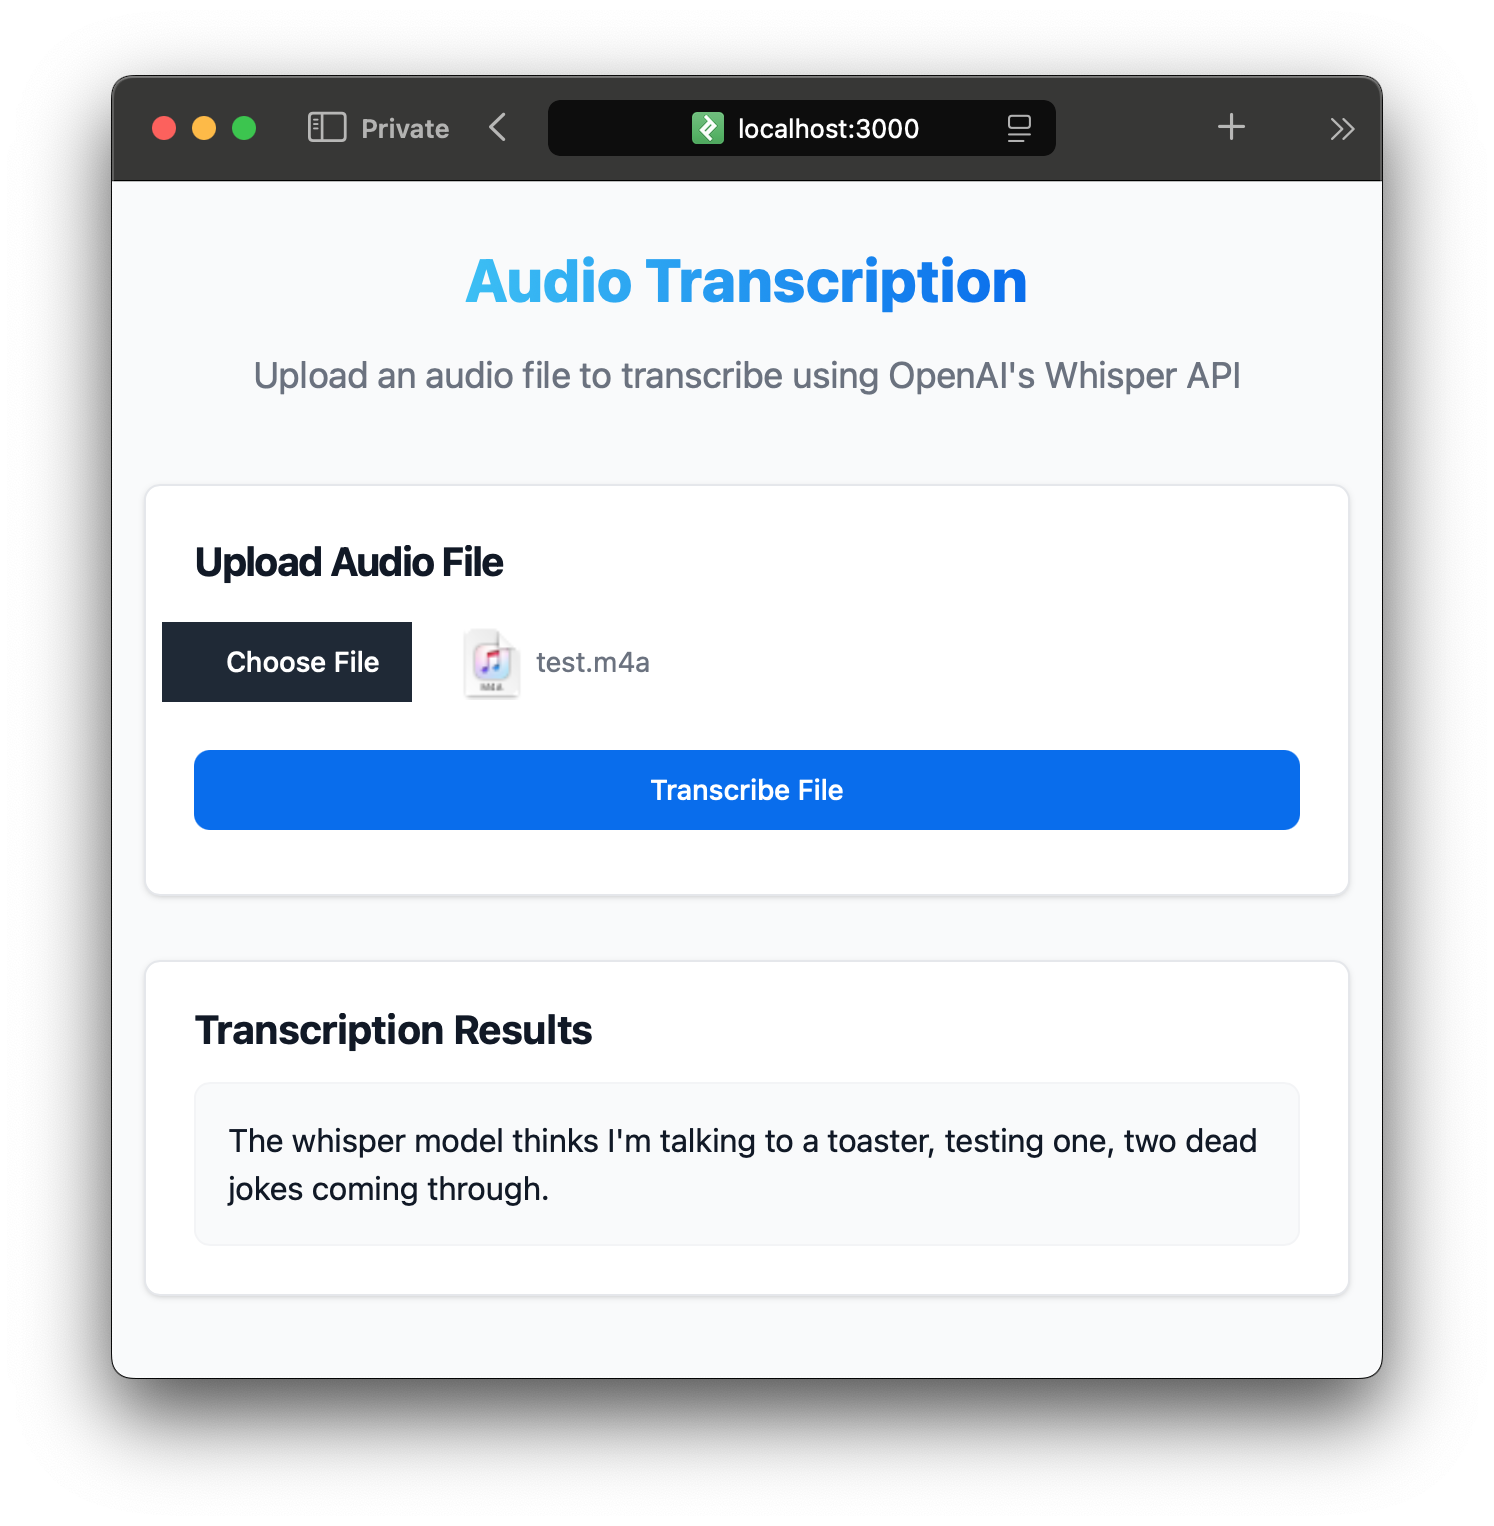
On the image above, you can see the application in action. The user selects an audio file, and after clicking the "Transcribe File" button, the application sends the file to the server for transcription. The resulting text is displayed in the results section.
Implementing Browser-Based Audio Recording
To further enhance our application's functionality and simplify testing of speech recognition, let's implement direct audio recording in the browser using the [MediaRecorder API]. This feature allows users to record audio without needing external files, making it convenient for quick transcriptions and testing different speech patterns.
The MediaRecorder API provides a simple interface for recording media streams from the user's microphone or camera. For our audio transcription application, we'll use it to capture microphone input and convert it into a format compatible with our transcription service. The API handles the complexities of audio encoding and provides event-based callbacks for managing the recording lifecycle.
Create a new file src/client/audioRecorder.js with the following implementation:
function getMimeType() {

  const types = ["audio/webm", "audio/mp4", "audio/ogg", "audio/wav", "audio/aac"];


  for (let i = 0; i < types.length; i++) {

    if (MediaRecorder.isTypeSupported(types[i])) {

      return types[i];

    }

  }

  return undefined;

}

class AudioRecorder {

  constructor(recordingStatus, recordButton) {

    this.recordButton = recordButton;

    this.recordingStatus = recordingStatus;

    this.isRecording = false;

    this.mediaRecorder = null;

    this.audioStream = null;

  }


  async start(onRecordingComplete) {

    let chunks = [];


    try {

      const mimeType = getMimeType();

      this.audioStream = await navigator.mediaDevices.getUserMedia({audio: true});

      this.mediaRecorder = new MediaRecorder(this.audioStream, {mimeType});


      this.mediaRecorder.ondataavailable = (e) => { chunks.push(e.data); };

      this.mediaRecorder.onstop = () => {

        const blob = new Blob(chunks, {type: this.mediaRecorder.mimeType || 'audio/webm'});


        onRecordingComplete(blob);

        this.recordingStatus.textContent = '';

      };


      this.mediaRecorder.start();

      this.isRecording = true;


      this.updateUI()

    } catch (error) {

      alert('Error accessing microphone: ' + error.message);

    }

  }


  async stop() {

    if (this.mediaRecorder && this.isRecording) {

      this.mediaRecorder.stop();

    }

    if (this.audioStream) {

      this.audioStream.getTracks().forEach(track => track.stop());

    }

    this.isRecording = false;

    this.updateUI()

  }


  updateUI() {

    if (this.isRecording) {

      this.recordButton.textContent = 'Stop Recording';

      this.recordingStatus.textContent = 'Recording in progress...';

    } else {

      this.recordButton.textContent = 'Start Recording';

      this.recordingStatus.textContent = 'Processing recording...';

    }

  }

}

export default AudioRecorder;
The getMimeType helper function determines the best audio format supported by the user's browser. Different browsers support different audio codecs, and this function ensures we use a format that both the browser and our transcription service can handle. The AudioRecorder class encapsulates all recording functionality. Its constructor accepts DOM elements for the record button and status display. The class tracks the recording state and manages both the MediaRecorder instance and the audio stream to ensure proper cleanup.
The start method requests microphone access through getUserMedia, which triggers a browser permission prompt on first use. Once granted, it creates a MediaRecorder instance with the appropriate MIME type. Audio data is collected in chunks through the ondataavailable event, which fires periodically during recording. When recording stops, these chunks are combined into a single Blob object that can be uploaded to our transcription service. Resource cleanup is important for audio recording. The stop method ensures both the MediaRecorder and all audio tracks are properly stopped, preventing the microphone from remaining active after recording ends.
The updateUI method provides visual feedback by updating button text and status messages. This immediate feedback helps users understand the current state of the recording process, improving the overall user experience.
Now, we need to plug-in our AudioRecorder class into the main application. Update your src/client/index.js file to include the audio recording functionality:
// Recording variables

const recordButton = document.getElementById('recordButton');

const recordingStatus = document.getElementById('recordingStatus');

const audioRecorder = new AudioRecorder(recordingStatus, recordButton);

// Handle audio recording

recordButton.addEventListener('click', () => {

  if (audioRecorder.isRecording) {

    audioRecorder.stop();

  } else {

    audioRecorder.start((blob) => {

      transcriber.transcribe(blob)

    });

  }

});
This code initializes the AudioRecorder instance and sets up an event listener on the record button. When clicked, the button toggles between starting and stopping the recording. If recording is stopped, the recorded audio blob is passed to the transcriber instance for transcription. To make it work, we need to add the "record" button to our HTML interface. Update your src/client/index.html file to include the recording controls right after the "Upload section":
<!-- Record Section -->

<div class="p-6 bg-white border border-gray-200 rounded-lg shadow dark:bg-gray-800 dark:border-gray-700">

  <h5 class="mb-4 text-xl font-bold tracking-tight text-gray-900 dark:text-white">Record Audio</h5>

  <button id="recordButton" type="button" class="w-full text-white bg-purple-600 hover:bg-purple-700 focus:ring-4 focus:outline-none focus:ring-purple-300 dark:focus:ring-purple-800 font-medium rounded-lg text-sm px-5 py-2.5 text-center mb-4">

    Start Recording

  </button>

  <div id="recordingStatus" class="text-center text-sm text-gray-500 dark:text-gray-400"></div>

</div>
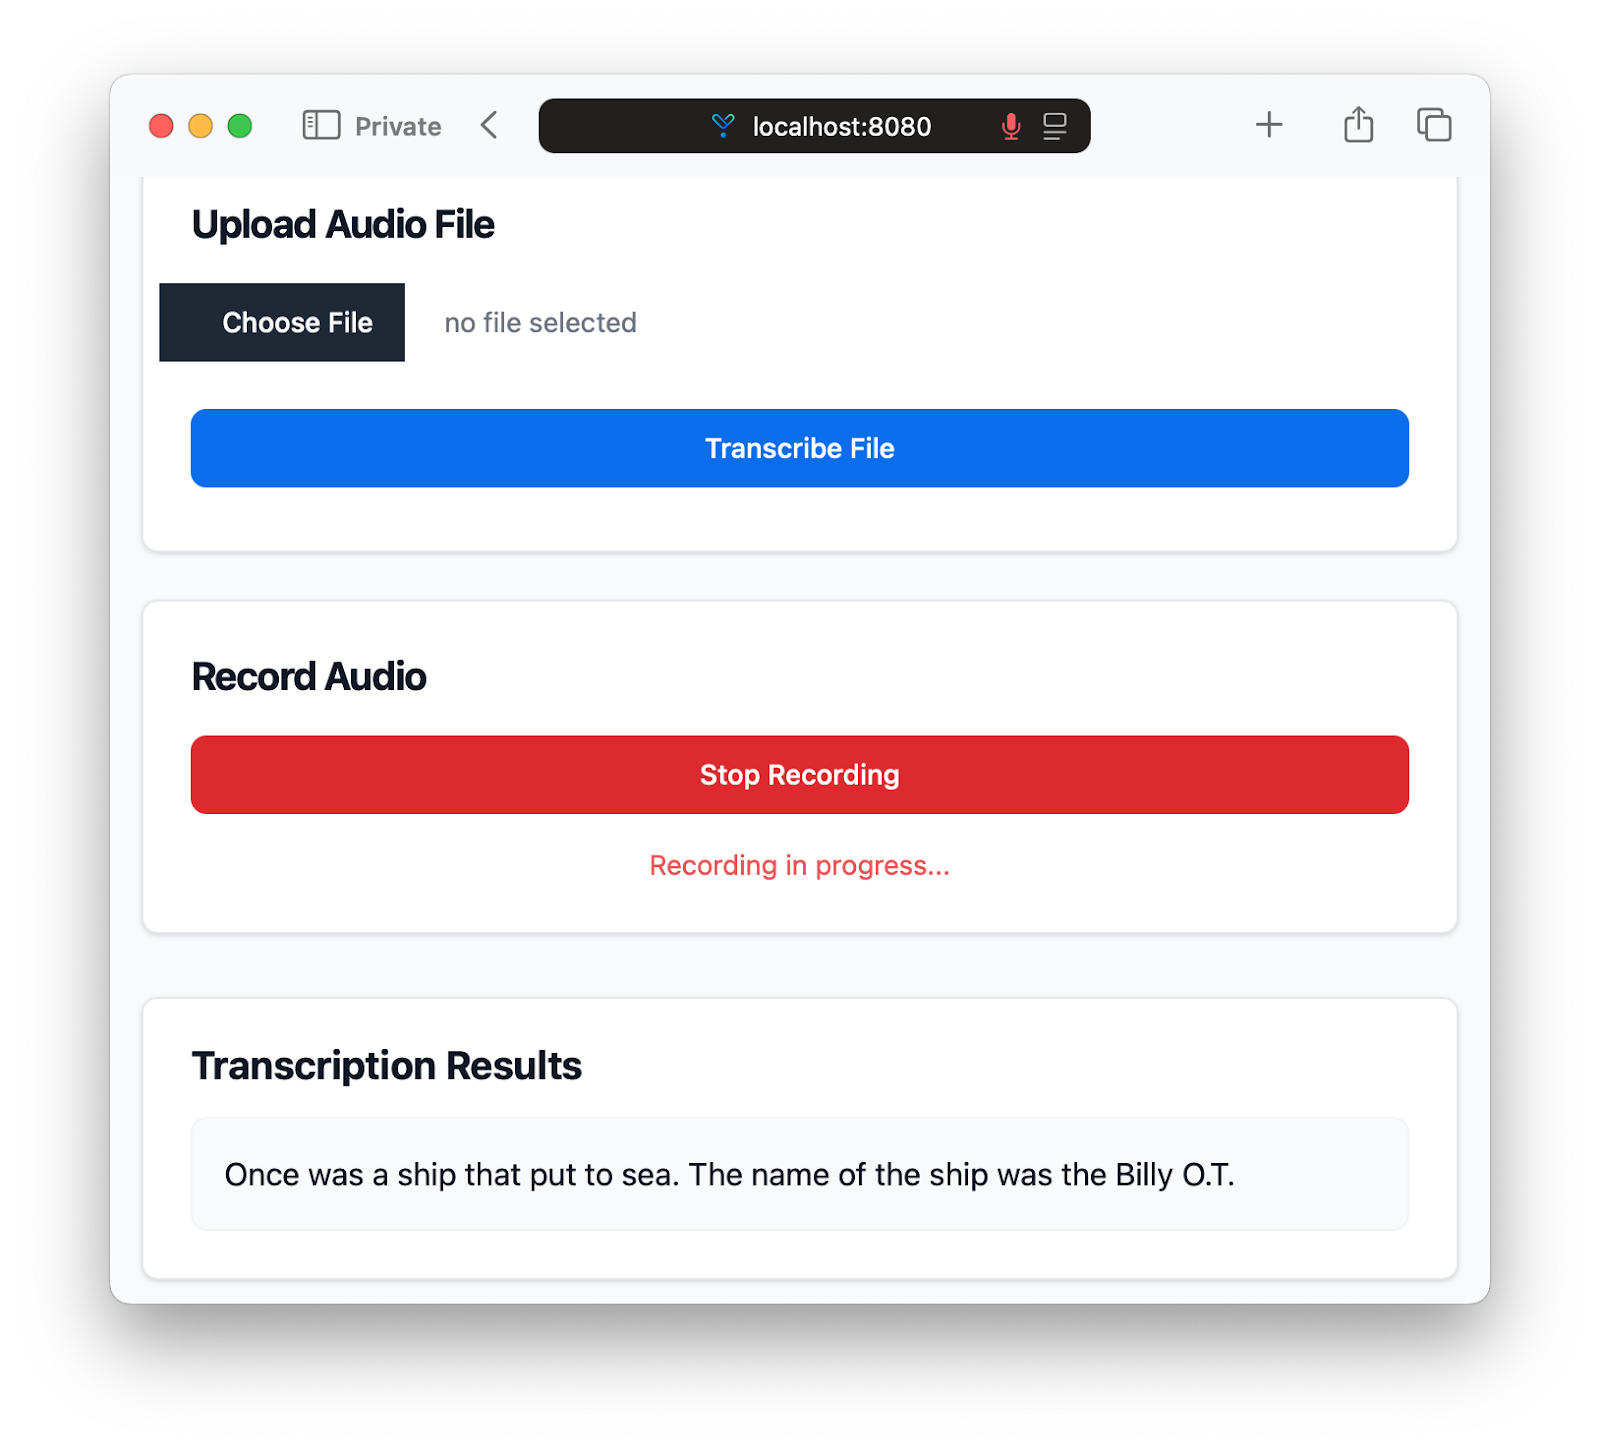
This section provides a button for starting and stopping audio recording, along with a status message that updates during the recording process. To test it in action, open your browser to http://localhost:8080 and click the "Start Recording" button. After granting microphone access, you can record audio directly in the browser. Once you stop the recording, the application will send the audio for transcription to the backend and display the results.
The application now supports both file uploads and direct audio recording, providing a flexible and interface for transcribing audio. As you can see, using OpenAI's Whisper API is dead simple, and most of the work we've done so far is related to building a user-friendly interface and handling audio data.
Suggested Reads
- How to Build a JavaScript Audio Transcript Application
- Node.js Speech-to-Text with Punctuation, Casing, and Formatting
- Transcribe and generate subtitles for YouTube videos with Node.js
- Transcribe an audio file with Universal-1 in Node.js
- Summarize audio with LLMs in Node.js
- How To Convert Voice To Text Using JavaScript
- Filter profanity from audio files using Node.js
Lorem ipsum dolor sit amet, consectetur adipiscing elit, sed do eiusmod tempor incididunt ut labore et dolore magna aliqua. Ut enim ad minim veniam, quis nostrud exercitation ullamco laboris nisi ut aliquip ex ea commodo consequat. Duis aute irure dolor in reprehenderit in voluptate velit esse cillum dolore eu fugiat nulla pariatur.
Related posts